Filmic as default is hurting the experience for people

this has got to be the most surreal internet discussion I’ve seen in a week. Seriously, it should be put in a conservation jar and displayed in some exhibition hall.

Usually I see Blender forums as a place that’s quite ‘sanitized’ from whatever strange communities are festering out there, but here we got the “normie” despising discord mod who straight up glazes over every painfully constructive response to their low-effort post that tries to find a solution to their specific taste, and yet they won’t move an inch until their demand is met, no matter the arguments, instead answering with personally charged meme edits and clipped anime art.

What a time to be subscribed to the forum newsletter.
Also, kudos to Blender for being the most customizable software Ive used so far, things like changing the startup file to your needs is a very cool option. and the fact that color management can be changed quite easily while providing a good solution from the start speaks further of the quality that is already here.
Either way, bookmarking this thread if I want to have another look at this car crash - like spectacle again some day.

16 Likes

One of the problem is global handling of rgb inputs, such as colors and bitmaps. Currently the user have to set each bitmap and color individual to match the choose LUT. So sRGB, Alembic and Filmic may lead to different results, depending on the inputs.
Blender lacks a ‘global’ option like other 3d Apps have, where you tell the software, what color method to use when changing the global render settings. So in case the users choose Alembic, he has to change every bitmap and every color input to match the render result individual. Where as in other application the user just need to change the global color handling.
This also leads to a minor problem, when loading bitmaps for the normal output Blender always choose sRGB, which is wrong. It should be linear. There is no global option or command to set all bitmap inputs in a scene to linear, other then diffuse for example.
As for output in Filmic, this can be prevented with a default scene and I also recommend that. Being a long time 3d artist, I always recommend the linear output with an sRGB LUT. Its what all professionals do. And as the output is 32bit linear, there is really no need for any other LUT. But ACES is currently quite fashion. Its fantastic in 8 bit workflow so, but thats not what we do in 3D.

I’m new to Blender, switching from C4D (taking an extensive course). I love the idea of Filmic, but didn’t realise it was on by default. Was not in my course yet. I’ve made 12 scenes while learning and was wandering about the look, tried to compensate in my lamps and shaders. I’d love to use Filmic later on in some circumstances, but my work is mostly motion graphics where this default is not wanted. I prefer a standard color management without a “look” by default. Just my 2 cents!

You have to understand what High dynamic range light is and does in a renderscene.Like real world light strength ratios from HDRIs from the sun.Then you hopefully understand that it is difficult or maybe even impossible to get a proper HDR lighting in a scene without clipping with standard CM.

On the other hand ,if you know you use maybe classic 3point lighting with a lightstrength range inside 0-1,then Standard CM works fine.

If that makes sence.

It’s not a look. It’s not something artistic which is supposed to change the mood of your image, it’s just that it has a crappy name (filmic), which implies it’s giving you some film-like look. But point of filmic is to compress photometric range into a sensorimetric one on the most common 8bit monitors. When you take a raw picture of a lamp with a camera, and look at that picture, without tone mapping, you will sometimes get some ugly clipped bright areas:

Where as when you raise your eyes from the camera display and look at the lamp directly, with your own eyes, you won’t see the clipped white area like you did on the picture, you will see some detail, as your eyes can perceive a lot wider dynamic range than your display can output:

What the correct color management/tone mapping does is that it tries to work around the issue of the average displays being unable to display the complete dynamic range of the images by compressing the dynamic range into the range the display can output, and it does it in a way that’s most similar to the way human eye perceives real world.

So it’s not a “look”. It’s not some stylization. It’s a transform meant to turn either a raw light captured by a camera sensor, or a raw light synthetized by a computer image renderer, and try to express it as close to the way our eyes perceive the real light that hits our retina in the real world.

If you are making motion graphics, and your output looks worse with color management enabled than it does with color management disabled, then it’s not the color management to blame, it’s a lack of your artistic competence and/or lack of understanding of how to work with color managed rendering.

7 Likes

Respectfully, just offering a point of view: as a newby, I’m expecting Blender to be able to render in 16 bit and have me compress the dynamic range in a compositor afterwards. I’m not expecting it to do that for me by default. This expectation is based on experience with RAW photography, C4D and AfterEffects.

2 Likes

You can do that in Resolve with Open EXR files.

Yes, when you output your images outside of Blender to some other software which does its own color management, then you would of course want to save your images without it. Blender has exactly a button for that:
image
But the point is that even while working in Blender, you want to be looking at your image through some color management transform, because that will still be closer to your final result than raw, clipped image. Let’s say you are rendering an interior scene with bright light coming out of the window. You want to be able to see the material properties of the window frame, instead of hoping that you got the window frame material right, but you can’t see it because it’s just a clipped white blob :slight_smile:

It’s just that the legacy workflow was: You are viewing your imagery in the 3D software in a clipped form, with limited color information, and you are hoping, with your fingers crossed, that you will “fix it in post”. And only in the postprocessing package, when you do your custom color mapping, you are actually starting to properly see what you rendered.

The modern workflow is: You are viewing your imagery in the 3D software in color managed space, so you can “draft” your postprocessing already there, and work with something that is way closer to the final look you’d expect to see after you run your output through the AfterEffects. And when you finally render your final images, you will just reproduce the similar look in AE (or ideally use the same color transform before your artistic control adjustments), and you are done.

3 Likes

I agree with every other thing you say in this post, but the ‘lack of artistic competence’ is IMHO not really a friendly way to welcome a newcomer to blender. And is also not really true. You can be very artistically competent, but as long as you don’t understand colormanagement you will have issues.

5 Likes

I mean it in a specific context of people who blame color management for their images not looking right.

Or in other words, if someone puts up a side by side example, where they just turned off color management, and claim that this alone makes their image look better, then clearly they need to acquire some more competence in this area to understand what’s going on.

4 Likes

then teach them to fix lighting in their video compositing, don’t just whinge that Blender isn’t 100% compatible with newbies, please.

I imagine that, if you save your render as EXR, then it doesn’t matter what colour-management “look” you choose, the saved pixel values will be exactly the same.

You should be able to confirm this in an image editor that can handle deep floating-point pixels. Like GIMP.

It seems to me that there are a lot of misunderstanding in this thread. I can’t say I understand it all but at least after reading about this topic for some time now I think I can clarify some things for you.

Before I write everything, I would actually like to link a kind of long article but I guarantee it would be a worth read, by Chris Brejon: OCIO, Display Transforms and Misconceptions - Chris Brejon

And then about Filmic vs “Standard”

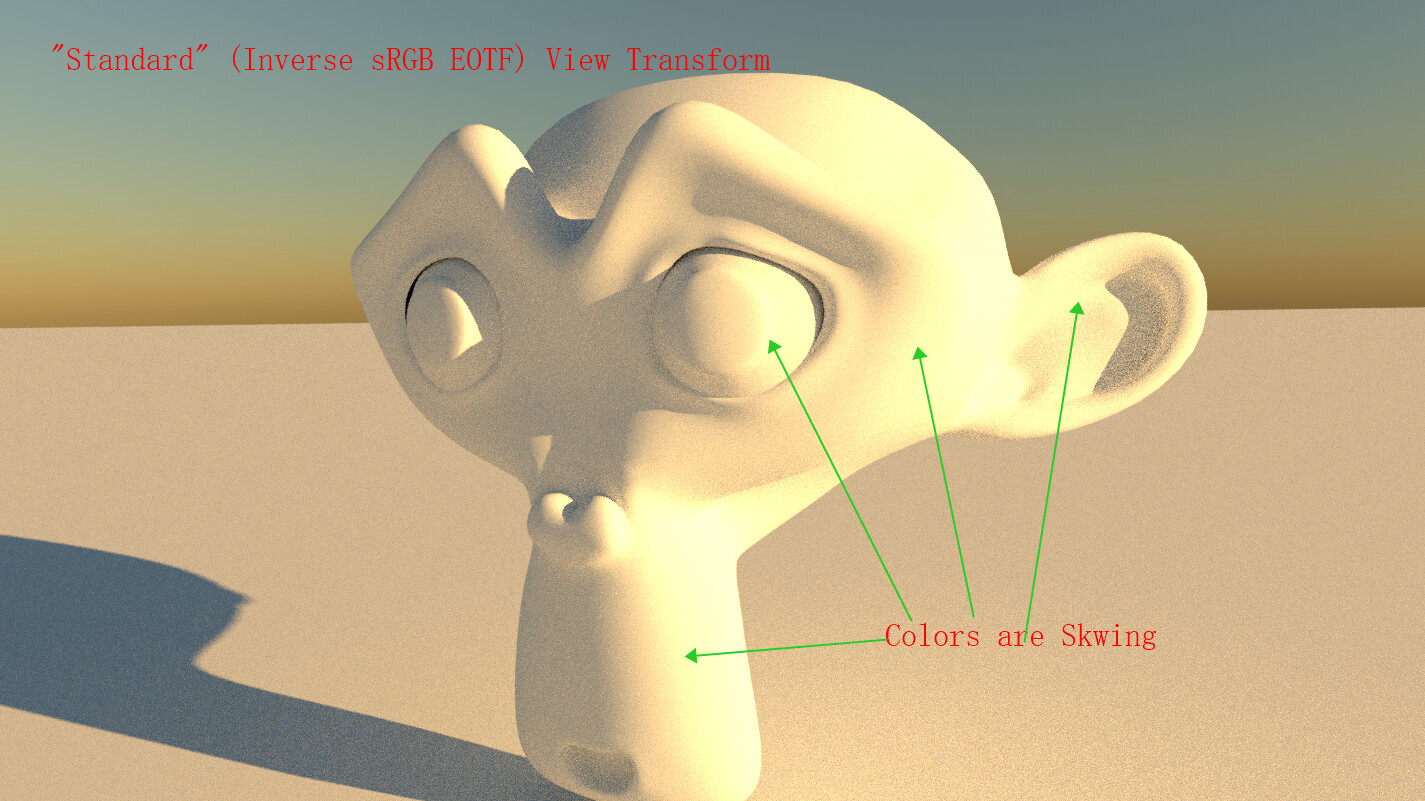
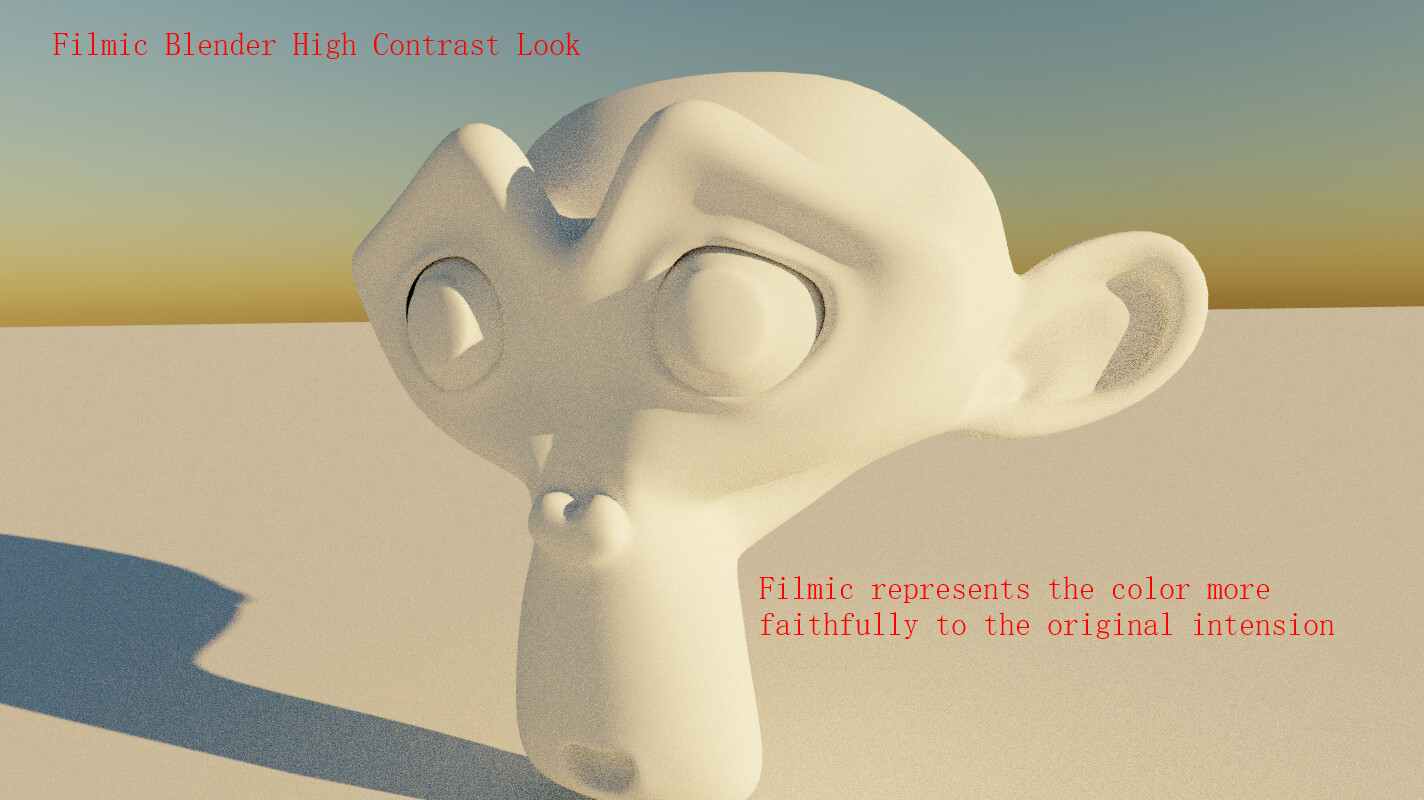
First of all, a showcase image showing why Filmic should be the default and why “Standard” should be avoided at all cost:


What does white mean? What did you mean when you said “white looks grey?”
Troy mentioned in his Hitchhiker’s guide to digital color that sometimes the most simple question gets overlooked, and it snowballed into some other misconceptions.

In this context, I assume you mean R=G=B=1. Here comes the problem, does it really mean white? What is white exactly? Again think about it if you haven’t if you overlook this you will miss a lot more.

The answer is, in current Blender’s case, R=G=B means it is using Rec.709 colorspace’s white point, D65 (6504k color temperature, sort of like one of the many “hue” standards for different kind of whites). (BTW this meaning of white would change after Cycles becomes spectral). Note that it does not have to be 1, R=G=B can be any number ranging from 0 to infinity (this is why it is called open domian, or scene referred), and it would still be D65. Therefore, in open domain scene linear’s context, white and grey is the same color with different emission intensities.

However, our monitor cannot emmit infinity power of light. You can have Nishita sky texture in Blender using real world’s sun strength, but can your monitor emit the same power as the sun? Can your monitor alone brighten the entire side of the Earth? Obviously no. So as a color management system, something needs to be done about it. the “Standard” view transform was never designed to handle this problem, the sRGB standard EOTF was supposed to only deal with range from 0 to 1, instead of 0 to infinity. Therefore the standard view transform never worked for Open Domain renderers like Cycles and Eevee.

What does Filmic do differently?
In Filmic Blender’s documentation we have this quote from Troy:

Filmic does two things:

  1. It compresses the scene referred linear radiometric energy values down to the display / output referred range. This aspect is known as a transfer function or tone mapping. The shape of the Filmic Base Log with a contrast aesthetic roughly emulates a photographic film curve.
  2. It compresses the gamut for high intensity values. As colour ratios increase in intensity, highly saturated ratios tend to be resistant to transfer function compression, which results in peculiar feeling imagery with some regions feeling appropriately over-exposed and others “lingering” behind. Filmic considers all colour values fair game, and attempts to blend colours into a consistent output that matches our learned expectations from film emulsion-like media.

For the first point, Troy back in the days made this image:


From: cycles render engine - How to get accurate colors with Filmic Blender - Blender Stack Exchange

I believe that this image by Troy is enough to understand the first point, also known as “Tonemapping” (the name tonemapping is actually misleading because it has nothing to do with "tone’, but intensity).
Filmic takes the open domain intensity of around 16, and map it back to the 0 to 1 range for sRGB encoding. Therefore if you want display referred white from Filmic, you need to use R=G=B=16, not 1.

The second point is bit harder to understand, but let’s break it down. Look at the graph above made by Troy. Look at the sRGB transfer output, compare it with the original scene value’s RGB ratio, see how it changed the ratio because the out of range channels are clipping.

This is the root issue for the skwing. The buttom line is you cannot have a monitor as bright as the sun, you just cannot. A simple tonemapper may extend the range 0 to 1 to something larger, but it still has an upper limit, when values hit that limit, it is still going to skw. Therefore at least in the foreseeable future, this clipping problem will still exist for a long time with us, if not forever. But as a color management system, something needs to be done about it.

The first thing to solve a problem is to study it. Note that this part is covered in the Chris Brejon article I linked above, so if you are interested please go read it.
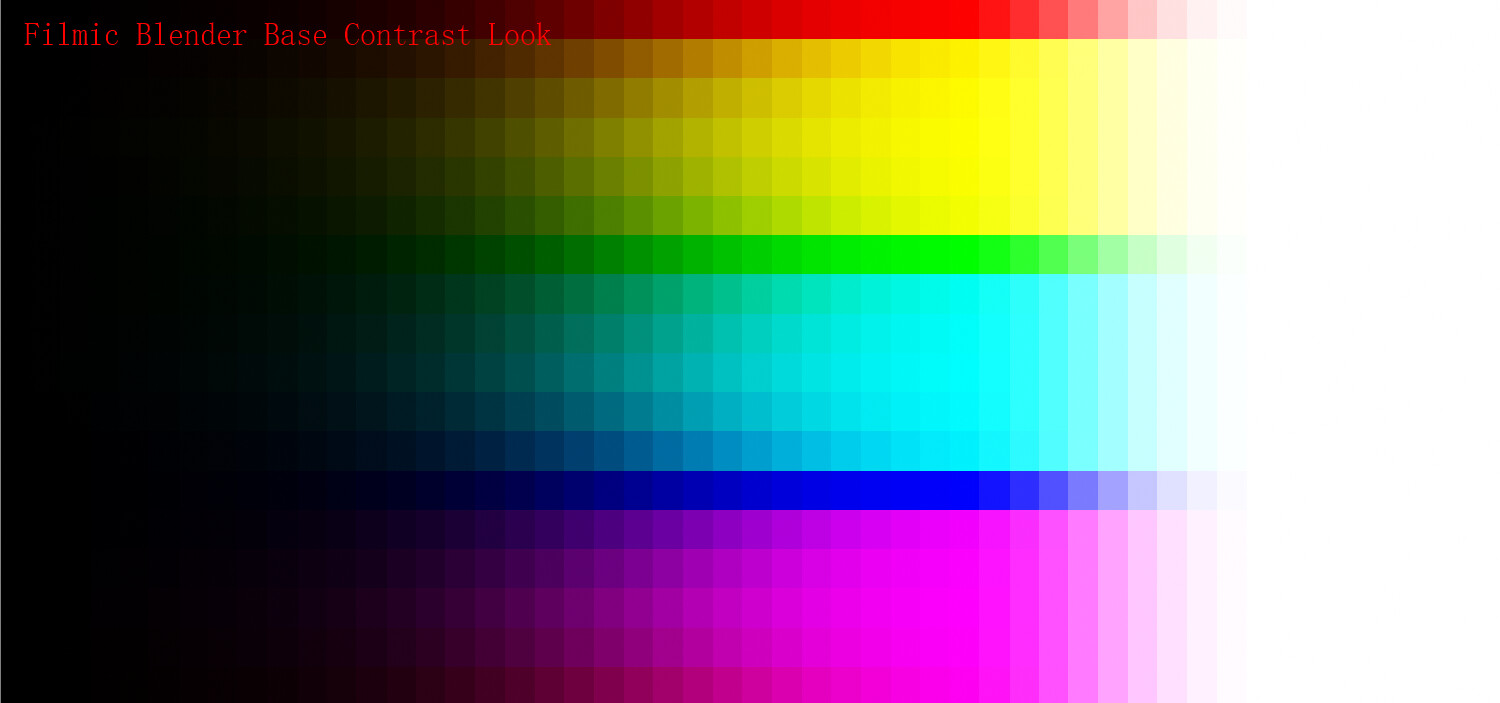
The skwing problem is dubbed the name “Notorious Six” by Troy and others, I don’t know who came up with this name first but this is how they call it. Here is why the name:


Here is a so called “color sweep”, a range of different colors increasing intensity from left to right. This is easiest why to see the “Notorious Six”. See as the intensity increases, the individual RGB channels are hitting their “1” walls and the ratio between the three skwed, and the wide range of colors becomes only 6 colors.
And here is Filmic:

What it did was that instead of letting it skw depend of the output device’s encoding, it tries to map it manually to a more sane color, in layman’s term “desaturate” it, note the more accurate term would be intensity based gamut mapping. The mapping ground truth is called “chromaticity linear” (or in layman’s term the destination of the mapping would be in the same “hue” of the original intent.) Note that Filmic is not perfect though, you can still see the “Notorious Six” before it goes to white. So it is definitely not perfect, but at least it tries to deal with the problem.

Conclusion, Filmic should be the default instead of “Standard” inverse sRGB EOTF, as it was designed to deal with Open Domain Scene Linear data that Cycles and Eevee generate, while the “Standard” inverse sRGB EOTF was not.

23 Likes

I believe that the thread makes a good point. However the terms of the standard preferences, the technical specifications of the rendered picture, are not exactly absolute. You can’t be sure about which is the ideal settings to choose.

However since the render settings are customizable, it would be easier to chunk these concepts into “Render Profiles”, so with only one selection you would be ready to go.

For the sake of the example, as of now I can identify between three very distinct render styles with their equivalent examples.

  • NPR: anime, cartoon, guilty gear, grease pencil style
  • 3D Animation: pixar, disney, toy story, sintel, sprite fright
  • Photorealism: iron man, avengers, tears of steel

So in the far ends you have NPR and Photorealism, but in the middle the zone is kinda neutral, so perhaps you would go for filmic but pump the environment lighting and the materials with emit so things look clear. This is a place for lots of creativity and expirementation. But in indeed on the other choices the settings to be chosen are very clear.

1 Like

5 posts were split to a new topic: Filmic and ACES

TL;DR: Filmic as default is fine, mostly because templates for GP, Editing etc switch to “standard” as needed. Blender does need to give the user more control over colour information though.

I can see the original poster’s point of view and understand how it could be confusing to new users trying to render NPR artwork and seeing everything looking desaturated and grey. On the flip side, new users are going to be watching tutorials to learn and a lot of Grease Pencil tutorials tell viewers to switch to standard. It shouldn’t really be a problem, it’s just part of the process of learning new software.

For all those saying Filmic is “correct”, well, that’s “incorrect” in my point of view. Use cases are different for each user, sometimes Filmic isn’t what’s needed, even for non new-users and photorealistic renders. I tend to render out EXR whenever I can, comping/editing in a different application. Some of these renders are photorealistic, but I switch to “standard” because I know that the comp won’t be done in Blender and they don’t have access to the filmic colour profile. Yes, you can load the Filmic OCIO in other applications, but where’s the reverse of this for Blender? If the pipeline is using a different colour profile, we should be able to import OCIO files into a project to match the comp/edit/grade/rest of the pipeline. At the minute, we’re flying a bit blind, especially with VFX work where the CG should match the footage as closely as possible.

I’ve been following Troy on Twitter for a long time now. It’s clear he knows his stuff in regards to colour. For him, the creator of Filmic, to call colour management in Blender a dumpster fire over and over again makes me think that Blender should give colour management priority and tackle the issue once and for all.

8 Likes

As I understand it, the whole point of EXR is the the data is always linear, regardless of whatever colour profile you might attach. So there is no need to invert a colour profile, simply (re)interpret the pixel data according to whatever profile you want.

You should be able to check this in an image editor that can natively cope with floating-point pixel components, like GIMP.

It seems some misconceptions continue. Maybe my previous post was not clear enough. So here I am writing more stuff.

No it has nothing to do with the rendering styles you listed here. It only has to do with one question:

“Am I working with data that is ‘0 to Infinity’ open domain/scene referred, or ‘0 to 1’ close domain/display referred?”

If you are 100% sure everything you are working with are within 0 and 1, and you will not use any operation to make the data go beyond 1 like changing the exposure etc, you are safe to use “Standard” sRGB Inverse EOTF because you are pretty much working in close domian in this project. Otherwise, like most of the time you would work in Blender, you will be dealing with open domain data with no upper limit, so you should use Filmic or TCAMv2 or whatever, just not “Standard” sRGB Inverse EOTF.

I would not say Filmic is “correct” because:

But using Standard sRGB Inverse EOTF on your open domain EXRs is 100% certainly wrong. As I said in my previous post, sRGB was not designed for data ranging from 0 to infinity. In the era of sRGB’s making, open domain/scene linear workflow was not a thing yet so it was never considered at all. It is completely wrong to use sRGB Inverse EOTF to view an EXR saved from Blender, 100% wrong.

As for “where’s the reverse of this for Blender”, I don’t quite understand what you mean. If you use EXR format, here is the answer:

So if your software down the pipeline uses Standard sRGB Inverse EOTF to view your imported open domain EXR, it’s wrong. It’s either you have the wrong setting (like you are aware you could have loaded Blender OCIO config), or that software is just not capable of dealing with open domain data at all. If that’s the case, I suggest you abandon that softare and go find an alternative. A software with hardcoded sRGB Inverse EOTF view transform is never designed to work with your EXR files. Go find other software that support loading OCIO config.

4 Likes

Slightly offtopic maybe, but I want to check of what I learned from reading these topic is correct:

To correctly interpret a linear exr file you still need to know what primaries are used, so you still need some colorprofile information. Or are the primaries for an exr file set in stone in the exr standard? Do I understand this right? Or do I miss some subtle detail?

I’m no colour expert, so please correct me if I’m wrong. With the “Where’s the inverse for Blender”, I’m mostly thinking about VFX work. If you shoot RAW, you’re going to have a LUT in your editing software to interpret the high dynamic range images to something viewable on your RGB monitor (I guess similar to Filmic). Being able to bring the raw footage into Blender and apply the correct LUT just to that part of the image (if it’s set to the camera background or a test comp) should be an available option. Applying the LUT to the rendered image would be useful too, but I’m guessing here you’ll tell me that the scene referred linear workspace colours of Blender are different to the RAW images from a camera and this shouldn’t be done.

As far as using standard because I know that Filmic isn’t available in the comp. Thinking about this more, it does make sense to provide the OCIO for filmic to the compositor and ask them to use it for the renders, it would be like using the correct LUT for your camera.

2 Likes