I am working for days in a retopology and I still think that not having the facedots, considerably worsens the experience in modeling because all the time I have to be guessing each other I am in the mode of faces or edges.
1 Like
And I’m glad they don’t change the active tool because they are completely different things! Active tools are only a set of gizmo for some basic operations, there isn’t an active tool for every tool of Blender, and when you use one, you basically “block” blender to that one active tool, while any other tool is still usable through shortcut (but might be harder to use because of some keys and mouse buttons used by your current active tool).
(From here I’ll refer to “active tool” as being the new buttons on the left panel, and “normal tools” as being any other tools like we have since years.)
Differences in Behavior
Active tools are not the same thing as the “normal” usual tools as we had before. They behavior is kind of the same of the transform gizmos in previous versions: an additional tool, independent of other tools, which can be changed between different modes.
If you’ve used other similar softwares like 3DS or Maya, you might expect what you’ve explained. As in those softwares, pressing the W/E/R shortucts do change the gizmo. But be aware that those shorcuts also exist in Blender (open your tool-bar, then press the shortcut for the active tool you want) and are not to be confused with G/R/S which are meant to DO a Grab/Rotatio/Scale transformation as you press them.
Differences in Mechanism
The mechanism active tools are to give you a set of visual manipulators and a set of keystrokes & mouse manipulations in order to use that one tool and it will stay that way as long as you keep this active tool as active. Once the active tool is set, you can use it, or not, but it will stay there as long as you keep it active.
While the mechanism of other “normal” tools is quite different. When you call them, they have an immediate effect (when you press G, your selection moves immediately without the need of any additional action), and you define precisely when they stop their effect (either you validate their effect via LMB or ENTER, either you cancel their effect via RMB or ESC.).
Differences in Purposes and user targets
Also, “Active tools” and “normal” tools don’t have the same purpose nor the same user target.
“Active tools” are more oriented to tablet/stylus users, new users or anyone needing strong visual information & feedback about what’s going on and what they can do. They have the big advantage of being very clear about their purpose and how to use them, they don’t require much learning time. The downside of that being a significantly slower usage, and they do bloat more the UI.
“Normal tools” are kind of hidden under the hood. Less usable by new users or tablet/stylus users, they require some time just for getting aware of their existence and learning to use them. But once mastered, they allow being extremely fast.
2 Likes
Your accurate explanation should be added in the Blender 2.8 manual. Clarifies the difference between Active and Normal Tool perfectly
1 Like
As far as I know “normal tools” are officially called Operators, and the modern Active Tools actually use them internally in most of the cases.
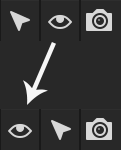
Not sure about you guys, but I think the “eye” in the outlner should be on the left since it’s used more often than the other two. Now we need a little extra care to click on it without accidentally click on the other buttons. ![]()
6 Likes
Actually, it’s the other way around. The modal operators are blocking, but the active tools are not. See the Loop Cut tool for example. The old modal operators blocks the entire UI until you exit - not so for the active tool.
Why would you make it so the two visibility toggles are not next to each other? I can’t see the logic in that.
2 Likes
You can enable face dots as an overlay
I was trying to explain that toggling on an active tool “disables” the others, not that you can’t do anything else while.
I know, but it is something that helps to have it activated by default, whoever wants deactivated for make screenshot perfectly, but the rest we want to work with blender bothers us not to have it activated by default.
2 Likes
Usability.
The eye toggle is the most accessed among the 3, and being on the middle requires an extra precision to click on it which slows things down, and is more error prone.
Usually the eye comes first on most apps because of that. It goes from most accessed to least accessed.
2 Likes
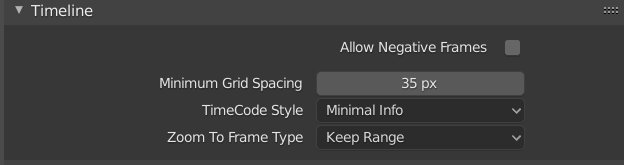
Factory settings is set to start on Frame 1, however the actual scrubber framerange by default starts at 0

This is because the scrubbing limitation is set by the “Allow negative Frames preference”
This drives me nuts ![]()
Maybe changing the preference to “Allow less than 1” makes more sense?
Why? Frame 0 is not a negative frame number?
The two visibility toggles are related though, and should be together. They could both be to the left of the selectability toggle, but should be next to each other.
What is the use of that preference? My proposal is changing it to “Allow frames less than 1” This makes it in-line with the default timeline settings and most use cases since it’s very natural to start at frame 1, and as an added bonus you can quickly scrub to the far left of the timeline and be sure you have landed on frame 1, rather than a frame 0, which is what happens now, even if the frame range starts on 1
The preference is not about going outside the play range - it is about allowing you to go to negative frame numbers, which is something quite different.
I know, I know… the paper is still cutting my finger, try it, scrub in a default file to the left. Any other way this could be improved?
There could a timeline setting added that doesn’t allow you to go outside the play range.
3 Likes
Yeah, this is one of those cases where in theory it makes sense to keep them together but productively it doesn’t.
But if you want to keep them together, then ![]() would be the way to go.
would be the way to go.
6 Likes
Btw, @billrey, Any plans for a “Solo” button in the outliner? I know about the “H” key tricks, but the discoverability of this feature is very poor, also the outliner is the place where I’m expecting to find that feature. 
1 Like