Well, I don’t want to adjust the start up file every time I download a new or experimental version of blender or move between different computers. So not so easy, but daunting.
You’re very correct about the 251 frames, that’s not very professional. But you brough something else to my attention. That 250 frames range. First of all the stadard in cinema is 24 fps not 25, which Blender correctly has it as default frame rate to begin with. So that’s good. But 1-250 is for 25p, and if you go render that in 24p it wil produce 10.41 seconds which is stupid. The the default for 24p should have been 1-240 for the timeline or even more correctly 0-239!
So I’m correcting my initial suggestion so that the default Timeline range in Blender should be 0 to 239 frames, that will produce excactly 10 seconds of rendering.
I disagree. Frame 0 makes more sense.
Also btw if frame 1 makes more sense then why does the Timeline head stop at frame 0? Try it yourself in Blender. Grap the blue Timeline head and drag it all the way to the left, it stops at 0 and not 1 as it’s the default currently.
Daunting! Come on it’s the matter of clicking once on that menu enter. Once for 2.82 once for 2.83, 2.84…
Once every 3/4 months… daunting…
Ok, you got 1 point.
If Blender wants to stick to Cinema standard, then go for multiples of 24, not 250. Or maybe go for PAL standard, or MP4, or NTSC…
Choose one, and then make multiples.
BTW, the next choice is ten seconds right? …Why? What would be the most professional default clip duration?
I disagree. Frame 1 makes more sense. 1 point to me
C’mon when you watch a video and say “first frame” what you mean? Frame 0??? As in arrays?
Why does it makes more sense to you? Because of other software?
I understand seconds: you start at 0 (non-recording time), then you count “1” only when the whole first second is passed. But if you handle frames you don’t have a non-recorded image at 0, you have the first image at 1st frame. Think at it as if it was a filmroll.
As you have mentioned, you are coming from a video editing background.
However, blender has a much larger focus on 3d animation, rather than video editing.
If you actually look at other animation software (Maya, ToonBoom, Adobe Animate), you can see that staring on frame 1 is pretty standard.
There are some exceptions, but it is pretty clear that the reason it might seem “unprofessional” to you is because you are looking at the wrong profession.
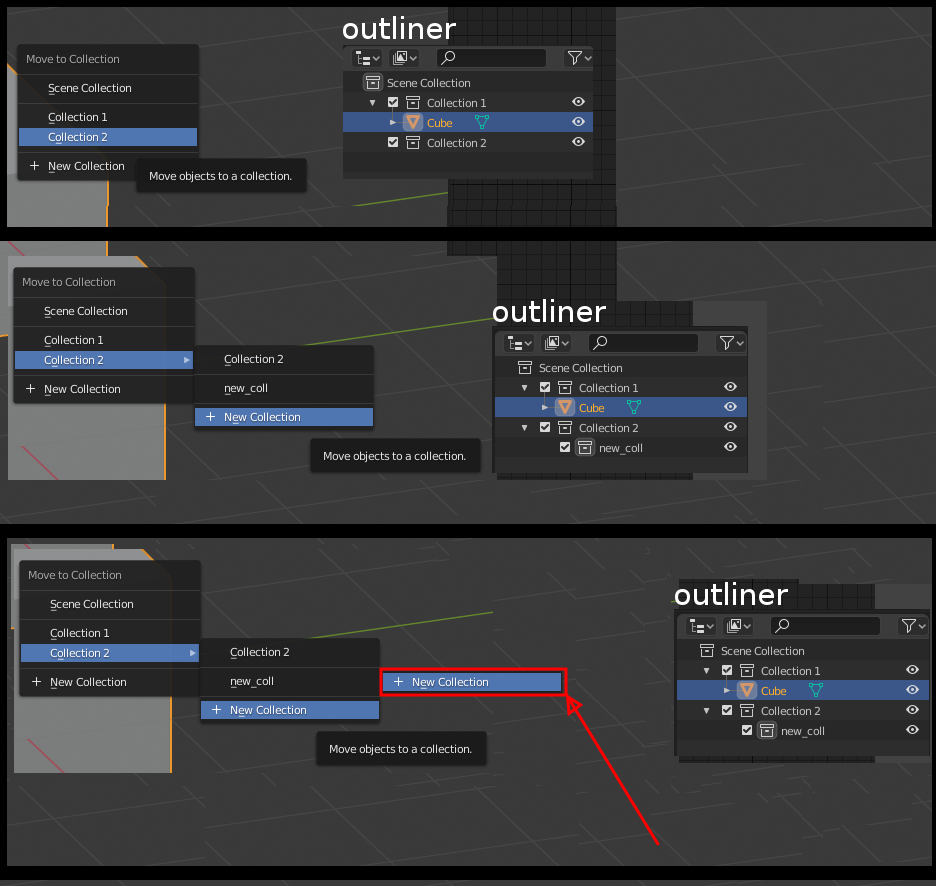
When you press m to move selected objects to a new collection in another collection there is no option to move to new collection unless there is a collection under that collection. This is the first two samples in the image. There is no create new collection option in the first example. In second example that option exists but you still don’t have the option to create new collection under new_coll.
The bottom 3rd example shows how it should be. There is an option to add new collection in the collection and as a child of the collection.
Also the new collection creation is still bad in outliner. Why is the newly created collection not activated and centered in the outliner. Why do I need to manually scroll to it and double click to change its name. Why doesn’t blender automatically select the newly created collection so I can just type the name I want? If I create new folder in windows explorer it directly gives me the focus so I can just type the name and press enter.
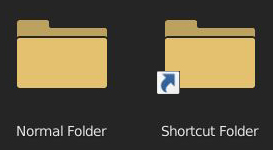
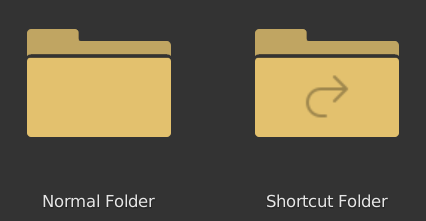
When we have to regularly open a certain directory that lies inside many and many sub folders, I find it easier to temporarily create a windows shortcut for that folder. But Blender doesn’t recognize these and doesn’t show them in the File Browser.
It would be nice if it could…
Those “shortcuts” are little files in a Microsoft proprietary format that would be a pain to decode. Instead just make a symlink. A symlink to a folder would do exactly what you want, work correctly in file browser, and would even display the folder with an arrow in it:
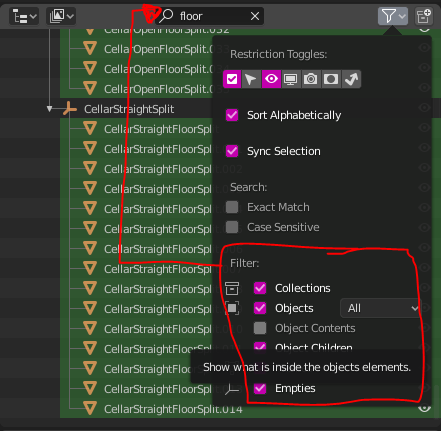
Continuing on what seems like an everlasting well of pure hatred for the average user, that is more commonly referred to as “the outliner”:
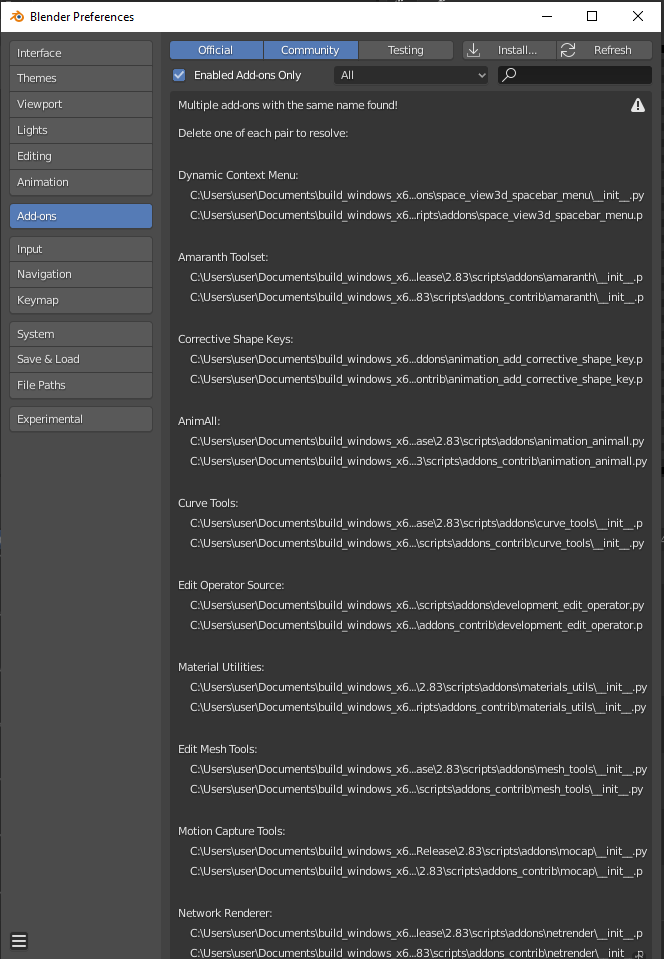
There’s no way to narrow down what the “type” is of that which gets filtered?
What if I just want to filter on object names?
I absolutely see the value in filtering on material names, but how do I restrict to only that?
EDIT: Oh! It’s all under a filter button, that 99% of the time I only use to filter “restriction toggles”, because that’s what’s on top of it… why isn’t this settings button split up into two buttons?
Follow up new paper-cut on top of this then:
Once I have removed the filter string, I need to go all the way to the bottom of this stupidly massive menu and click in all of the options in order to see all my objects again!
If you add a bezier rectangle (shift-a, Curve>Rectangle) you can not scale the individual knots like you can with normal bezier handles by just selecting a knot and pressing s to scale. To reproduce add that rectangle, go into edit mode, click on the knot and press s. Nothing happens. Add a bezier curve and select a node, press s and the scaling does work. To scale the rectangle you need to choose the out vector nodes to scale them. Is this a bug or intended feature? If it is intended, why?
I’ve been dealing with a minor paper cut for a while. I searched the site for similar posts or topics, but didn’t find any, so please feel free to ignore me if it has been posted before:
If you have a file in “Recent Files” that resides on a network/removable drive, but that drive is unavailable for some reason (e.g. you forgot to mount your NAS), you’ll get an error message when trying to open that file, which is totally fine and expected - but the entry will also be removed from “Recent Files”.
This removal is pretty annoying, because all I might have to do to make the entry work again is re-mounting my NAS… but because Blender removes the entry, I now have to navigate to the project directory to open the file.
Suggestion: when a file is not found when opening from Recent Files, add a dialog that asks whether to remove the entry or keep it. Or add a preference option that deals with this question.
The Advanced Numeric Input mode bugs me a little while using imperial units. I think it can be improved by making inches the default unit, rather than feet, and also allow spaces to be used between whole and fractional units. Maybe something like the following would work. It would certainly speed up my workflow…
I’m intrigued to the continuing offensive nature of your posts?
Did the developers really set out with ‘pure hatred for the average user’?
People do enjoy watching other(s), like yourself find problems that may need addressing; they just don’t need it to accompanied by the snideness/attitude problem.
looking at this image I do start to wonder if we really need to specify that it’s “Euler Rotation” and not just “Rotation”? Wasn’t it just “Rotation” in the transformation panel?
Not sure if this has been asked yet, but having trouble finding objects in complex scenes in the outliner that have a child parent relationship.
Basically instead of using multiple outliners or not filtering child relationships I’d like to be able to highlight the selected child’s parent or at least that little object icon in a different color. Didn’t find it in the theme settings, waaay to many submenus there.