Blender UI paper cuts

how does that chain show me something in the viewport? in a example like that it might be ok but if you have hundreds of objects with multiple collections and partening level you will not see those chains

1 Like

Last Blender 2.9Alpha
This tooltip is still here
image

I just want a camera “look at” constraint (similarly to “circular array”). I don’t want to have to do an internet search to find out the technically correct but impossible to remember answer every time:

image

This actually has been “fixed” a couple weeks ago by changing the default axes for that constraint
Not sure about the others

So, next step in learning camera animation:

image

I understand keyframe animation, but this apparently creates a graph, which is new to me, and I had no idea where to find it without doing another search:

Here, I didn’t understand why I couldn’t just select the curve in the graph and insert control points in it and drag it around… apparently I need to go to another “hidden by default” N panel and look for the oh-so-logical “modifiers”…and modify some Y= value? At this point, I just gave up.

That UI is not made for normal humans.

Instead, I keyframe animated the offset of the “follow path” constraint… it’s just unfortunate that it’s not normalized.

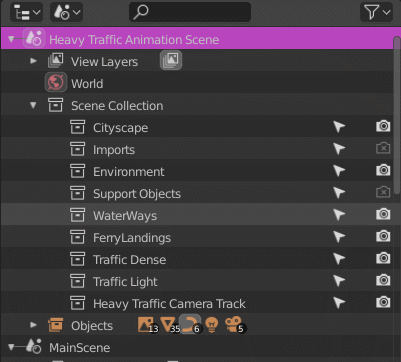
Another thing I’m trying to learn is how to have different sets of animations inside of the same file, using different scenes. However, I haven’t figured out how to move objects between scenes because dragging and dropping doesn’t work:

GIF 29.05.2020 10-20-16

Also, in this view, it’s impossible to tell what objects are linked into this new scene, and what objects are “local” to it…

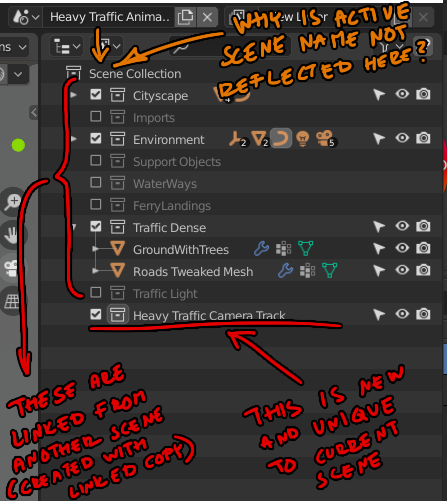
EDIT: Apparently, if I move the objects in the layer view to the newly created collection in my new scene, they disappear from the old scene, which is very nice (but what works in one view, should really work in the other to not break UI consistency). However, I still can’t see in the outliner what collections are local to the current scene and which collections are linked!

1 Like

This operator creates a curve modifier, which are tools normally used by animators on a daily basis for cycling, stepping, etc. so nothing too spooky really. Agree this should create a linear curve from two keyframes instead, since user is likely to go and modify that curve anyway.

In any case that’s the “legacy” way (not sure why it’s not scrapped but I think it should) - you can use the “fixed position” value and animate it instead, which allows for different objects to travel at different speeds along the curve. There’s only one “evaluation time” property per curve and any object bound to that curve through a constraint is going to obey that unless “fixed position” is checked. (I hope this is clear)

1 Like

Absolutely right. I’ve brought this up before. There should be a way to distinguish collections linked throughout several scenes. They could have a little chain symbol on their icon for instance, or a number counter (so that the user knows in how many scenes they’re linked).

Oh, now I finally understand the hate for Blender’s “window manager”:

Also, when I want to split a window, it’s not always I can choose any corner to drag from. I have to try two or three corners before I find one that works (and no, I’m not going to use the “area split” menu, I clicked on a border and because it doesn’t show a preview I have no idea which of the two adjacent areas it wants to split).

More camera track + scene oddities:

GIF 29.05.2020 15-12-44

The delay when I switch “track to” from Y to -Z is because the GPU gets pegged at 100%… this sometimes is persistent, forcing me to delete the constraint in order to re-gain control of the app.

I don’t understand why, because in the other scene, an identical setup works just fine.

EDIT: Hahahaha, my GIF recording software removed the delay! :upside_down_face: Perhaps because the GPU freezes the entire PC for several seconds. Anyway, you can still see that the constraint goes from red to ok and then back to red when I switch to -Z…

What is happening in this gif ? I can see you collapsing two editors and resizing another ?

I can’t quite see what you are trying to illustrate there. I see a successful join, but a cancelled split, and not sure why. Can you explain it better?

All four corner widgets are the same size and are in the same relative place. Generally the (crappy and hidden) detail that screws people up is not knowing where exactly to click. You don’t want to click right in the corner between areas, but at the location of those (hidden) widgets:

interface_window-system_areas_split

When I right-click on any edge I get that menu with the two “split” options. When I select either of those I do get a preview that will show me exactly where the split will occur. In fact I can start on any edge and then split any area at all, even those far away from that initial menu.

I’m curious if this is a display issue, where I see the preview lines and you do not, or is some part of the process confusing and could be changed or even the documentation improved.

I was testing the new geometry creation tool, and there is an option to close the base cone “Base Fill Type”, which has been hard for me to understand its function. Maybe because I’m not English, but Fill understands it as occupying a space, not covering a hole.

I remember that at first the name the face actions “Fill” and “Grid Fill” also seemed strange to me. I think, “Closing Holes”, “Grid Cap”, and “Base Cap Type”, would be more understanding.

I guess he wants some magic (join 2 editors against 1, all in one go)…

Am I right? @eobet

2 Likes

He definitely mentioned “split” though in regards to that.

With merges they are now (in master) a bit more tolerant of being unaligned. So you could merge these left/right now:

MergeTolerance

But not any more than that as there are just too many complications possible.

1 Like

I know there are some complex cases but why not just show 2 arrows in cases where it’s 2 to 1 area merge? Having to manually do split is very finicky when you just want to collapse something like outliner.

1 Like

Probably because I can’t see in your example how you would differentiate between the following two processes. The first looks more likely to be the intended outcome than your second.

ComplexJoin

2 Likes

Being able to undo split/join would be super useful, since what you want to do, rarely works in the first attempt, and you end up with more regions than you need.

2 Likes

@Hadriscus @Harleya

@TheRedWaxPolice is correct, I wanted to get rid of the rightmost column, regardless of how whatever is in the column to the left of it is split, but the right-click menu didn’t contain any option for it.

And as mentioned, I’ve seen several people really curse Blender out on Twitter because of this over the years too…

Sorry, first proposal was not very clear.

Top row - current process:
1 pick corner or use right click / join area operator and try merge small area into big one. Discover what it’s not possible and cursor turns into :no_entry_sign: symbol
2 manually add new area split and position it
3 merge first part
4 merge another part
5 done

Bottom row - suggestion:

1 start join area operator
2 when moving cursor from small area into big one left to right merge arrows appear in both top and bottom small areas. What stuff gets merged into what is based on mouse movement (same as when trying to merge 4 areas - order is determined by which area border mouse cursor crosses)
3 done

1 Like