First link in this post:
Indeed)
Tested a bit, interesting solution with header buttons by the way, Xray settings looks more polished in general.
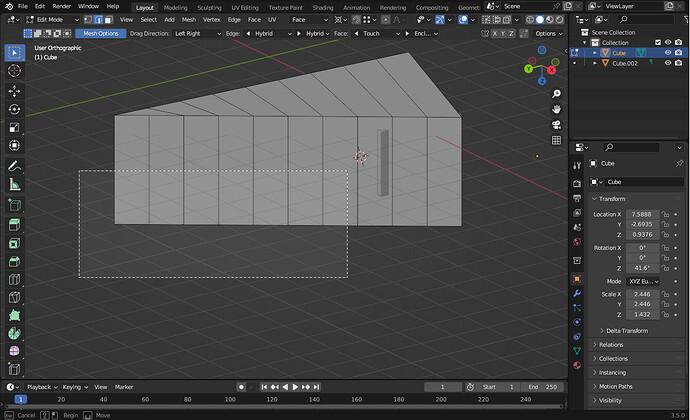
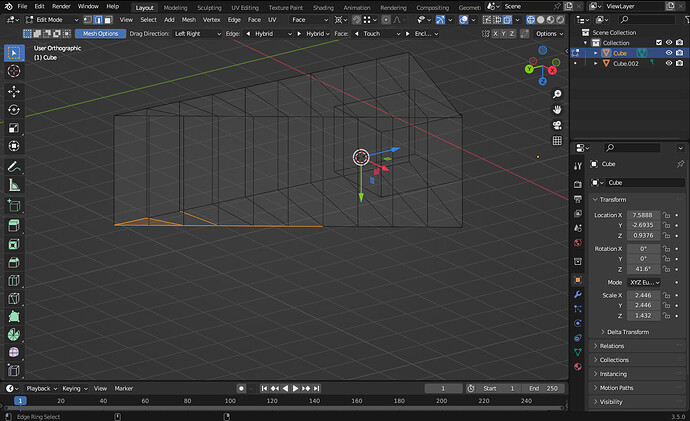
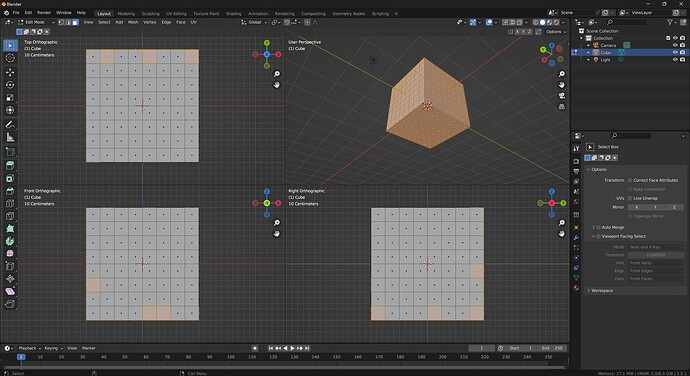
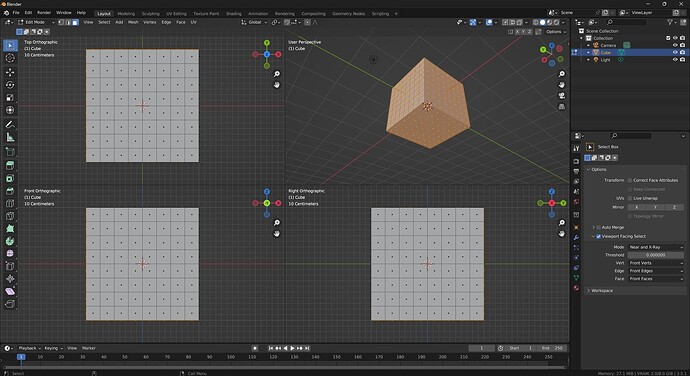
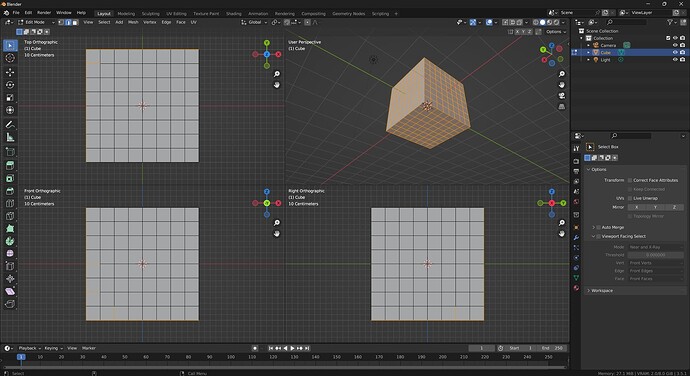
Found a problem with edges selection - in solid mode and no through, it seems to select additional invisible edges that are connected to selected
the selection:
the result:
Can you confirm?
A file in case if could be useful.
Also, is there a combination of settings that allow to select with circle/lasso by facedots in wireframe mode?
The unseen edges being selected is a problem blender has, and it’s the main reason I made what I’m calling “viewport-facing select”. Tried your file in regular blender to be certain, but I was pretty sure its the same thing that happens for me as well. You can mitigate this by using the viewport-facing select, but it isn’t perfect. I wrote about it a bit in feature #5 in the first post.
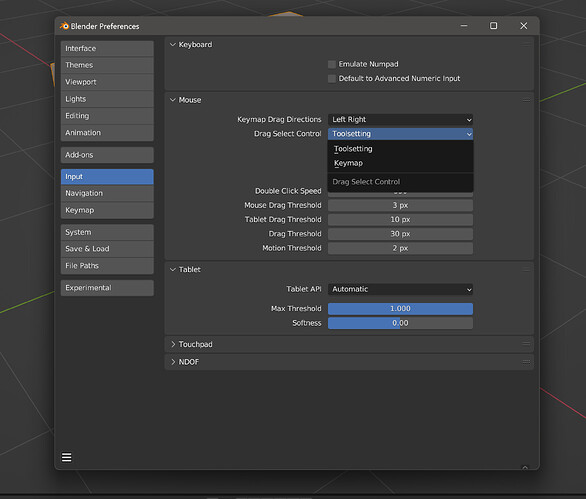
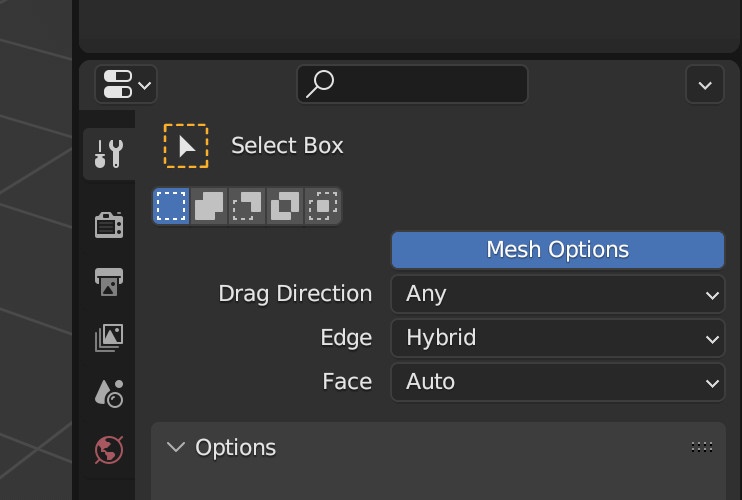
Mesh select and the xray options can be controlled 2 different ways, keymap or toolsettings. Default would be toolsettings, you can choose which one in userpref -> input -> mouse -> drag select control. I included a toolsettings option for drag select because I wanted to emulate this and this but put it in toolsettings instead of userprefs.
I’m going to change this though, just keep it one way. Mesh select options in the keymap, and the xray stuff in the header. Less confusing, more details in the first post.
For mesh selection to work different in xray and solid shading the only way I’ve provided is the default one called “auto”. It will work like regular blender in that case, touch in solid and center in xray. Otherwise it will treat xray and solid the same for Touch, Enclose, and Center selection of faces. Each tool has their own way of working, so they can be setup differently.
If using toolsettings
if using keymap
Planning out a youtube video to show how everything works. I will do it once I remake this build to only work one way. Once the video is done I’ll post it around different places like blender artists, right click select, and reddit. I’ll look for any other blender communities, I’d like to get as much feedback as I can. Then I’ll update the different features and make a design doc for selection as a general topic, with links to different pull requests. I’m open to input about this if anybody has some ideas.
Aw, indeed “auto” and “hybrid” -like terms are not very self-explanatory, and will require additional information to operate with them.
will this be officially part of Blender|
Yeah I don’t know what to call the default behavior. I had called both of them “default” but a name-change was suggested. I think the reason was that if someone is new to blender, they wouldn’t know what the default was. But I don’t really like the names “hybrid” and “auto” because they don’t mean much without knowing ahead of time what they do anyways.
Unless somebody can think of a descriptive name, I think I will change both of these names back to “default”, because that will at least imply that you’re going to get existing behavior out of these tools for anybody who knows. Otherwise, the names “hybrid” and “auto” require knowing what the existing or default behavior is, while also knowing that I decided to give this default behavior a name that doesn’t really describe what it does.
@Kranos you never know, but this is nothing official or even asked for by developers. Going to be a week or two, trying to sort out a Mac and Linux build and then make some videos. After that update things to main, which just means a few hours probably now that each feature is split up and a little easier for me to process where things don’t want to merge automatically. Then make a design doc for selection as a general topic, with links to each selection feature that is ready-ish for real blender.
I almost always underestimate, but I am going to say sometime around June things will be in a state where we can see what developer feedback we get.
Also, with these new forum categories I’d consider this more of a “contributing to blender” than “user feedback”. But who knows, I might also have to consider myself lucky that I have a small corner of this forum to put my work on. Really depends how this thing is percieved ![]()
I think that the UI/UX research behind the build is very valuable, since it attempts to reconcile all the possible abilities and realizations into a single compact but versatile approach, which always is a very challenging design job, as it requires exploring all possible contexts.
Speaking of “auto” and “hybrid” terms - maybe additional info about them in the tooltip description will be helpful.
Definitely, it’s very important work. For those tooltips, I can image doing a community read over to make it as concise and as precise as possible. We have been mostly consolidating towards a certain naming scheme already during the process so that’s also part of the design ![]()
Otherwise, the names “hybrid” and “auto” require knowing what the existing or default behavior is, while also knowing that I decided to give this default behavior a name that doesn’t really describe what it does.
I haven’t tested this build, so perhaps this suggestion will be quite stupid. But, if the user chooses to NOT use whatever expanded feature set this offers, they’re in effect using the “old” feature set. So, I believe that makes perfect sense to call “Default”.
I have no personal desire to have selection behave different based on the direction I drag the mouse, so to me “default” would tell me “it works like it used to”. A new user might not get the context, but I don’t think it matters. It’s little different than software X called a layer filter “Add” vs “Add (Classic)”.
@lcas do you think you could submit the features for Blender 4.0?
Yeah I just finished with the last update for 3.51 build, going to make a design doc for selection now
[BUILD] Blender 3.51 ← now on gumroad, builds for windows, mac and linux
[DIFF] Blender 351 custom build
I don’t have an AMD gpu that is new enough for HIP. If anybody is on Linux with HIP, check out the Linux build for me and let me know if you have hardware rendering or not. AMD does not have a windows SDK yet, sometime this year is what I heard.
Same goes for Intel ARC, either Windows or Linux, let me know you have hardware rendering, thanks.
The idea is to keep things the way they are, while giving you more options for:
Box, Circle, and Lasso Select
X-Ray
Drag Direction
Facedots
Selection Radius
Mouse Cursor
Header Highlights
Header Buttons
Camera Zoom
Frame Selected
Repeat Last
Drag Select Edges and Faces
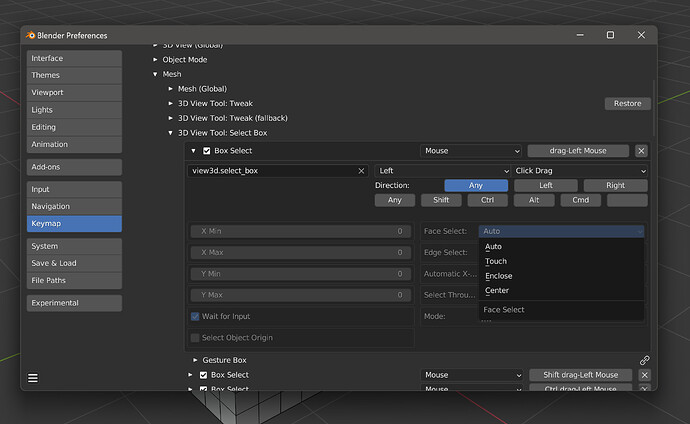
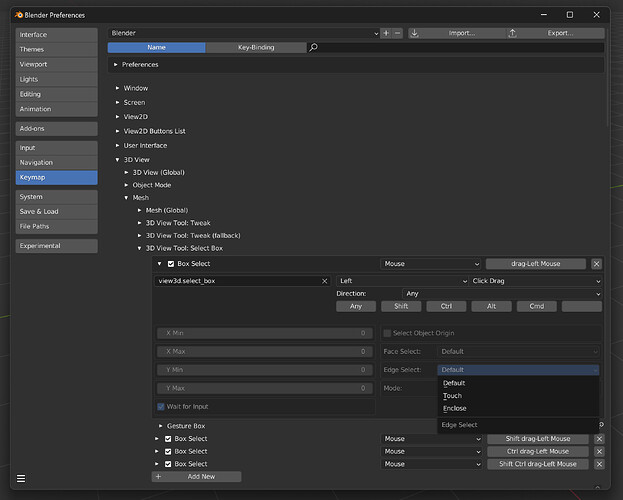
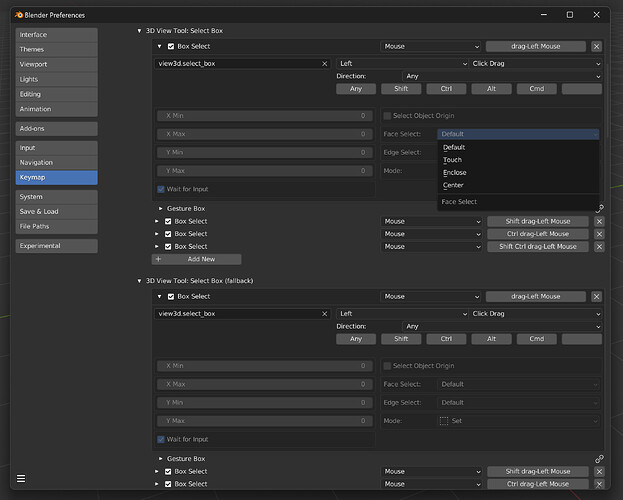
Preferences->Keymap->3d View->Mesh->(Box / Circle / Lasso) Select
There’s a dropdown for Edge Select with up to 3 options:
Default will do what Blender does, and Circle doesn’t have this option
Touch will select anything the selection area touches
Enclose will select edges that have both ends inside the selection area
Edge options
All these tools have 4 options for selecting Faces:
Default does what Blender does
Touch will select anything the selection area touches
Enclose will select a face if all their verts are inside
Center will select a face if you touch their center
Face options
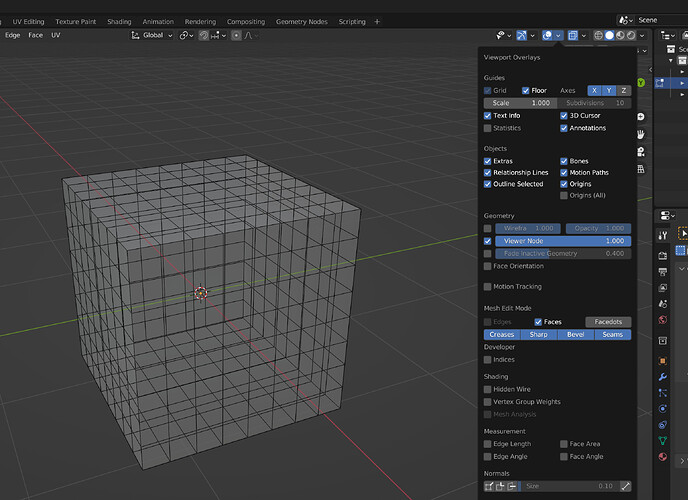
Facedots
Blender doesn’t let you hide Facedots in X-Ray shading, but with my build you can. Found in the Overlay Popover is an operator that toggles Facedots for either solid or X-Ray
Facedots in the Overlay Popover
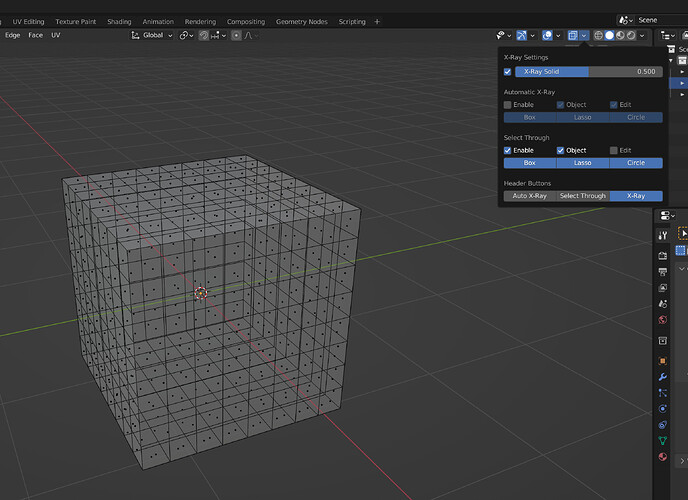
X-Ray
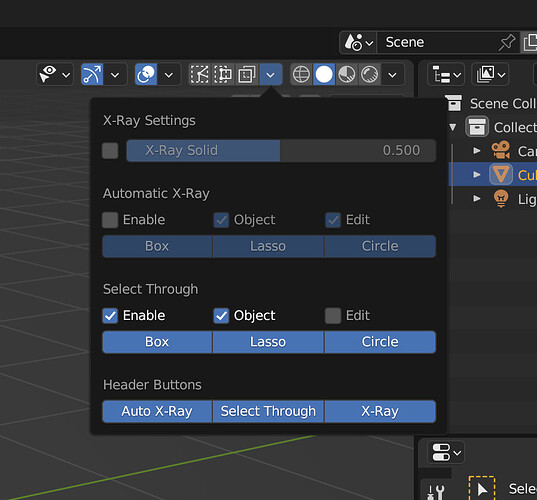
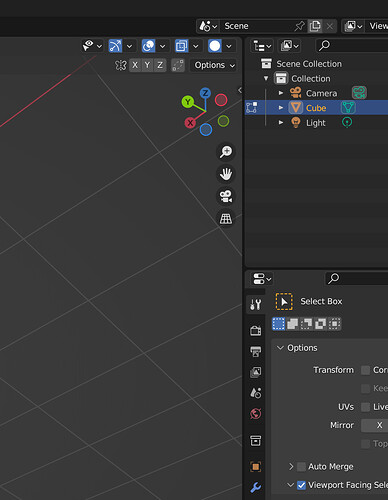
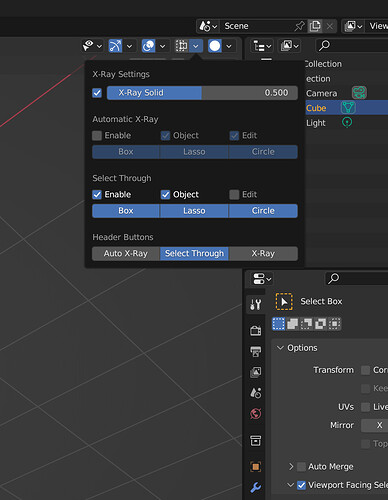
Blender doesn’t select unseen mesh. You select what you can see. If you want to select something on the other side of your mesh, you’d either turn on X-Ray or move the camera until it’s visible. With objects you always select through, and can’t turn it off. Not anymore. In the Header you’ll find a popover next to the X-Ray button. I moved the X-Ray settings here from the Shading Popover. They have new names so it’s more clear that wireframe and solid have separate X-Ray properties.
X-Ray Options
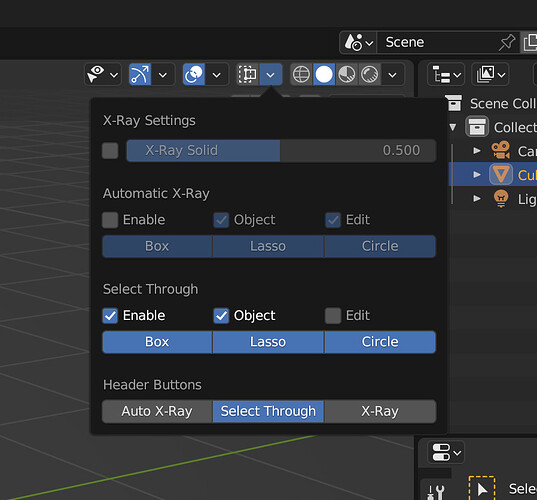
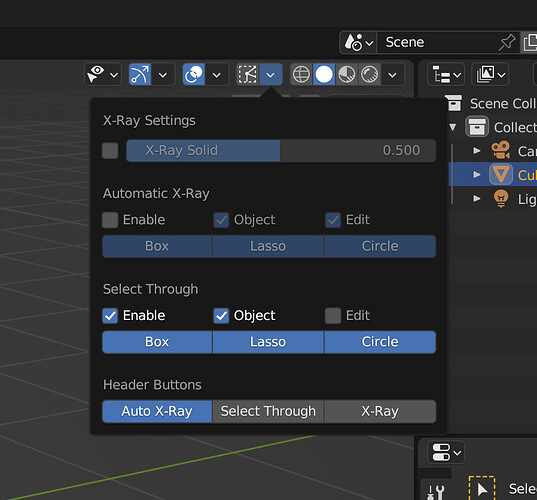
If you want to select unseen mesh without X-Ray, try Select Through. You can decide which tools and modes will use it. If you don’t want to change how X-Ray affects selection, try Automatic X-Ray. When you start to drag select with Box, Circle, or Lasso it will turn X-Ray on, and when you’re done it will turn it off. The settings work the same as Select Through.
I included some operators. You can show any combination of them in the Header. If you have everything necessary for the tool and mode you’re in, the button will be lit up. It’s modular, so there are many ways to setup your shortcuts. The icons for auto X-Ray and Select Through were made by Alexey Adamitsky.
X-Ray, Select Through, and Automatic X-Ray buttons in the header
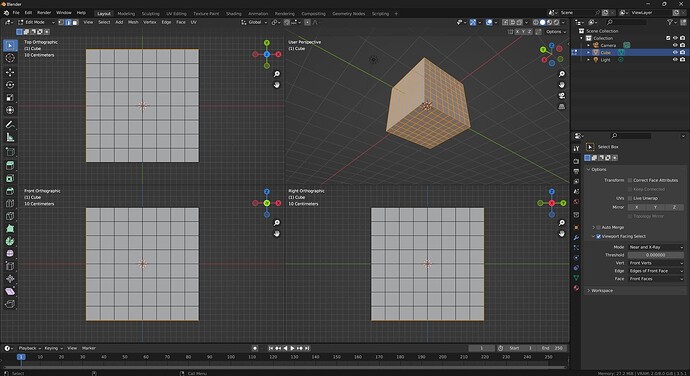
Viewport Facing Select
Blender does select unseen Mesh, and not in a good way like Select Through. If you can see some verts of an edge or face, they’re potentially selectable regardless of their visibility. If it isn’t truly random which unseen edges and faces this applies to, it may as well be. The 3 drag selection tools select the same wrong things, but if you move or rotate the viewport, this will usually mean that different unseen edges and faces are now selectable.
You can use Viewport-Facing Select to deal with this. It’s in Toolsettings, at the bottom of Options. It works in near select, X-Ray, or both. When you drag select, it compares mesh normals to the viewport. If they aren’t facing each other within the threshold, they won’t be selected. Greater or equal to 0 means the mesh normal is pointed in the direction you have it set to. The higher you set the threshold, the more your mesh needs to be facing in that direction. A value of 1 should mean the viewport and mesh are aligned, but was only working from the front perspective (numpad 1) and from nowhere else regardless of ortho. Max threshold is 0.999999, it is functionally the same as having it at 1 except it works from any angle. Negative values can select unseen mesh.
I use the All Verts setting. It’s saves performance without compromise, because Blender doesn’t select unseen verts. They’re dimensionless, and since there’s only one position for them to be drawn in, they shouldn’t be in the selection bitmap unless they’re visible.
Front Verts will select verts based on their normals,. If you try this, you’ll probably notice how some of the verts at the edge of your mesh are excluded. Verts of Front Face will fix that, it selects verts if they’re part of a face with a viewport facing normal. There’s also rear facing counterparts to these, they do the opposite where they’ll select stuff pointed away from you. Not sure if they’re useful but it’s easy to include.
The settings for edges work the same as verts. Using edge normals will exclude things you probably want to select, and Edges of Front Face will correct that. Same goes for face settings, except Front Faces are what you want for accurate selection. Faces of Front Vert will select faces that have at least one vert with a viewport facing normal. This means it can select unseen faces, which is what I’m trying to avoid, but maybe it’s useful for something.
Sometimes you can see a face even though it has a rear-facing normal, and VFS won’t select it. Usually this is because you’re dealing with two triangles that have no business sharing the same quad, but that’s going to happen from time to time, and you’ll need a way to select them. Besides turning this feature off temporarily, triangulating or otherwise fixing your mesh, single-clicking, or rotating your camera, you can drop your threshold into the negative. How negative you go depends on what you’re willing to live with, and it gets worse the lower you go. I keep it at zero, because at least you have a chance of noticing things you didn’t select. Hard to keep track of random selections that you can’t see. It’s not perfect, but it’s predicable, and should work with most geometry.
VFS off and on when selecting faces (undesired faces can be seen in ortho)
VFS off and on when selecting edges (undesired edges can be seen in ortho)
Object Origin
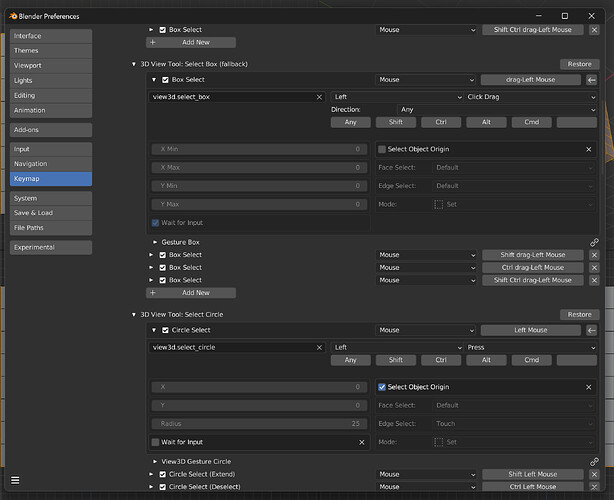
This feature is incomplete, but functional. Circle is forced to select objects by their origin, while Box cannot do this. There’s a checkbox called Select Object Origin in the Keymap. It’s a little off, an object’s origin can be still be selected when it is behind something else if some other part of that object is inside the selection area. Also, the selection area for Circle is larger than it appears when origin is off. One more thing: I couldn’t get Lasso working right, so I left it out. If you need more options for object select, there’s an addon called X-Ray Selection Tools that should work pretty good. Automatic X-Ray is inspired by a feature from that addon, it was added to my build at the request of Hologram.
Object origin in the keymap for Box and Circle
Mesh Select Issues
Intersect doesn’t work with Touch or Enclose face in X-Ray and Select Through. It will do a Center select instead. I figured it’s better to do something close to what you’d expect rather than nothing.
Enclose face works in near select, but it’s hard to use if you can’t see all the verts of a face. If you have a visible face, but some of it’s verts that would otherwise be on screen are behind something else, the selection bitmap thinks they don’t exist. This means that it also thinks that part of these faces are outside the selection area, even though they aren’t, and they get excluded from selection. One thing you could try is avoiding the selection bitmap entirely. Turn on Select Through, and set Viewport Facing Select to work in X-Ray, Verts of Front Face, Edges of Front Face, and Front Faces. Threshold at zero is best in my opinion. Now you get a decent result, but you have to deal with the baggage that comes with Select Through and VFS. You don’t always get everything you can see, at least when you have some weird faces that have triangles pointing in very different directions. Also, you’re going to select like X-Ray so if you have something that is facing the viewport, but don’t have line of sight, you’re going to select it without actually seeing it.
Drag Direction
Blender let’s you assign a direction to click-drag in the Keymap. There are 8 of them, which is nice, but it’s confusing and inaccurate if all you need are 2.
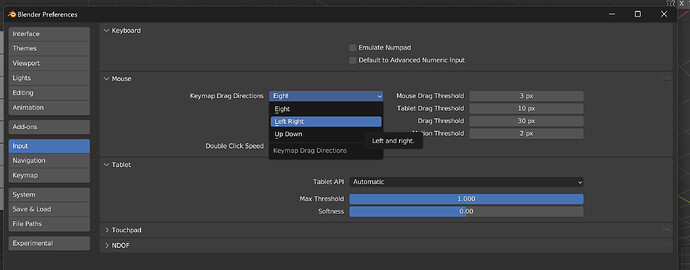
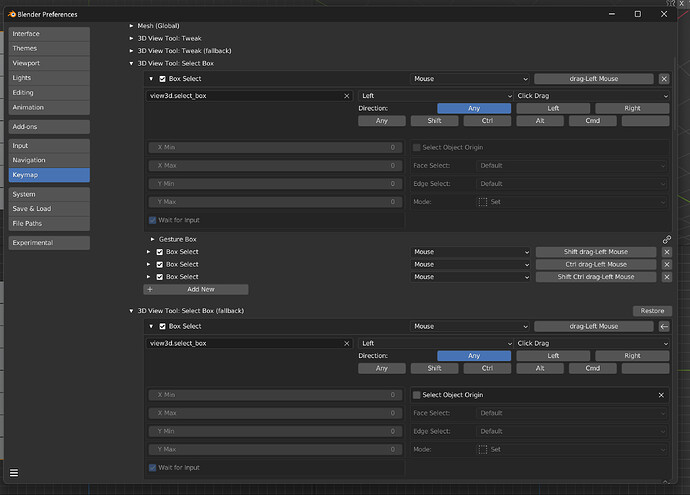
Preferences->Input, at the top of Mouse. Keymap Drag Direction has 3 options. Eight, which is what Blender does, Left Right, and Up Down. The tradeoff for mine is that they’re exclusive. If you use Left Right, the only Keymap items Blender will match with are Any, Left, and Right. Unless something has been manually set to a direction, there shouldn’t be anything besides View Axis, the ones where you hold ALT and Middlemouse while dragging in the direction that corresponds to the view you want.
With Blender’s way, try to set Box select to Extend when dragging left aka West, and Subtract when dragging right aka East. If you don’t initiate the mouse drag within 45 degrees of left or right, you get a Tweak Event instead of what you expected. There’s a way to make this work better. You set Extend to Any, and Subtract to East, Northeast, and Southeast. The Keymap item set to Any needs to be after the other 3 or they’ll be undetectable. Not intuitive, didn’t figure out this was possible until after making this feature.
With my way there’s 3 operators that will set your direction. If your Keymap is undetectable, it will warn you about it. Nothing bad will happen, it’s just telling you that this Keymap item won’t do anything because Blender can’t see it anymore.
Drag detection has some perpindicular bias. In short: whatever is perpindicular to the direction you have things set for, move in that direction before the expected one and there’s decent chance you don’t get what you wanted. The Left Right and Up Down options are very unlikely to experience this issue, and you can work around this by increasing your drag threshold in Userprefs. In detail: if you’re using Left Right, and you drag up or down far enough before moving to the right, you’re going to get the Left Keymap item instead of the Right Keymap item that you intended. If you’re on Up Down, and you move horizontally before going up, you would get the Down Keymap. With Blender’s Eight way, assuming you set it like I described, the dominant Keymap item is the one you set to the Any direction. The Left Right and Up down options are a lot more precise so it’s hard for this to happen. The Eight way calculation rounds to the nearest int, so it treats every mouse drag within 45 degrees of a cardinal direction like it went straight vertical or horizontal.
Drag Direction options
Left Right in the keymap
Selection Radius
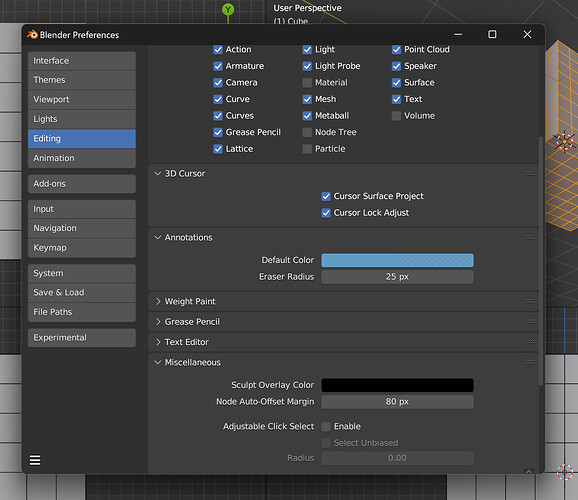
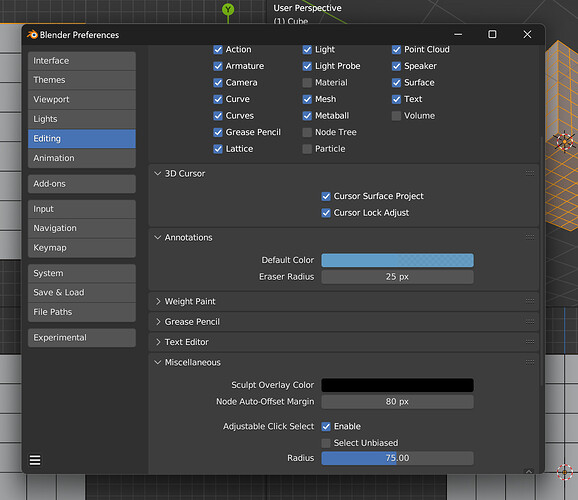
Preferences->Editing->Miscellaneous-> Adjustable Click Select.
Single-click an edge, vertex, or facedot and there’s a pretty big area you can grab it from. Faces in near select have zero radius, so you have to be right on top of them. I made this adjustable and consistent. Faces act the same, and you can change the size of the selection radius. Blender gives unselected mesh a slight bias, this can be turned off.
Adjustable Click Select radius will be at 0 instead of 75 like it should be if you already have a startup file for the same version of Blender
Mouse Cursor
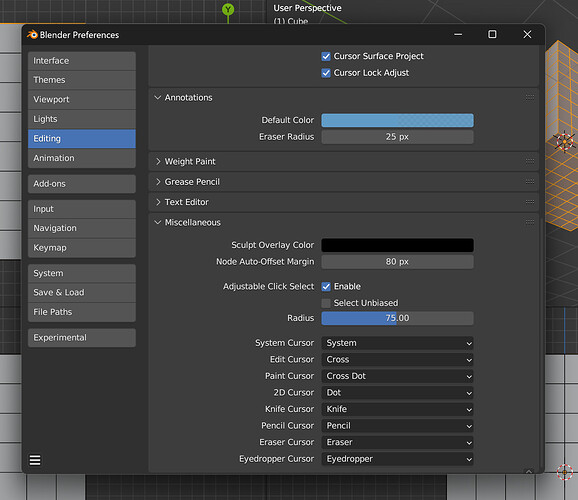
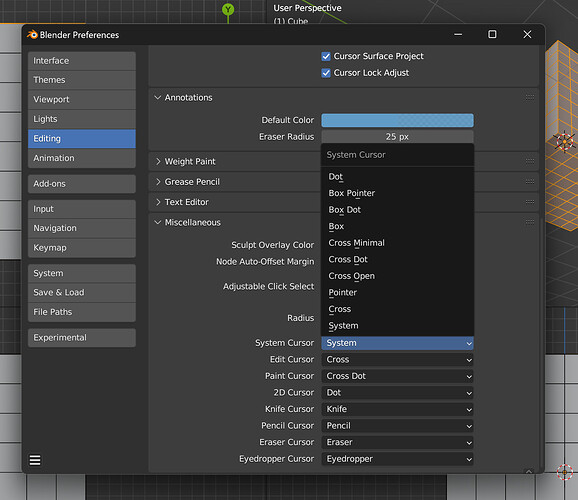
I don’t like the Edit Mode crosshair, so I made a replacement. Then I decided to just make this available to most of the cursors and have a few options to choose from.
Preferences->Editing at the bottom of Miscellaneous. You’ll need to move your cursor in and out of whatever area they’re from to see the change take effect. If you are on Mac or Linux, most of the cursor options don’t work, but System and Cross should show up correctly if you’d like them as an alternative for any cursor. I’ll expand on this feature if there’s interest.
Mouse cursors that can be changed
Alternate cursor types are basically limited to System and Cross if you are using Mac and Linux
Header Highlights
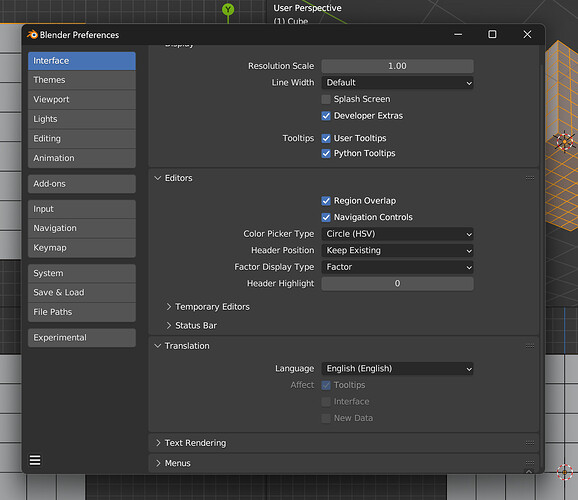
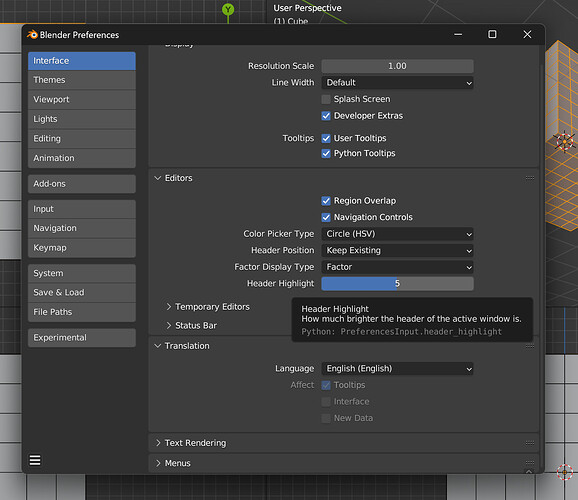
The top of the active window gets brighter. If you want to change that, go to Preferences->Interface->Editors->Header Highlight.
Header Highlight will be at 0 instead of 5 like it should be if you already have a startup file for the same version of Blender
Header Buttons
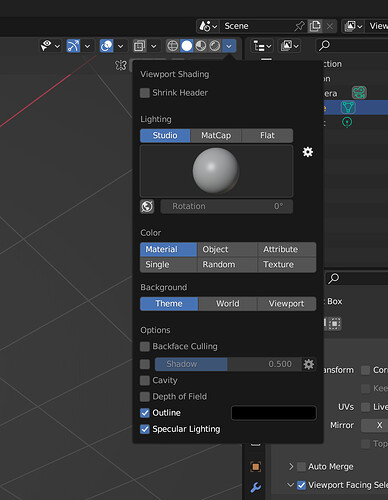
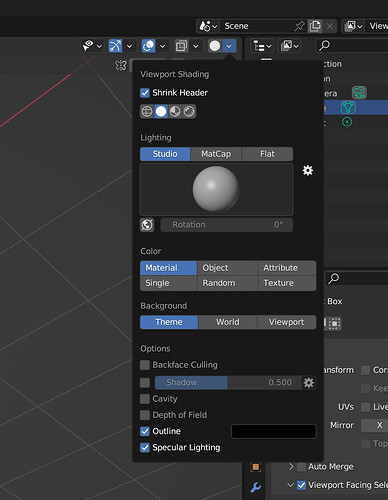
I don’t need buttons for X-Ray or Shading, so I combined them into one thing to save space. Top of the Shading Popover, there’s a checkbox called Shrink Header. The X-Ray button replacess the Shading buttons, and it changes icon to reflect what Shading Mode you’re in.
Shrink Header off
Shrink Header on
Probably want to replace a redundant X-Ray button with Select Through or Auto X-Ray
Camera Zoom
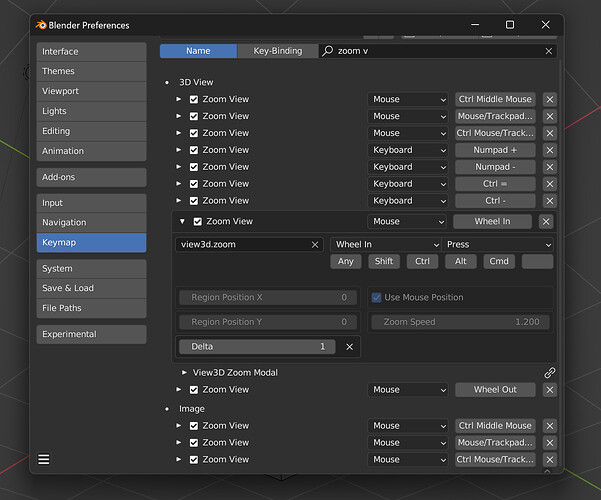
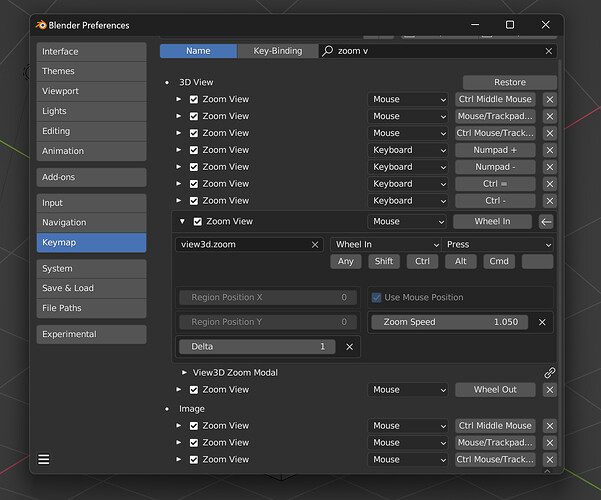
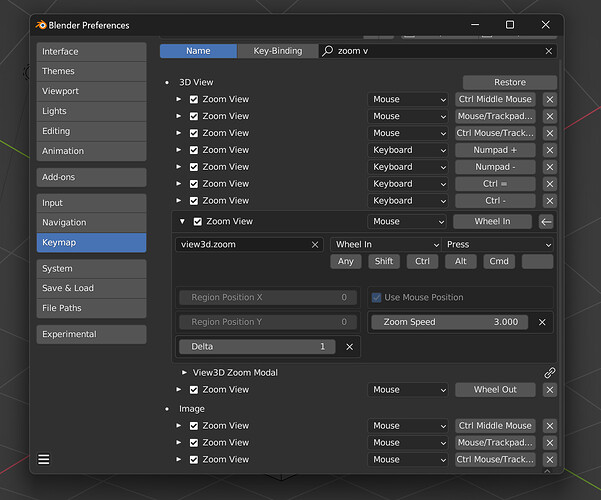
You can make camera move faster or slower for view3d.zoom. If you want multiple zoom mappings you need to manually set the speed for the existing zoom keymap or the speed of the new one you make will be used for both.
Zoom default, fast, and slow. Can get out of hand if you go to the extremes
Frame Selected
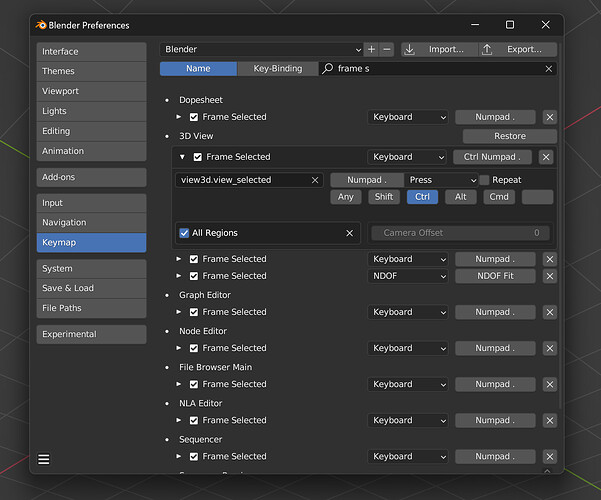
You can set a camera offset for view3d.view_selected. Like camera zoom, if you want more than one mapping for different distances, you need to manually set the existing one or it won’t work right.
Frame Selected default, and a small offset. Can go way out there to the edge of default clipping if needed
Invoke Last
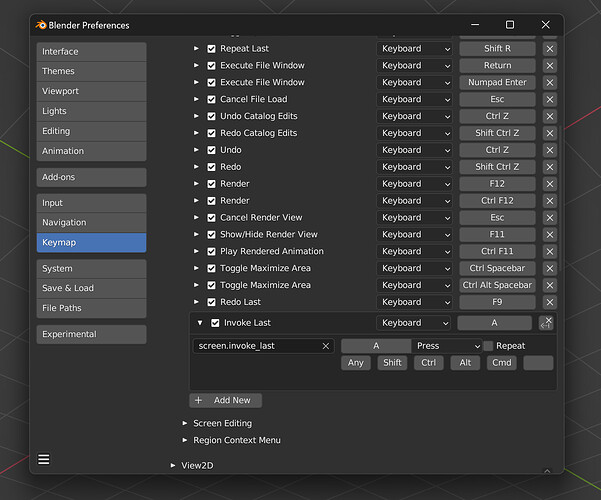
A new operator called screen.invoke_last that works the same as Repeat Last, except instead of executing everything the same, it just invokes the last operation. You’ll need to add a new Keymap entry for screen.invoke_last. Undo makes it lose memory the same as Repeat Last.
Invoke Last in the keymap
Defaults
Everything has defaults that will preserve what Blender does, but if you already have a startup file for the same Blender version as this build, it won’t know what these new defaults are. Fortunately it doesn’t matter for most of the new features. The only ones I’ve seen affected are Adjustable Click Select (which is opt-in so if you don’t use it makes no difference, and if you do just set the radius to something higher than 0.0) and Header Hightlight (minor cosmetic change that you might not even realize was different)
AMD Cycles in Windows
If you’re on Windows with an AMD gpu, you won’t have hardware rendering. Everybody’s waiting for AMD to release their sdk, it’s supposed to be soon. When it comes out I’ll update the build.
Thankyou
This build is only possible because of the knowledge and experience shared by the community. I want mention some people that helped me figure things out like Chris Blackbourne, LazyDodo, Harley and Campbell. Everyone on devtalk and in the chat, thank you. Most of all, I want to thank kio. Select Through, Facedot visibility, and Touch select faces in X-Ray are from the work he did. Some of it is basically untouched, and I learned a lot by updating it and changing how it works.
This sounds like you are using the dot product to get the direction of the selection. Is there a way for you to convert the values from 0 - 1 to something angle based (-179 - 180)? That would make it the setting more predictable.
I guess I would move the mouse cursors to a dedicated section in the preferences if you plan to add this feature as a patch.
Other than that it looks pretty darn solid, you’ve been adding lots of goodies lately, thanks for your hard work and dedication!
Yeah, that’s thanks to Chris Blackbourne. All I knew at the time was that subtraction wasn’t getting me anywhere, so I threw myself on the mercy of the chat, and fortunately he was there to show me how to use dot product. Not that I could really tell you anything about them, I just know they are useful.
Angles would be cool, not sure how to convert. Also, can’t use 1.0 for whatever reason, only works from the front perspective. So I tested it with autohotkey, moving the mouse the minimum amount by script, and seeing how far down I needed to go before the minimum movement would no longer select a max threshold value. Turns out it is 6 decimal places.
After a few days or so to see if anybody can confirm gpu rendering with AMD and Intel, I’ll post this on blender artists and reddit, assuming that reddit blackout thing isn’t still going.
Here’s a design doc, not sure what to do with it from here for it to get any eyes on it. I usually save my pestering for when I can’t figure code stuff out and I’m just going to assume that can be a very fine line to walk this close to 3.6 ![]()
Thanks @lcas !
I had tested a version of your build a few months ago but I had not been convinced.
Today, I tested this new version and I must say that I was pleasantly surprised.
I think you’ve done a fantastic job of adding so many features while still keeping the interface pretty simple. I hope the devs can integrate it into blender 4. That would be a big step forward.
Keep up the good job and thanks for your efforts.
For Angle input, I don’t know how you have implemented the dot product, but you could compare vector angles as well. Not sure how performant in would be, here is a basics on vector math, maybe it helps:
There are ways to convert the dot product back to angles, because the result of the dot product ranges between -1 and 1, because it is related to the Cosine of the vectors. People more versed in vector maths than me should be able to explain it to you with ease.
@David-Cros glad to hear it, you’re welcome
Yeah that video helps, a handful of “oh, ok yeah” moments for sure. But it’ll take a couple more watches to get through the rust of my mathbrain.
The way it works is, I thought about how there must be some way that Blender already knows and uses this information, and fortunately I was right otherwise I would’ve had no idea how to make it work. View Axis has an Align Active option that will align the viewport with whatever you have selected. So I initially just followed that down to a point to where it did what I wanted and borrowed it. The final part was doing the dot product, being told what column, etc. rather than just subtracting one from the other.
I think one or more of the setup steps is the reason why a 1.0 value only works from the front perspective. A closer and more informed look would spot it pretty easy I imagine. Viewport matrix is stored, nothing needed to be done there, its the mesh matrix that needs setting up, and it’s different depending if its a vert, edge, or face. Once I have a better idea what is actually happening, I’ll add some notation. But really, just a sleepy watch through that youtube video has some gears turning as far as wrapping my head around all this. I don’t know if I’ll be able to do anything more with it, but it’s fun to at least partway learn some new things.
/* this one is just used by the face setup,
not modified in any way so I won't bother posting it
all the way down to what BM_face_as_array_vert_tri
and BM_vert_tri_calc_tangent_edge do */

void BM_face_calc_tangent_auto(const BMFace *f, float r_tangent[3])
{
  if (f->len == 3) {
    /* most 'unique' edge of a triangle */
    BMVert *verts[3];
    BM_face_as_array_vert_tri((BMFace *)f, verts);
    BM_vert_tri_calc_tangent_edge(verts, r_tangent);
  }
  else if (f->len == 4) {
    /* longest edge pair of a quad */
    BM_face_calc_tangent_edge_pair((BMFace *)f, r_tangent);
  }
  else {
    /* longest edge of an ngon */
    BM_face_calc_tangent_edge((BMFace *)f, r_tangent);
  }
}

/* this stuff below is what I took from some orientation scripts
that make view axis work, I had originally done everything in there,
but the linux compiler did not like that so I took it out of there and
did it separately. Probably for the best. */

void edbm_vert_orientation(const BMVert *eve, float normal[3], float plane[3], float meshmat[3][3])
{
  float vec[3] = {0.0, 0.0, 0.0};
  float tangent[3] = {0.0f, 0.0f, 1.0f};
  copy_v3_v3(normal, eve->no);

  if (eve->e) {
    float vert1v3[3] = {eve->e->v1->co[0], eve->e->v1->co[1], eve->e->v1->co[2]};
    float vert2v3[3] = {eve->e->v2->co[0], eve->e->v2->co[1], eve->e->v2->co[2]};
    sub_v3_v3v3(plane, vert2v3, vert1v3);
  }
  else {
    if (eve->no[0] < 0.5f) {
      vec[0] = 1.0f;
    }
    else if (eve->no[1] < 0.5f) {
      vec[1] = 1.0f;
    }
    else {
      vec[2] = 1.0f;
    }
    cross_v3_v3v3(plane, eve->no, vec);
  }
  normalize_v3(plane);
  copy_v3_v3(meshmat[2], normal);
  cross_v3_v3v3(meshmat[0], meshmat[2], tangent);

  if (is_zero_v3(meshmat[0])) {
    tangent[0] = 1.0f;
    tangent[1] = tangent[2] = 0.0f;
    cross_v3_v3v3(meshmat[0], tangent, meshmat[2]);
  }
  cross_v3_v3v3(meshmat[1], meshmat[2], meshmat[0]);
}

void edbm_edge_orientation(const BMEdge *eed, float normal[3], float plane[3], float meshmat[3][3])
{
  float eed_plane[3] = {0.0, 0.0, 0.0};
  float vec[3] = {0.0, 0.0, 0.0};
  add_v3_v3v3(normal, eed->v1->no, eed->v2->no);
  sub_v3_v3v3(eed_plane, eed->v2->co, eed->v1->co);
  cross_v3_v3v3(vec, normal, eed_plane);
  cross_v3_v3v3(normal, eed_plane, vec);
  normalize_v3(normal);

  if (BM_edge_is_boundary(eed)) {
    sub_v3_v3v3(plane, eed->l->v->co, eed->l->next->v->co);
  }
  else {
    if (eed->v2->co[1] > eed->v1->co[1]) {
      sub_v3_v3v3(plane, eed->v2->co, eed->v1->co);
    }
    else {
      sub_v3_v3v3(plane, eed->v1->co, eed->v2->co);
    }
  }
  normalize_v3(plane);

//this is happening twice, forgot to remove from here, so edges will be more efficient in 3.6
  normalize_v3_v3(meshmat[2], normal);
  negate_v3_v3(meshmat[1], plane);

  if (is_zero_v3(meshmat[1])) {
    meshmat[1][2] = 1.0f;
  }
  cross_v3_v3v3(meshmat[0], meshmat[2], meshmat[1]);
  cross_v3_v3v3(meshmat[1], meshmat[2], meshmat[0]);
  normalize_v3(meshmat[1]);
}

bool edbm_normal_facing_viewport(ViewContext *vc,
                                 struct BMVert *eve,
                                 struct BMEdge *eed,
                                 struct BMFace *efa,
                                 bool use_direction)
{
  ToolSettings *ts = vc->scene->toolsettings;
  float normal[3] = {0, 0, 0};
  float plane[3] = {0, 0, 0};
  float meshcol3[3] = {0, 0, 0};
  float viewcol3[3] = {0, 0, 0};
  float meshmat[3][3] = {0, 0, 0, 0, 0, 0, 0, 0, 0};
  int direction = eve != NULL ? ts->viewport_facing_select_vert :
                  eed != NULL ? ts->viewport_facing_select_edge :
                                ts->viewport_facing_select_face;
  bool backface = use_direction && (direction == 4 || direction == 8);

  if (eve != NULL) {
    edbm_vert_orientation(eve, normal, plane, meshmat);
  }
  else {
    if (eed != NULL) {
      edbm_edge_orientation(eed, normal, plane, meshmat);
    }
    else if (efa != NULL) {
      copy_v3_v3(normal, efa->no);
      BM_face_calc_tangent_auto(efa, plane);
    }
    normalize_v3_v3(meshmat[2], normal);
    negate_v3_v3(meshmat[1], plane);

    if (is_zero_v3(meshmat[1])) {
      meshmat[1][2] = 1.0f;
    }
    cross_v3_v3v3(meshmat[0], meshmat[2], meshmat[1]);
    cross_v3_v3v3(meshmat[1], meshmat[2], meshmat[0]);
    normalize_v3(meshmat[1]);
  }
  normalize_m3(meshmat);
  invert_m3(meshmat);
  meshcol3[0] = meshmat[0][2];
  meshcol3[1] = meshmat[1][2];
  meshcol3[2] = meshmat[2][2];
  viewcol3[0] = vc->rv3d->viewmat[0][2];
  viewcol3[1] = vc->rv3d->viewmat[1][2];
  viewcol3[2] = vc->rv3d->viewmat[2][2];

  bool mesh_facing = false;
  if (backface) {
    mesh_facing = dot_v3v3(meshcol3, viewcol3) < -ts->viewport_facing_select_threshold;
  }
  else {
    mesh_facing = dot_v3v3(meshcol3, viewcol3) > ts->viewport_facing_select_threshold;
  }
  return mesh_facing;
}
3.6 build should be ready to go. Just a matter of Linux and Mac working a little smoothly this time. Should be faster the second time around.
Updating, or rebasing, the old Drag Select Edge and Face Keymap Options from 3.5 to main (4.0 alpha) was not cooperating on my end. I can either waste more of my time, or nag somebody in the hopes that they waste some of theirs trying to show me what to do. I have a detour around the problem so I don’t see the point right now. I will make a new PR for the things that are close enough to submit. I’ll link them here as I do them:
Detail:
I pre-emptively removed a handful of conflicts, all of them related to adding another argument to lasso select so it can check for enclosed mesh. Then I changed target on the website from 3.5 to main, no big deal. Rebasing my local branch is quite a hassle for whatever reason. Either way I go about it I’d have to manually remove conflicts, and the conflicts that came from rebasing are nothing to do with my changes. Other scripts, old includes that it can’t find, and a lot of extended living inside command line.
So I decided to just delete my local branch and replace that by grabbing the diff from the website. Seems easy: delete local branch, download the de-conflicted PR diff from the website, apply it to 4.0, make local branch, fix it for 4.0, and then push it back to the website. That doesn’t work either. Building the updated PR diff either gives me 3.5 instead of 4.0 (which shouldn’t happen because it has been set to main) or it gives me similar errors that I see trying to rebase. I re-fetched and re-synced myself, doesn’t do anything. This is not an issue with the changes I am making. Really easy to just do it over again myself and ignore this branch.
I’m 99% doing something wrong, but I’m not stupid. If I can’t figure it out after a while it is lacking a certain human usability. I wish there was a way to replace a branch, where the website would let you click a “start over” button. Then you give it a diff and a target. It would disregard whatever state the PR was in, and just do it already. Then I don’t have to make a new branch and tell people where to go find the same thing. Would make this a lot faster and approachable.
