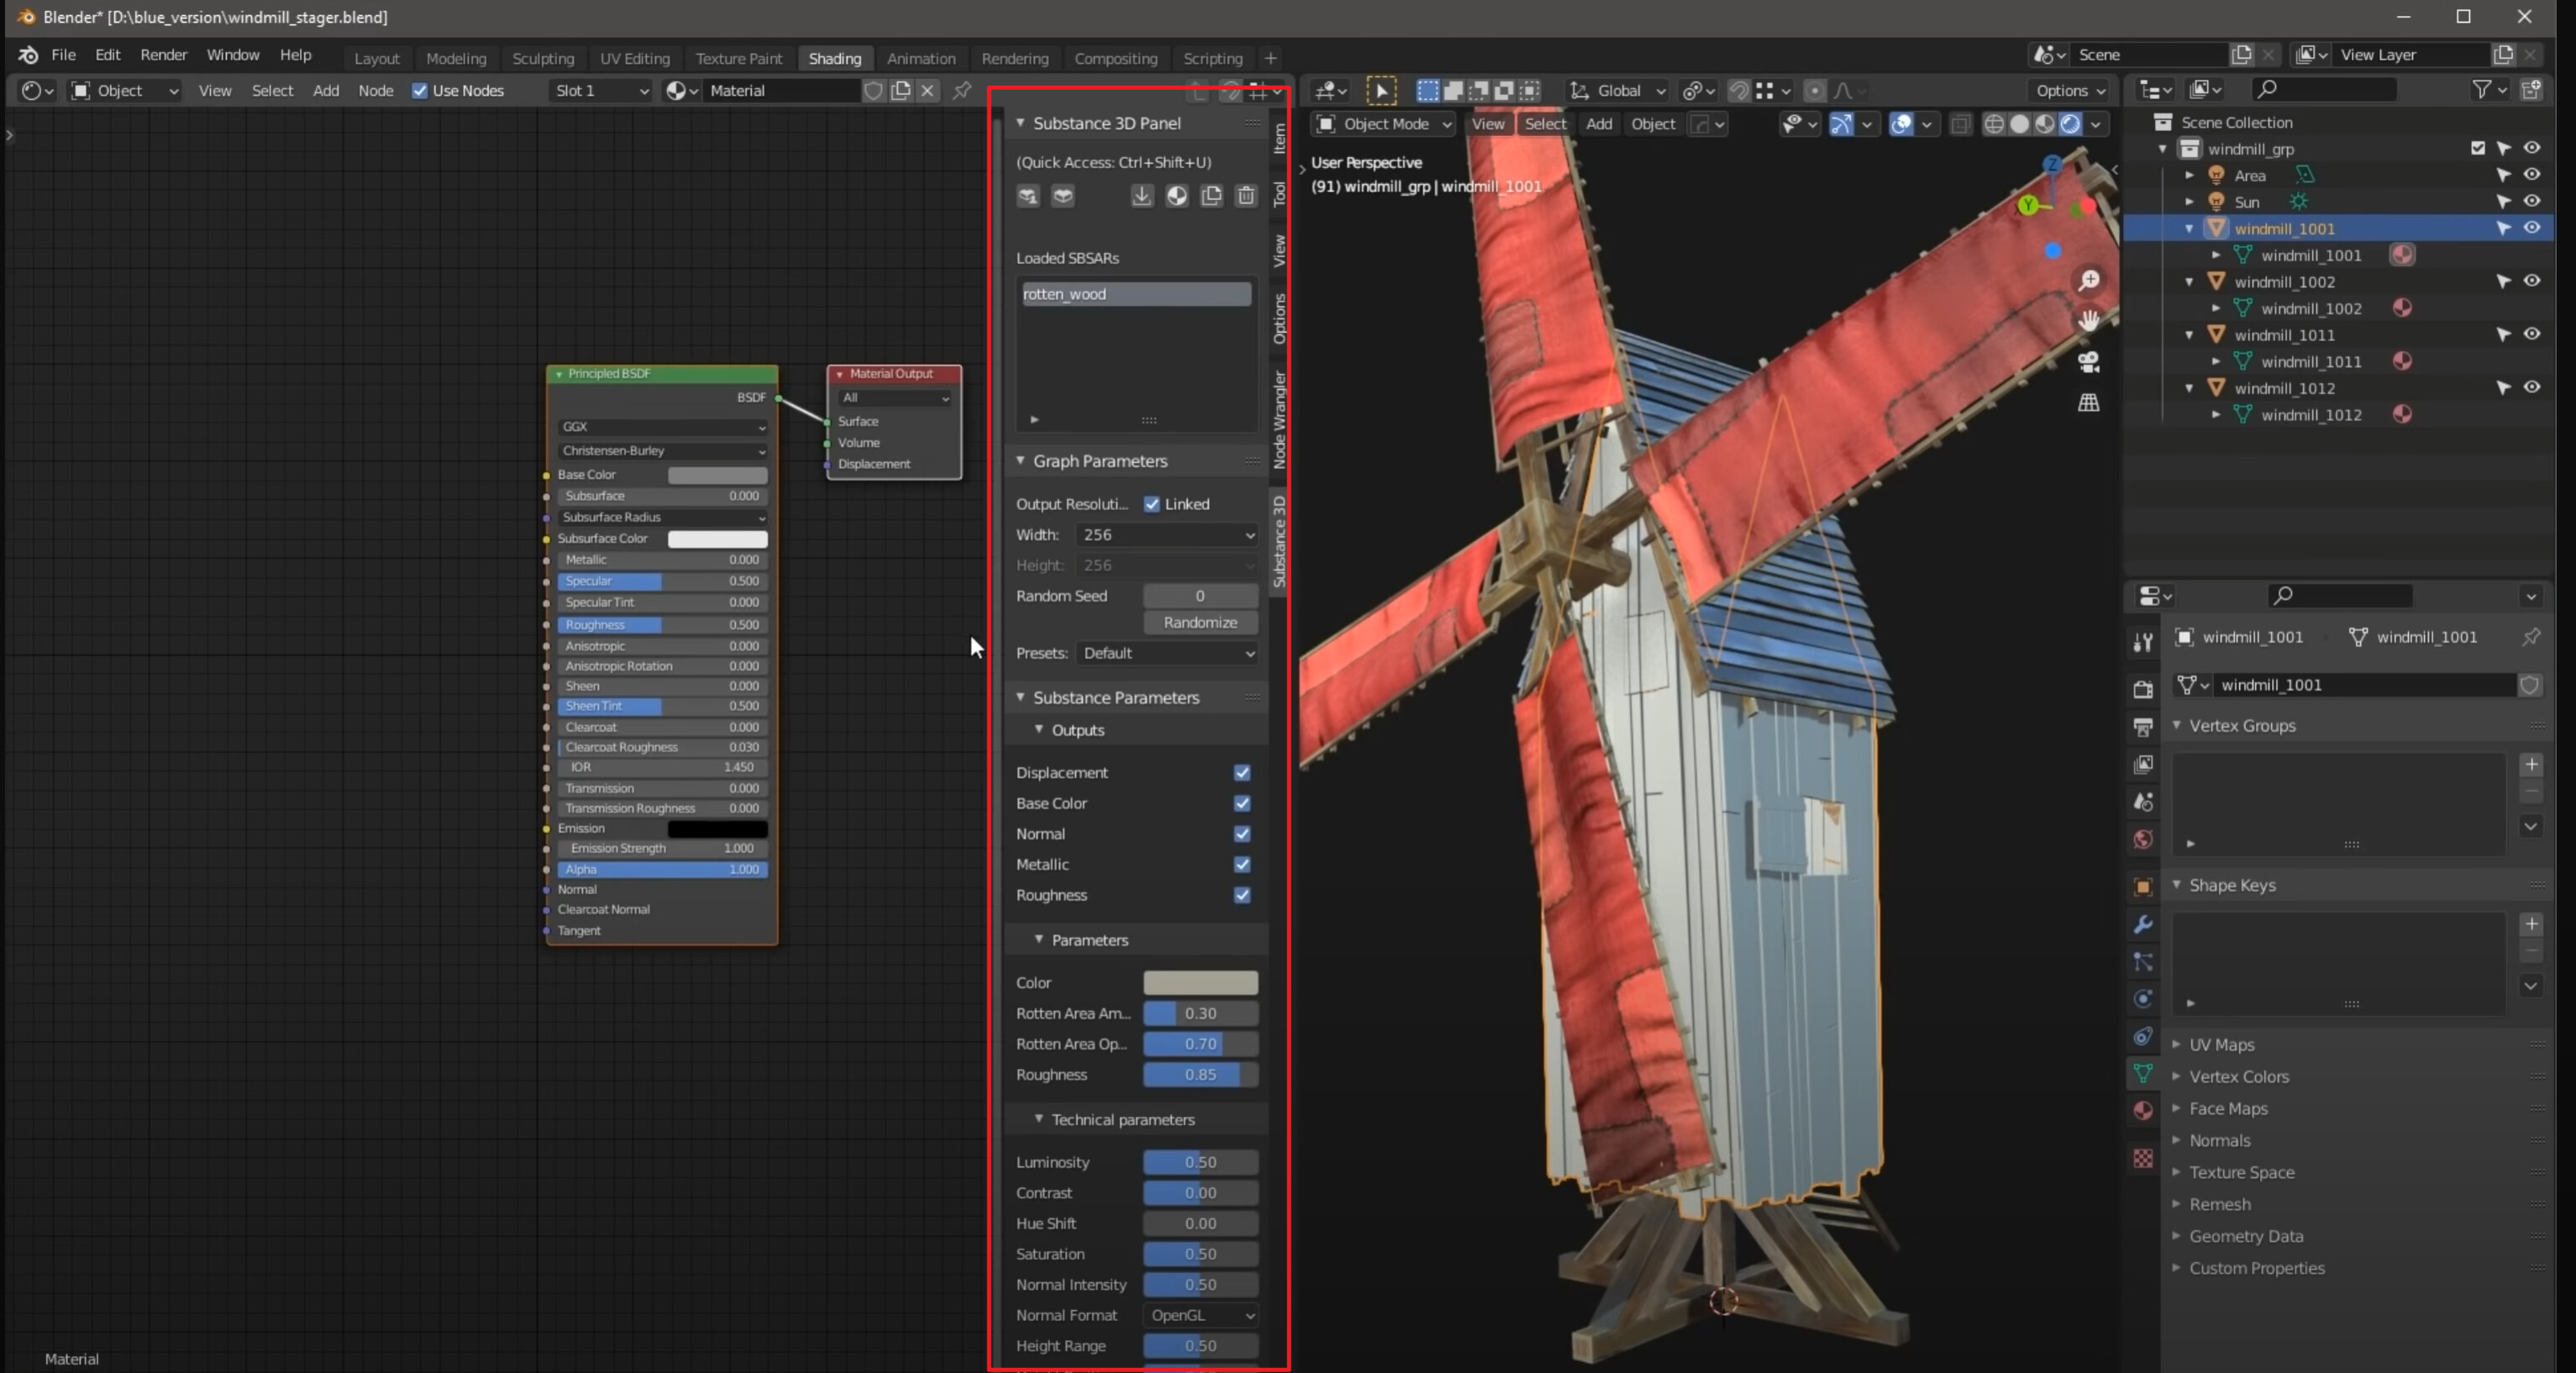
The current asset browser design is OK. However it lacks a lot of features and needs pretty much polishment work to be used in production work.
E.g. at the time being, when a object asset being imported to a scene it defaults to be appended while a collection asset is defaulted to linking which is right. From my concern, doing asset management is all about keeping things in an organized and tindy workflow and linking should absolutely be the default behavir for assets like Objects & Collections, Materials and Scenes. There’s even no need to make a Mesh assets category. Those type of assets mentioned above tend to contain rich data and making variations could be approached by adding increment data on top of them. In real world production, even for a standalone artist, linking could help reducing blend file size, and what’s more important, keeping asset in one place instead of various versions all over the place. For this example, I would highly suggest make an option in preference that allow user to change the default asset importing behavior and default to linking, for more even make a hot key to toggle to append when importing.
Here back to what I wrote in the title: Variation System.
Implement this feature in system level would help the override system also.
NECISSITY
“Doing asset management is all about keeping things in an organized and tindy workflow”, as I said above. Nowadays blender has pretty strong parametric modeling and shading ability. When making assets, why bother making a bunch of duplicates of meshes or shaders variations that shares a lot of common properties among themselves?
Take this example: a movie about a book library, thousand of book assets shall be made, each book should have different cover images, different shell thickness, different papers etc. Hand modeling and material creation is possible but laber-intensive, unless you have a hollywood team. Say if you also want to reuse the book assets in another project, you definately want them to differ from the ones used in the former project…
Another pitful is that linking assets makes things organized but hard to modify in real projects cause currently to modify a linking material wouldn’t be possible if not opening the original file.
A METAPHOR
Consider a cooking machine like this: it only accepts certain kinds of raw materials and it’s cooking method can be configured. If you feed it with different raw materials keeping the same cooking method, you get different dishes comes of it, but they share similiar flaver. Else if you feed it with same raw materials while set it to use different cooking duration or cooking flavor, you get different flavored dishes which can easily be tell what are they made from. Also you could mix them all to make more variations. Else if you’re bored of all the dishes made by the machine, you can add more options it accepts and upate it’s cooking algorism yourself.
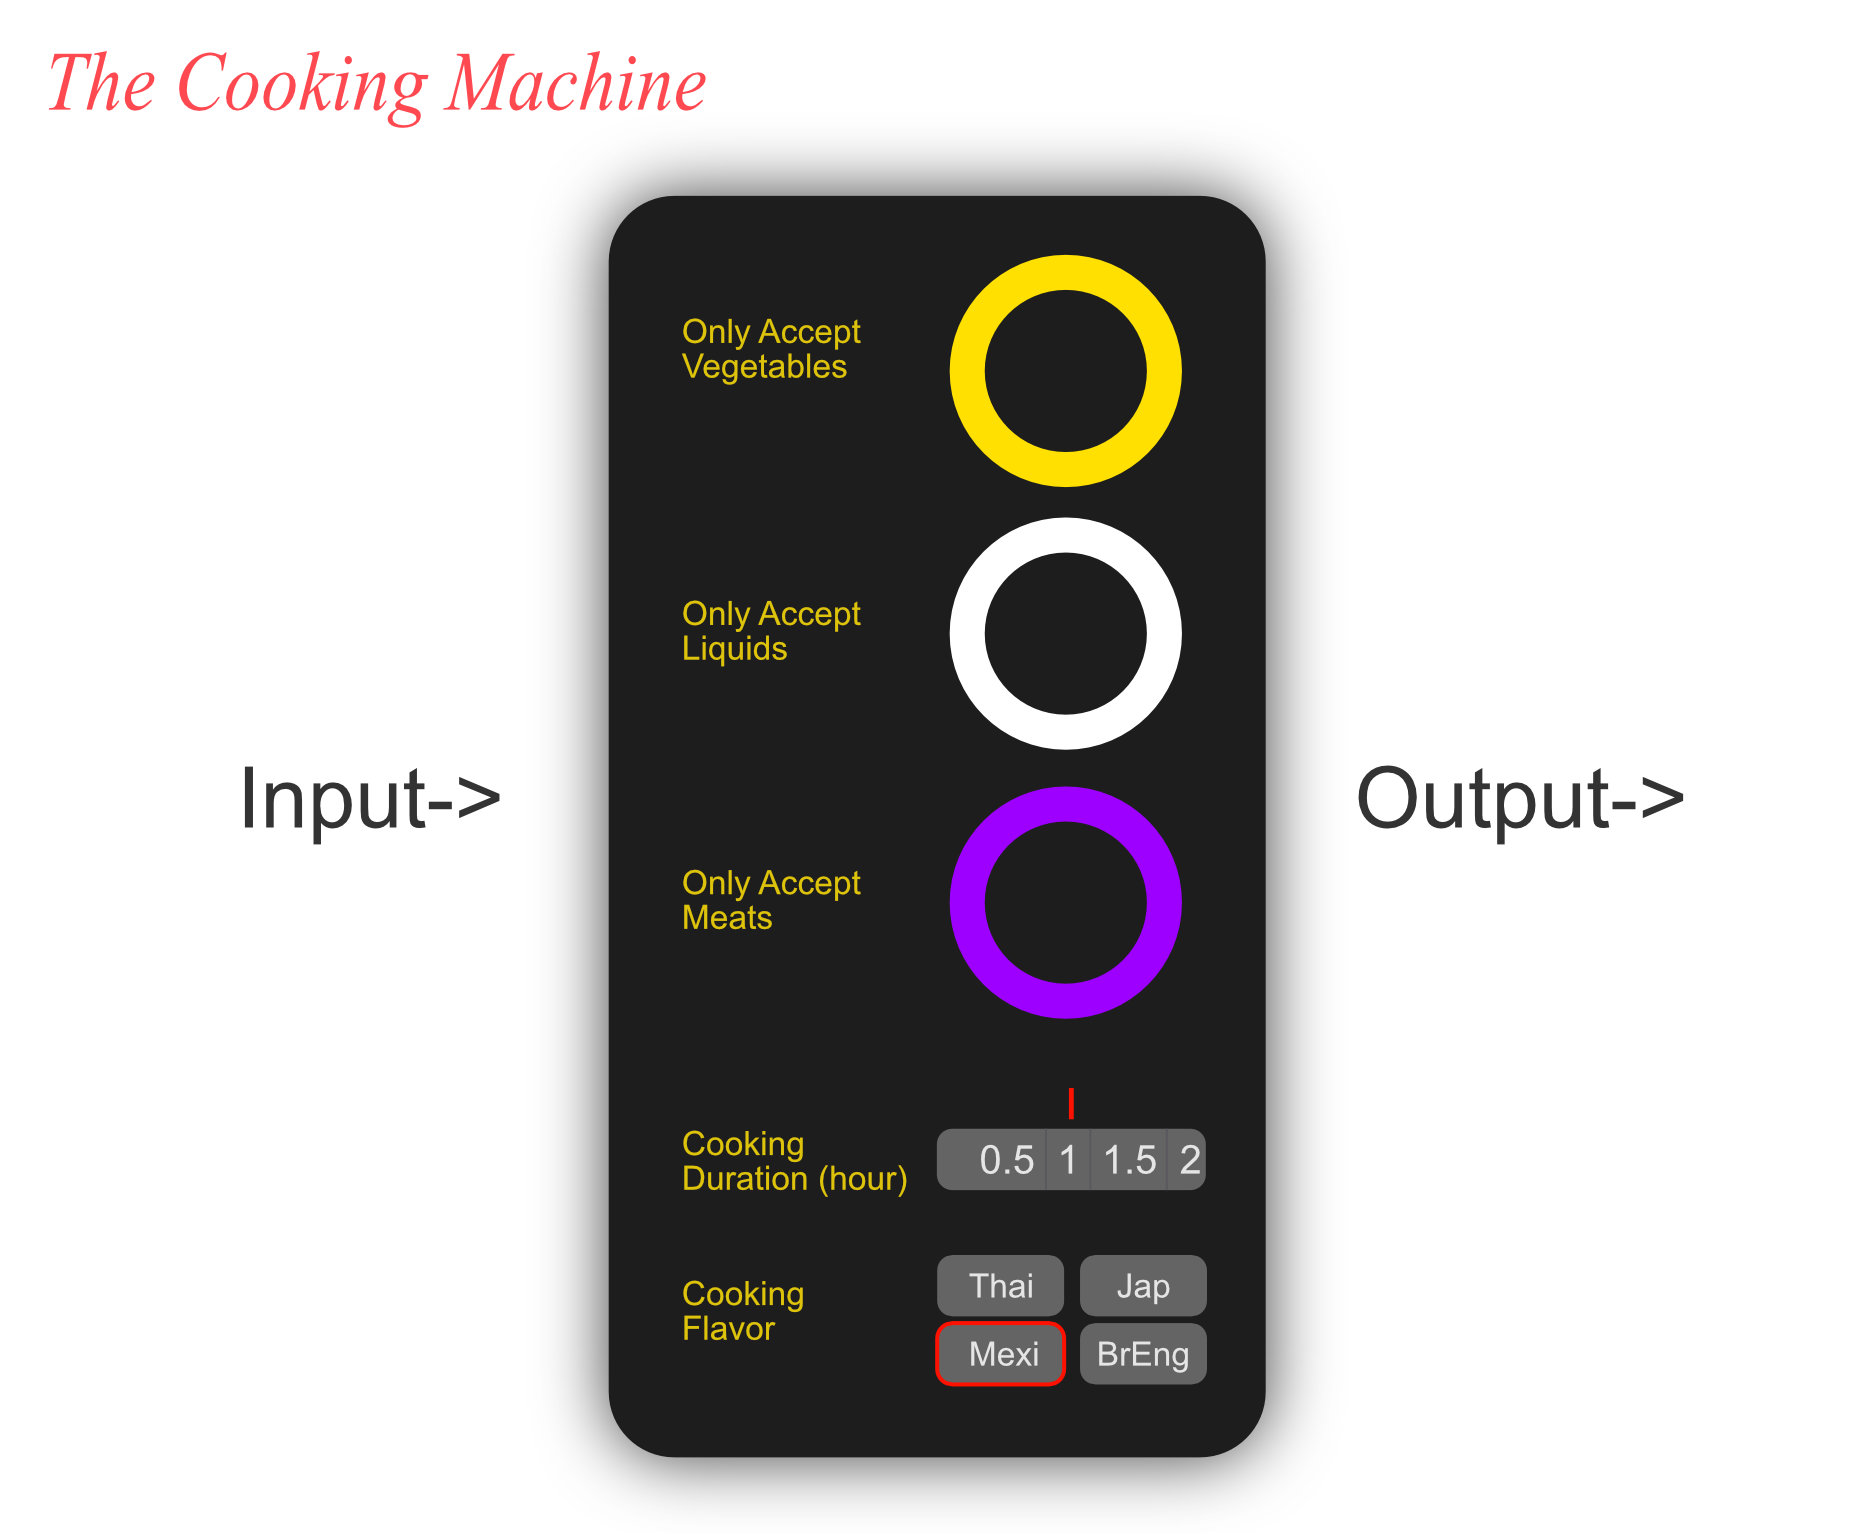
IllUSTRAION
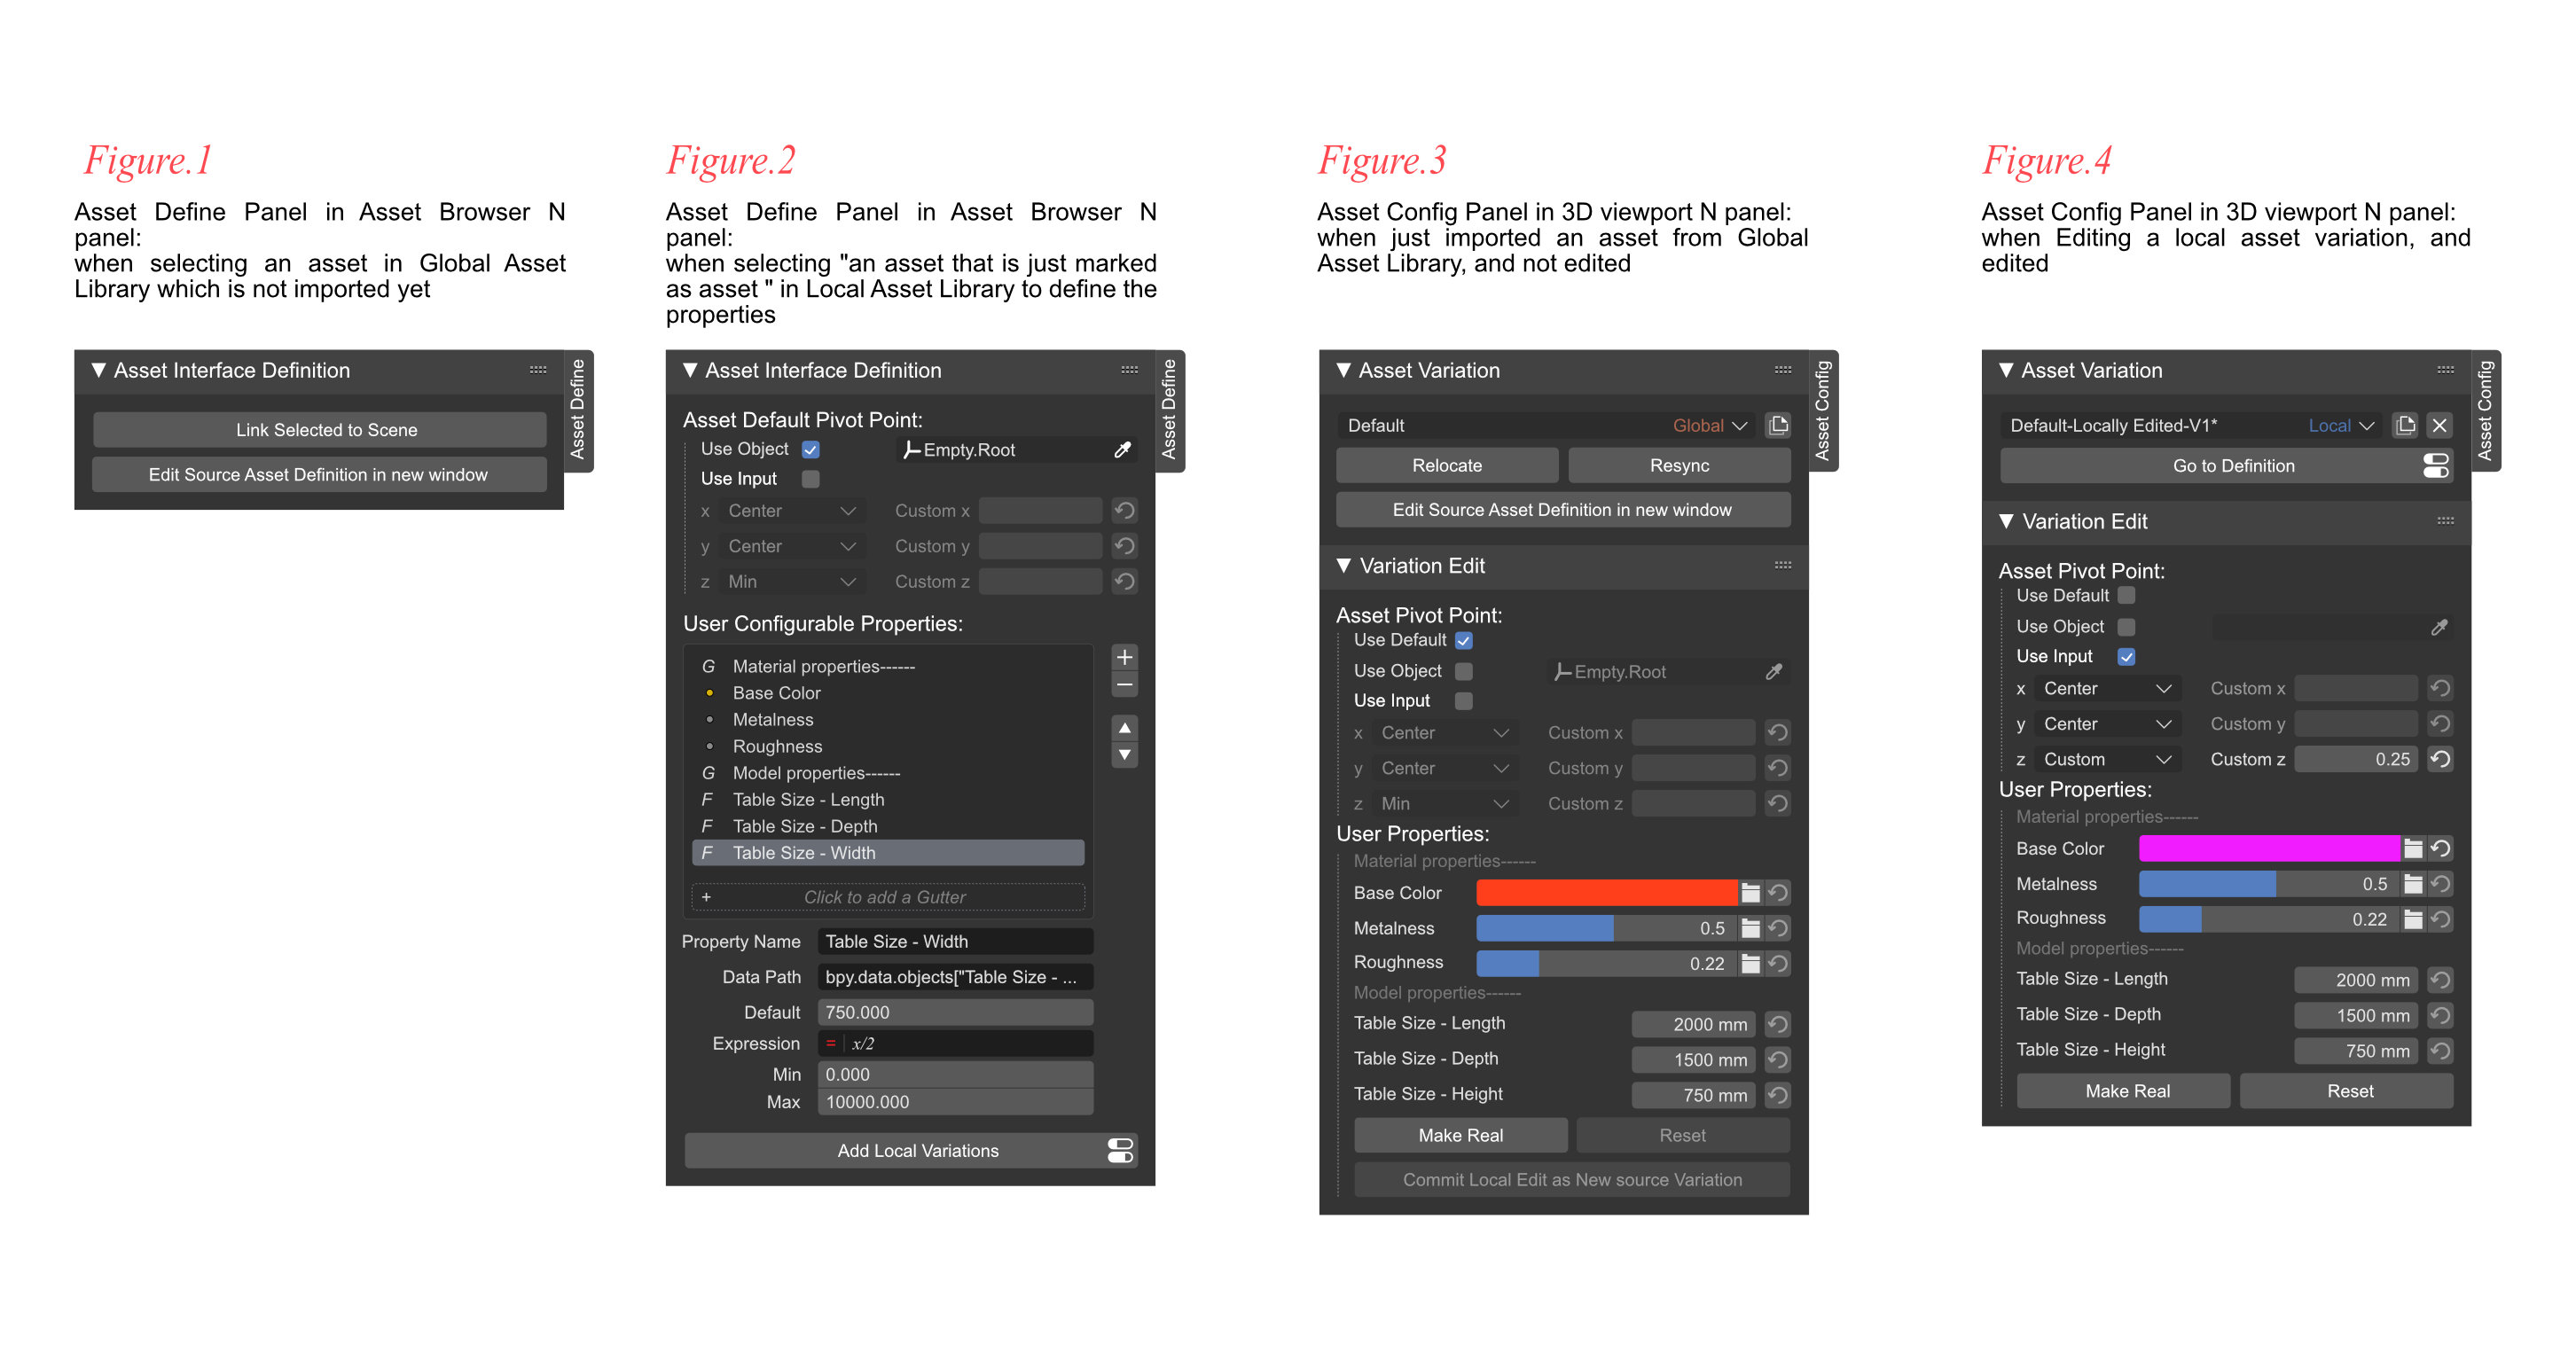
Here’s four figures of my instruction of how it could be implemented. These functions are the basics. Please don’t focus on details about when to disable or hide certain botton or input areas. Just think about the logic behind it. And BTW, these are hand-drawn illustrations, just ignore the imperfections.
These 4 figures show the workflow of making a variable collection asset.
Figure.1 and 2 shows the same panel under different situations. It’s called “Asset Define” and locates in the N panel of the asset browser; Figure.3 and 4 shows the same pabel under different situations, and is called “Asset Config” locates in the N panel of the 3D viewport.
In real world, things happends in the order of: Figure.2 → Figure.4 → Figure.1 → Figure.3.
[Figure.2]
An asset that is almost completed and about to be archived into the global asset library. The creator now could define the default origin point or pivot point of the asset which will determine how the asset’s linking instance would behave when placing and tranforming. Then the creator could drag and drop properties like object transformation inputs, material color, modifier inputs etc. into the user configurable properties panel area. Or maunally copy data path and define the input ranges. The configurable properties panel definition works similar to node group output process combined with drivers editor. When the defining process’s done, keep the asset selected in the asset browser then hit the botton on the bottom says “Add Local Variations” and see Figure.4.
[Figure.4]
By duplicating and then tweak the default configurations of the former defined properties, the creator makes several variations that will be stored along with the asset in the Current File asset library. After that, this blend file will be put under global asset library path and ready to be consumed by user.
[Figure.1]
A user open the asset browser when doing a project. He select the just created collection asset, and the asset define panel tell him that this is a global asset and not being imported yet. If click the bottom botton, he could edit the asset’s source file in a new blender window. Else click to import and use it right now.
[Figure.3]
The imported asset could directly be used. Or the user could choose pre-defined variations by the creator using the “Asset Config” panel. Or he can duplicate and tweak to make new variations locally just like what’s shown in Figure.1. What’s different is that when imported, this asset became the local asset of the current working blend file. It’s referencing or instancing the original asset. Local variations made by the user lives in the current working blend file just like making a “Delta Transform” to a object. The “Asset Config” panel under this situation allows user do 4 type of manipulation: first, making local variations which only stays with this file; Second, commit local variations to the asset’s source file and share the new variations just made to other projects or to backup; Third, open a new blender window to edit the asset’s source file to get more or less user configurable properties, and when done back to this file and fresh to get new interface; Last, the user really want a unique copy of the asset and makes the instancing asset real local.
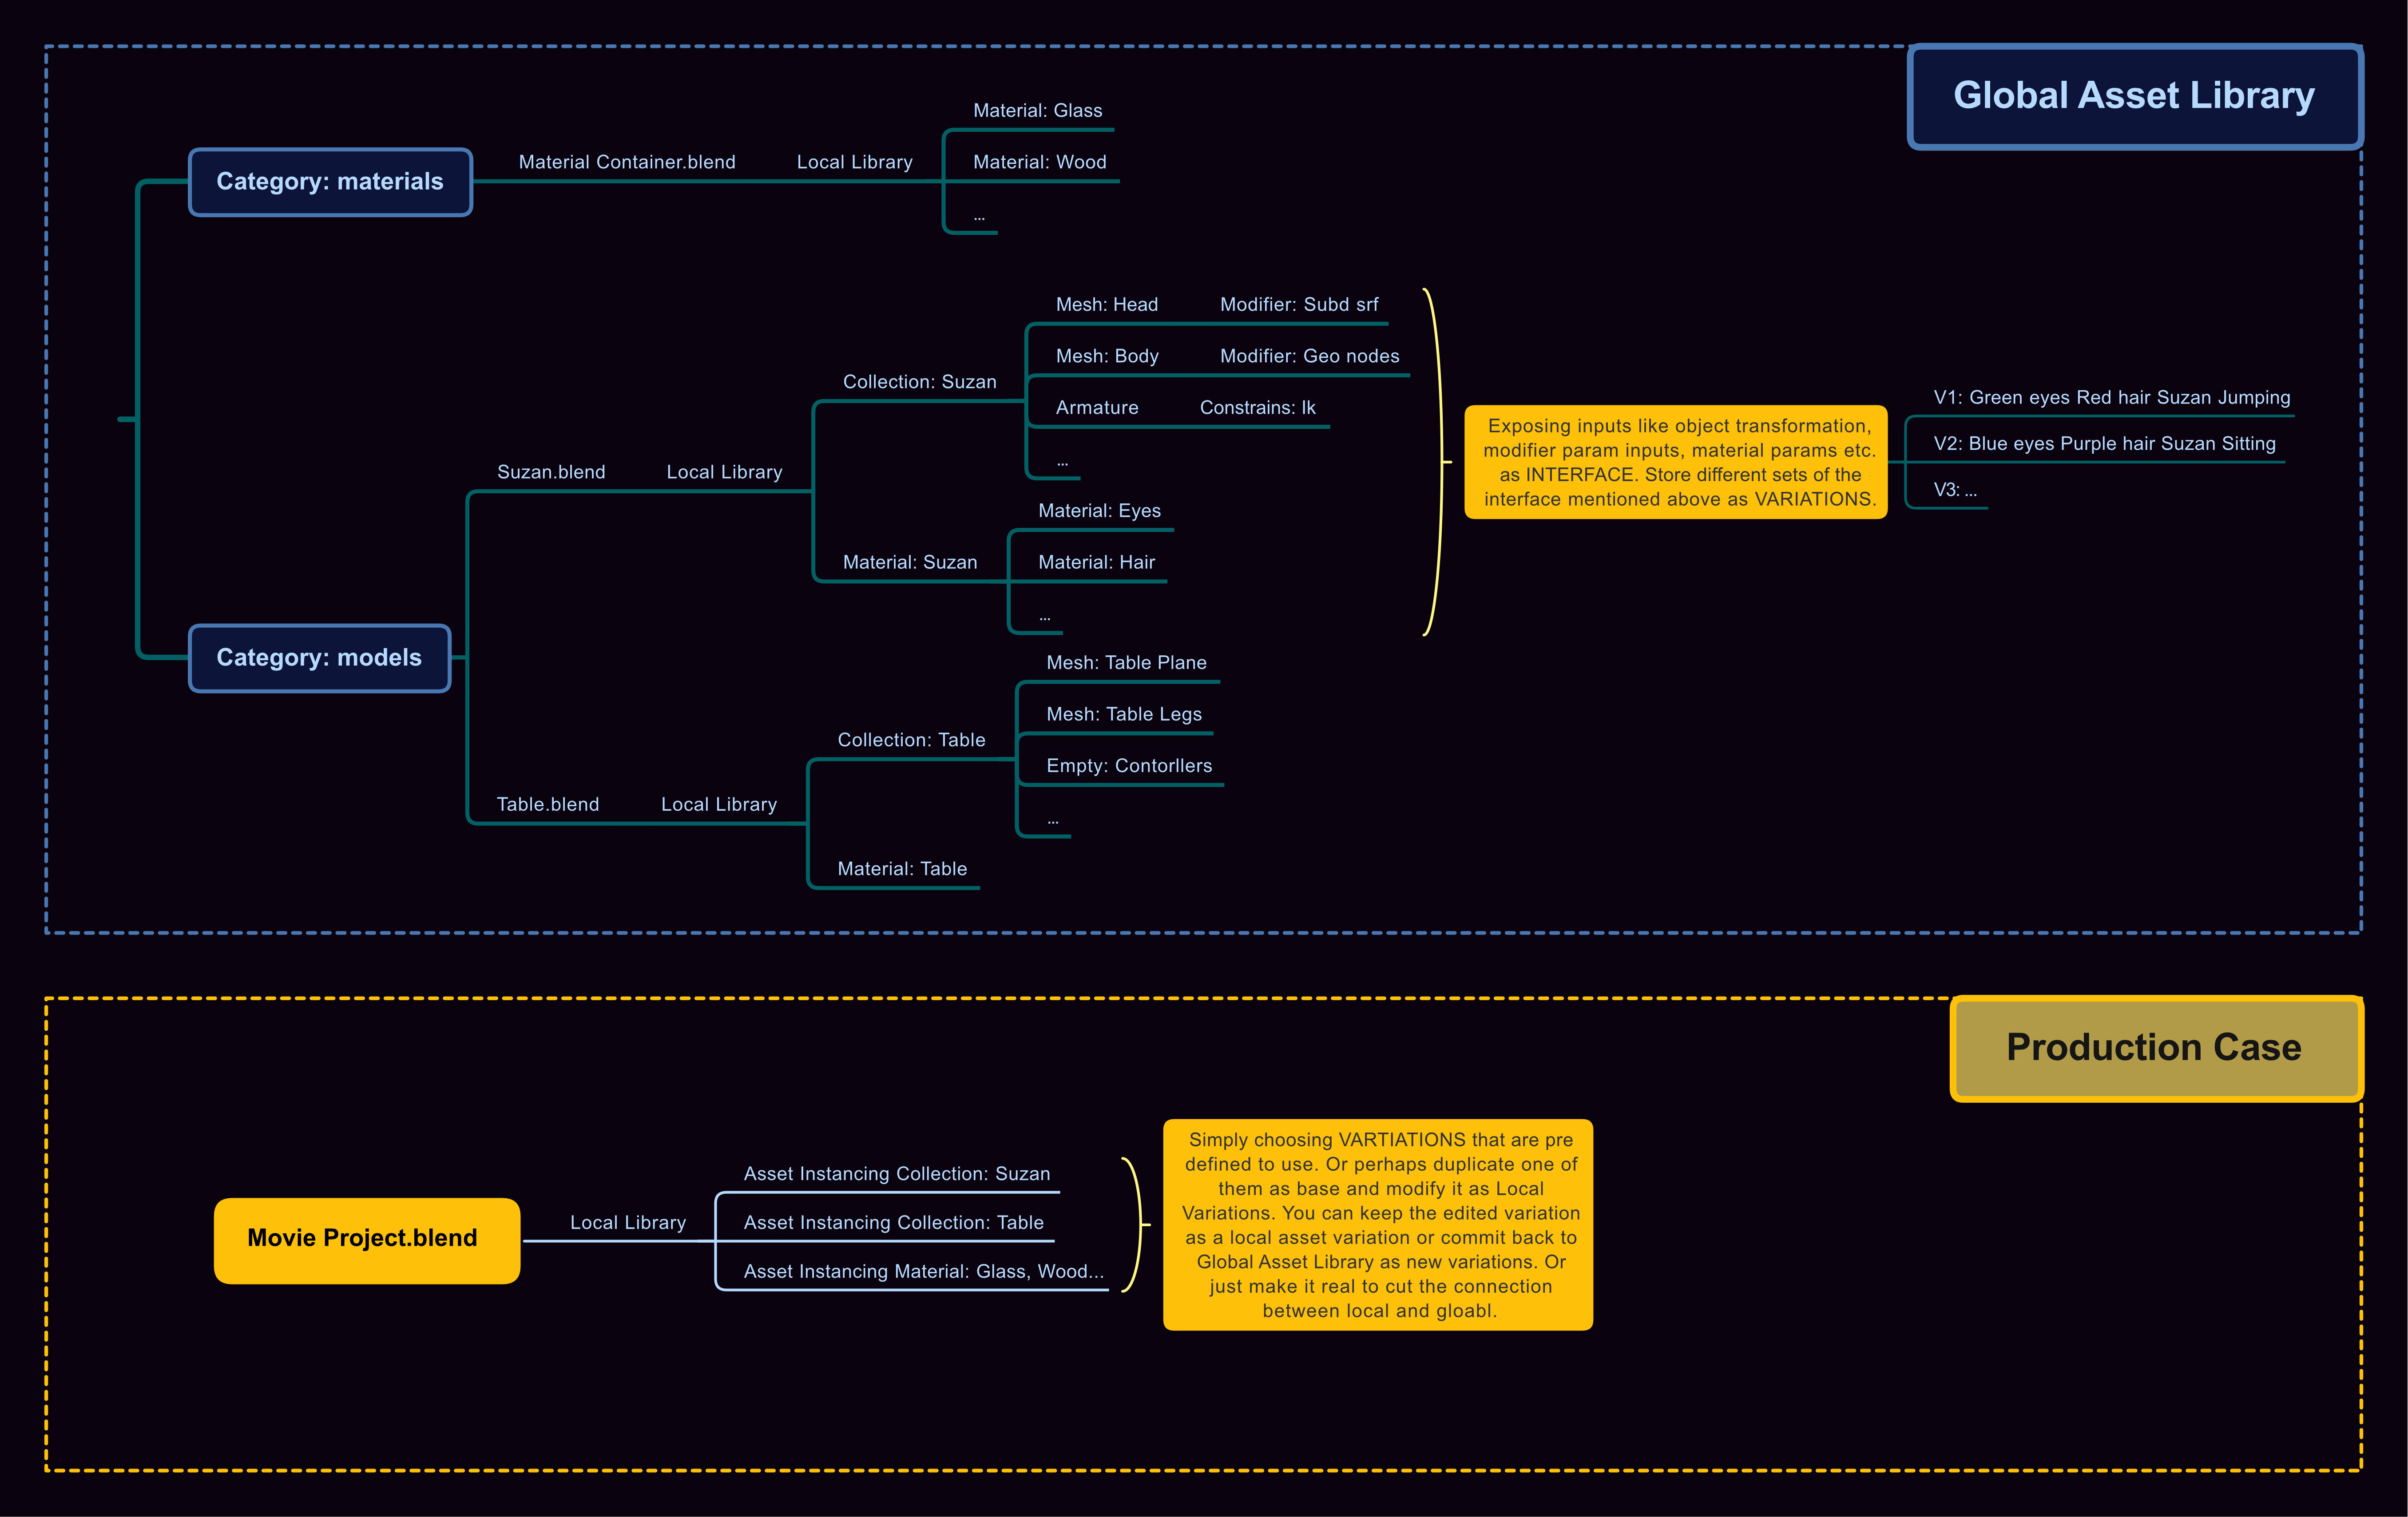
STRUCTURE
Here is an instruction of the structure described above. Nothing more to be explained.
OTHERS
Surely, considerably amount of situations I didn’t get covered. However, the rests are more or less similar and can be deduced from this. More attentions should be drawn to deal with linking chain problems and circular linking hell etc. What’s more, I have a dream that one day we could have a common purpose node editor that could also be used to define, manage and consume assets.