EDIT:
Now that Blender 3.5 has been released I want to use this thread as an opportunity for users to post their feedback on the workflow and issues/potential improvements they run into. Keep in mind: Bugs should still just be reported and tracked on projects.blender.org
Original post:
Blender 3.5 will include a set of node-group assets to empower the workflow of procedural hair using Geometry Nodes and the new hair grooming tools in Blender. For the past weeks I have been working on this package alongside the geonodes team. It’s still heavily WIP but the main building blocks and logic are there, so at this point it would be useful to get more feedback. But be aware that lots of the aspects are still subject to change.
The long-term target is to replace the old hair system with something more powerful and flexible. However, for 3.5 this will not yet be the case due to other missing aspects, like simulation. So the short-term goal of this bundle is to give a solid foundation of procedural hair tools for an out-of-the-box experience in Blender.
Deadline for user-facing features (anything except performance tweaks) is the transition to bcon3 on February 15th.
The idea is also with these node packs that they can change a lot between Blender releases, as they are implemented as node-groups and will not break compatibility for files that they are used in.
Thanks to @DanielBystedt for kickstarting this bundle with an initial pass of nodes!
Things that are still changing with iterations of feedback and discussion include:
Naming of nodes
Inclusion of certain nodes
Naming of sockets
Scaling/Interpolation/Unit of inputs
Defaults of in-/outputs
Available node outputs
Underlying functionality (Minor changes)
Missing to a large part:
Node descriptions
Socket descriptions
Asset thumbnails
Node documentation
Asset tags
Catalog organisation
Performance pass to optimize for realtime workflow
node-tree cleanup and structuring for readability
Additional Notes:
The Performance Mode toggles are temporary. It should be benchmarked how big the performance and the quality impact is for the individual nodegroups. Ideally the Toggle should be removed in favor of using it at all times.
Until the attribute propagation from the spline to the point domain is fixed there are some workarounds in the node-trees with some minor performance impact.
The symmetric hair shape as suggested by @DanielBystedt is currently only possible to achieve with Cycles and not with Eevee/Workbench due to the missing ability of rendering curves with an arbitrary radius attribute. Therefore I’m sticking with the shape that is supported by both Eevee and Cycles for now to avoid confusion.
The high-level nodes in the pack are designed to be useable together in the modifier stack, but also in the node-tree directly. Because of this, some of the inputs may be rendered redundant, depending on other inputs that are being used. This will hopefully be possible to avoid in the future, when users can define a more dynamic interface with nodegroups. But as I am locked to the same feature set as any other user with creating these node-groups that I settled with this as an acceptable trade-off.
The shape input gives general control over this. However, when the shape is set to 0, that means that this influence is constant along the curve and then the factor input can be used to achieve exactly that. As we don’t have the ability (yet) to expose a curve in the node directly this will work only in the node version of this function. But there will be an operator that allows you to promote a modifier to a node-group while keeping the inputs intact. That will allow you to use a node system to drive all of the inputs.
Firstly, thank you for all your hard work on these. I’m sure a lot of people are looking forward to the new groom system, and it’s looking great.
I got a couple UX related questions -
Are there plans regarding the modifier stack? With many nodes there can be a lot of clutter, constantly having to expand, collapse and scroll in that list may be time consuming.
If I would want to work with maps (use a noise texture as a mask for a clump for example) - is the expectation to go into the geo node editor and connect the node manually?
I’ve been only giving it a quick try and the first thing I wanted to do is throw on a couple nodes onto an existing groom. How do I do that?
It would be great to add the selection flashing thing when changing meshes in sculpt mode using alt-q
Is there an example that would mimic a guide workflow? Like conciously placed guide hairs, not random picks. Currently when changing density on the distribution the hair shape changes constantly, which is probably not preferred.
Are there plans regarding the modifier stack? With many nodes there can be a lot of clutter, constantly having to expand, collapse and scroll in that list may be time consuming.
Yes, I agree. Using the node-editor and cherry picking inputs to control in the modifier UI would be an option. There are general plans to improve the modifier/node UI with subpanels and flexibly hiding redundant inputs. But that will only be some time in the future.
If I would want to work with maps (use a noise texture as a mask for a clump for example) - is the expectation to go into the geo node editor and connect the node manually?
Yes. That would be the expected workflow. Generally I kept an emphasis of keeping large parts of the functionality exposed in the modifier UI directly, but the node-tree is really the main interface for these nodes.
I’ve been only giving it a quick try and the first thing I wanted to do is throw on a couple nodes onto an existing groom. How do I do that?
Adding the nodegroups as modifiers is indeed right now a bit tedious. But there is a patch already to allow drag and drop into the viewport. That patch has been approved today afaik and should be merged any day now.
It would be great to add the selection flashing thing when changing meshes in sculpt mode using alt-q
I’m not sure what that means tbh
Is there an example that would mimic a guide workflow? Like conciously placed guide hairs, not random picks. Currently when changing density on the distribution the hair shape changes constantly, which is probably not preferred.
Hm, I see the issue here. Unfortunately in favor of being able to propagate arbitrary attributes from the surface mesh I had to remove the original guides from the curves and promote the closest new curve to be guide. That results in some inaccuracy and also these jumps, as a different curve receives the guide status with a different ID for the randomization of its shape.
I’ll try to think of a more stable approach that would still be acceptable…
In sculpt mode when switching meshes using alt-q we get a bright flash -
I’d be great to get similar visual feedback in curve sculpt mode, because currently while switching works, one can only guess which groom is being sculpted on unless interacting with it using a tool.
I’m trying to think of more complex scenarios like the bear in Revenant, Planet of the apes, Lion king etc. the complexity would be pretty big. While 10 node groups can be worked with, 100 node groups might be an issue, without the ability to organize and group them in the UI.
Quickly accessing masks, painting them or modifying their values could be time consuming as well, if we’re relying on doing that in the node editor.
I guess for a lot of people doing groom matches, working with guides would be essential. Placing them consciously, visualizing them in the viewport, selecting or grouping one or several of them is something that would happen quite frequently.
I see, I wasn’t even aware this operator also already worked for curve sculpting tbh. It sounds reasonable to me to add this there as well. Not sure if this a bug report or a feature request. I can make a note and bring it up.
For more complex scenarios the intention is to leverage the node-editor more and more. It’s reasonable to try and keep the modifier interface nice and clean, but for the proper flexibility the node-tree is the ultimate way to go. Of course, the way things are exposed in the modifier can still be improved, but for now we have to work with what we have. This will be the first iteration of the system and it will definitely improved/expanded over the coming releases.
Oh yea, a guide workflow like that is definitely the intention. There is a patch to have an overlay of the guide geometry in sculpt mode that will make it easier to select and sculpt guides.
I just pushed an update to the file that makes the guide ID stable and ensures that a generated new guide curve matches the original guide exactly. So the jumping around shouldn’t happen anymore.
The guide workflow is also more powerful in the node-tree version, but for the use in the modifier stack this is from my testing the best way moving forward.
I understand. Sounds feasible. I do prefer working with nodes, but it’s also super easy to break stuff. In most pipelines there’s often the issue of flexibility - I call it an issue because everyone does things a different way and a lot of time goes into making node networks readable and easy to use, with very mixed results. I just had a colleague talk to me about him having to untangle a katana node graph for days, this is also a recurring thing in fx/houdini or nuke.
A bit like texturing - it would be great to have a UI for groups/layers/masks as an alternative to having to dive into a node editor with all it’s complexities. In a pipeline with many people involved there will be a variety of skill sets and preferences, and the bottom line is always speed and efficiency.
Amazing work Simon! I’m really liking the new braid and curl nodes :-).
Here are some thoughts:
Smoothen curves
Pin at parameter does not seem to have any effect. The root point changes position when weight is at 1 and lock ends == False. I would assume that the root point wouldn’t move with those settings.
Clump hair curves
Unclear what guide index map means. When I change the default value -987654, the clumping disappears. Perhaps only documentation is needed?
Shrinkwrap
I’m missing a shrinkwrap node that I made a prototype for. This is useful for wet fur that sticks closely to the skin and also for pusing points out that ended up under the surface.
I see your point. I think this is something that will also crystalize more as people are using the system and maybe a node-tree abstraction as is planned for the texture nodes can also be applied here. But overall, I think, a safe bet is just continuing with what we are planning anyways, which is to expand the node-tree capabilities with a simplified modifier UI and making it more powerful and structured with more options for a better UX (like subpanels, enums, dynamic socket type and number)
That input is intended for use in the node version only to pass in an explicit guide map from previous nodes. We were going back and forth a bit on how we want to handle sockets that only make sense in the node and not in the modifier, but eventually this input will not be visible in the modifier. There is a patch afaik.
The node I made in replacement is called Hair Surface Collision, I didn’t realize your use-cases went beyond pushing points outside of a mesh. I can add a toggle to affect points outside of the mesh as well. I guess the naming might need to be revisited then.
I’m sure once textures are overhauled we’ll be able to expose texture sockets to geonodes modifiers. Having to dig into the node tree to add a mask is a pretty big hurdle for anyone not familiar with geonodes, and as always we can’t expect everybody to be.
@DanielBystedt The pinning for the smooth node should be fixed and I added a Shrink to Surface parameter to the collision node. To me the name would still be okay, but maybe we’ll rename it.
Well, with subpanels, dynamic sockets and texture inputs everyone could basically build their own little panel for their nodes, so I guess that could work just as well. I was hoping that template lists could get some love (like the outliner got a while ago) to at least have multi select and hierarchies, but if a node workflow is the main direction then it’s perfectly understandable to focus on that.
I found a little bug of sorts in the test scene. When adjusting the profile it’s having some issues with decimals (0.01 works, 0.1 gives us 10, and 1 gives us 1 but a much larger radius than there was originally with 1)
I looked at the node graph and saw that the radius is a multiplying the shape, which makes sense, but didn’t want to spend all that time untangling the math in the shape range group - you’ll probably know what to do right off the bat.
For consistency, I think every example groom should have Hair Shape and Distribution exposed. Currently not all do, and the naming is different for them, on some of them.
Also, some brushes work great, others change the whole groom (I guess the ones that are either changing the root positions or the number of points) which is something that would need to be avoided if possible -
It’s a super fun scene to play around with though, and I’m sure it’ll want people to jump right into the node graph and do their own things. Thanks again for working on this, great stuff!
And a quick suggestion on the side - I think it’d be great for these things to get some more exposure. Not sure who’s in charge of social media, but it’s not every day that one can test the new hair system and give some feedback. There are not a lot of users visiting devtalk since it’s generally not the place for user feedback.
I’m actually not sure what is unexpected here. Hair with 1m thickness will look a bit ridiculous in any case…
Aah, I see the confusion. The units are set to adaptive in the scene settings. The displayed value will round to the nearest sensible unit. The values you are typing in are in meters, so typing 0.01m = 1 cm, 0.1m = 10cm and so on. You can change how these values are displayed/switch to imperial units in the scene settings.
That’s something we’ll just have to deal with for the time being, I’m afraid. I put quite some effort into trying to keep things as stable as possible, but at the end of the day these are procedural operations that will give a different result for different inputs. There are some things that could be improved on the Blender side. For example there could be an ID per curve that is managed by the sculpting tools.
Maybe we can push for that for 3.6, but depending on the exact use-case there will always be something that is not perfectly stable for certain operations with the procedural generation.
Keep in mind also that this new hair system also allows for a flexible destructive workflow. You can always apply any amount of modifiers and sculpt on the result for exact control.
Thanks for the kind words and thanks for your extensive feedback, it’s much appreciated! The scene itself is only my WIP testing setup, we’ll have an example scene in a similar style (but hopefully much nicer) up on b.org for the actual release.
This is something that is a little bit due to the timeline. Unfortunately the state is still very much unfinished while it needs to be merged in the coming days to make it in time (but it’s getting there). So extensive iteration with lots of user feedback is at this point not really possible on top of what is left to be done regardless, I’m afraid.
The good thing as that these nodes can potentially change a lot between releases, as there are no compatibility issues with them. I’m sure we will get a lot of feedback down the road with the release. So far we have gotten very useful feedback from some powerusers close to the Blender development, so I’m quite confident that the bundle will be in a useful state either way. Replacing the old system entirely will also not be done with 3.5 regardless, so getting a solid fundamental system that we can iterate over seems to be a good way to go for now.
That looks rough, for the moment.
Examples with disabled or unnamed modifiers, muted connections is confusing.
Tags and Catalogs should be used in asset browser, to distinguish nodetrees generating curves from nodetrees displacing them, from nodegroups for Curves info, from materials for shading (currently all Curves objects have same hair material).
Examples dispatched into collections is not sufficient to clarify things.
Subpanels to quickly find redundant settings (subdivisions, viewport amount, shape, length, distance) is really a must-have to manage density of geometry, generated in viewport, and avoid a crash, or simply to harmonize shape through several modifiers.
Examples with textures or painted attributes should be present.
In absence of an edit mode to create guide groups, ability to paint a mask is really a must-have, too.
I think that an example involving several Curves objects for one haircut would be welcomed.
Subdividing and smoothing through nodes can not be as satisfying as being able to control resolution of guides, per curve or per object.
We have a limited control on placement of waves on long hair by that restriction in sculpt mode.
We have a very complicated control of that with nodes. We need to isolate long curves, to resample them and have to deal with a complicated setup if we want variations along curve.
That is very frustrating to be able to draw any simple Curve object geometry.
But not be able to exploit it with Curves object.
Your node groups are great. But that makes lack of base geometry control more frustrating.
A lot of the things you are giving feedback on are besides the point of this file. I listed in the initial post what aspects of the nodes are still missing/changing (e.g. tags and catalogs) and the file itself is just the WIP testing file, nothing to be bundled/released.
This upcoming release can not yet possibly aim at replacing the old curve or hair system entirely. A lot more will be possible once all the missing features from either system are merged to new Curves object. On top of that better/more options to customize node/modifier UI are planned.
But afaict none of that can be addressed by an asset pack which this is.
In UI improvements are not for next release, to me, that looks pre-matured to think about such bundle for upcoming release.
Updated version would be requested for 3.6, anyways.
I would never do such an awful thing. That does explain the behavior though - what was confusing is that it was set to 1 by default, and changing it to the same value gave me a different result.
That’s why it’s important for guides to not be procedurally generated I think. What I can see in production very often (literally with every digi double) is that groom artists get a 3D scan of an actor and have to match the groom to both that and the photogrammetry camera images. That’s only possible with making every clump by hand. Well mostly, but the recurring comment in dailies will be “match that clump in the upper left”, “that other strand is sticking out too much”, etc. A glimpse of what groomers have to deal with can be seen in this tutorial teaser for example. Not advertising anything, just wanted to show an example for the photo matching that’s part of a common workflow.
Even with creatures, more often than not it’s either matching a specific photo or a concept (which was most of the time made using photobashing for furry creatures). Supes will literally put one over the other and switch between them until they get a close match. So if people can’t freeze/mask what they’re happy with they’re probably not going to use it.
That’s for VFX production. Since A/Bing has gained a lot of ground when it comes to supervision I’d imagine AAA gaming would be similar.
More people using it is always good. I think most people understand the time constraints and can set their expectation accordingly. What’s important is seeing how it’s used, what the most requested blockers are and how/if people get around limitations.
Well, thank you for all your hard work! A lot of people are looking forward to this, and since there are no great grooming tools publicly available there’s some real opportunity here.
I am agree with most whar @dan2 wrote.
It would be very nice to have more stable generation, maybe not for 3.5 if it is not possible, but for future relizes for sure .
And ability to chose painted texture masks in modifier for usability.
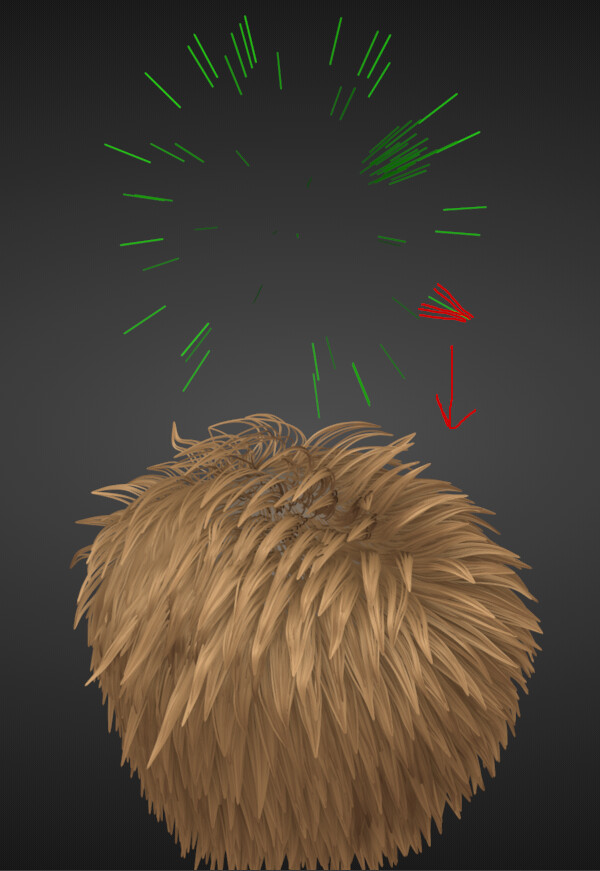
It would be Amazing to have the ability to generate clumps guide picking from other hair Curves Object.So you can manually change density of clumps and where they will be.(it doesn’t matter how they look, we take only position of hair roots from it to generate clump). So radius of the clump (distance between clumps) and their place always will be where you want. Maybe picture will help you get what I mean.( I moved green hairs Curves object (that will be used to generate clumps) upper so you see it better)