Making an Add-on for Precision Drawing Tools (CAD)

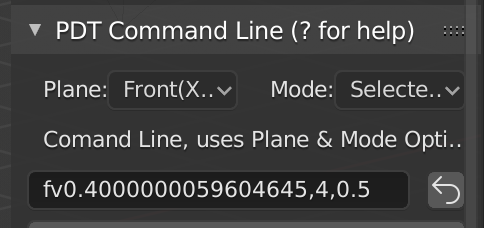
Yep, can confirm. Looks like all VectorProperty types are missing out :frowning:
Iā€™d almost file a bug report, if it didnā€™t look like a feature request.

Something else, although I guess this is stretching things a bit. The method is similar, but instead of alert, you can, heh, set a keyframe for one second. (Works for VectorProperty types)

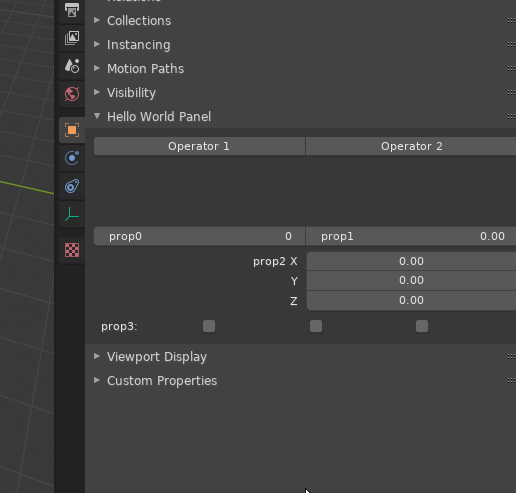
If the key is on current frame, it shows yellow. If itā€™s on a different, it shows green.

keys

import bpy

class OBJECT_PT_hello(bpy.types.Panel):
    bl_label = "Hello World Panel"
    bl_space_type = 'PROPERTIES'
    bl_region_type = 'WINDOW'
    bl_context = "object"

    def draw(self, context):
        layout = self.layout
        
        row = layout.row(align=True)
        op1 = row.operator("object.dummy", text="Operator 1")
        op2 = row.operator("object.dummy", text="Operator 2")
        
        # Set which ui group to alert on hover
        op1.ui_group = 0
        op2.ui_group = 1

        layout.separator(factor=10)
        col = layout.column()
        row = col.row(align=True)

        # Each property needs its own sub-layout
        # This way, alert works per property
        
        row = row.row(align=True)
        row.prop(context.scene, "prop0")

        row = row.row(align=True)
        row.prop(context.scene, "prop1")

        col = layout.column()
        col.use_property_split = True
        col.use_property_decorate = False
        col.prop(context.scene, "prop2")
        row = layout.row()
        row.prop(context.scene, "prop3")

# Runs when operator's tooltip is triggered
def highlight(ui_group):

    # Define ui groups for each property
    groups = {
        0: ["prop0", "prop3"],
        1: ["prop1", "prop2"]
    }

    screen = bpy.context.screen

    def redraw():
        for a in screen.areas:
            if a.type == 'PROPERTIES':
                a.tag_redraw()

    def set_false():
        for prop in groups[ui_group]:
            scene.keyframe_delete(prop, frame=frame)
        redraw()

    # Set highlight
    scene = bpy.context.scene
    frame = scene.frame_current + ui_group
    for prop in groups[ui_group]:
        scene.keyframe_insert(prop, frame=frame)
    redraw()

    # Register a timer to turn off highlight
    bpy.app.timers.register(set_false, first_interval=1.0)
    

class OBJECT_OT_dummy(bpy.types.Operator):
    bl_idname = "object.dummy"
    bl_label = "Dummy Operator"
    bl_options = {'REGISTER', 'UNDO'}
    bl_description = "Operator Tooltip"

    ui_group: bpy.props.IntProperty(options={'HIDDEN'})

    def execute(self, context):
        return {'FINISHED'}

    # Operator ui tooltip callback
    @classmethod
    def description(cls, context, self):

        highlight(self.ui_group)
        return cls.bl_description


classes = (OBJECT_OT_dummy, OBJECT_PT_hello)

if __name__ == "__main__":
    for cls in classes:
        bpy.utils.register_class(cls)
    bpy.types.Scene.prop0 = bpy.props.IntProperty()
    bpy.types.Scene.prop1 = bpy.props.FloatProperty()
    bpy.types.Scene.prop2 = bpy.props.FloatVectorProperty(size=3, subtype="XYZ")
    bpy.types.Scene.prop3 = bpy.props.BoolVectorProperty(size=3)
4 Likes

To be honest, I am not convinced this is a good idea, it is a lot of code to maintain in order to highlight associated menu items, when they are explained in the Wiki and I can find no other part of Blender, or any other add-on that does this.

Is this something many people want?

Re-arranging the menu when its width is shrunk does make sense however and is not so much code.

Cheers, Clock.

2 Likes

This way of highlighting associated options, while clever, looks like a huuuge hack to me.

I like the re-flow functionality enough that I wonā€™t mind if itā€™s included, as long as it is made as simple to use and maintain as possible from a code perspective.

Keep in mind that the reason we have the PDT Design UI panel in the first place is that we havenā€™t found a good way to piggyback on the existing UI yet.

It is entirely possible that re-using the Transform (Move/Rotate/Scale) widget but adding some select functionality to it could be the way to go.

It is also possible that itā€™d be nicer to use a Pie menu where selecting an Operation (e.g Move Cursor) gives you the option of using Absolute/Delta/Direction placement and once youā€™ve selected one of those placement types, a box with the appropriate input fields appears.

Who knows, maybe the Pie menu concept could even be combined with Transform widget usage as appropriate for certain operations.

This would certainly cut down on the button box explosion and make it intuitively obvious which options and inputs belong to which Operation.

Just my ā‚¬0.02

5 Likes

Definitely not something Iā€™d personally want for a trunk addon. Was a nice experiment either way :stuck_out_tongue:

4 Likes

Perhaps I owe it to you to mention that sharing your code was very kind of you. Thank You!

All Iā€™m saying is that the UI we have now is not the product of a thorough product design analysis, but rather is the product of basic ā€œprogrammer artā€ which we have then attempted to slightly improve ā€“ from ā€œhorrendousā€ to ā€œrather terribleā€ one might say?

Iā€™ve tasked @clockmender with writing up a basic design spec to help clearly specify which options and inputs apply where. This should help allow us to work on a slightly less, erhm, ā€œintimidatingā€ UI/UX concept ā€“ or so I hope!

7 Likes

This document, in its unfinished state, is now on the Wiki. I need to add all the PDT Areas, but it is a start. Also there is the latest menus, which hopefully have progressed beyond ā€œRather Terribleā€. :rofl:

Cheers, Clock.

3 Likes

@clockmender is away on a weekend get-away, yet it appears that Mrs. C. has graciously (or is that ā€œunwiselyā€?) allowed him to bring along a computer.

Among other things, we have discussed church posters (and what not to write on them, lest one acquaint oneself with the fire and brimstone usually reserved for the worst of all sinners) ā€“ apparently, threatening to beat the cr*p out of your customers and telling them that if they donā€™t buy any items, theyā€™ll be sent home to their spouses or straight to hell (whichever is worse) is not the proper way to raise church funds at charity events. I donā€™t know about you, but I thought it was a fairly brilliant and on point marketing strategy given the target audience? Ah well, you live you learn.

We have also discussed some much-needed refactoring on the code base, aimed at ensuring that the PDT Design GUI and the PDT Command Line functionality both use the same back-end functionality. I have it on good authority that I might not be the most popular dog in the doghouse at the moment, primarily because I may or may not have been fairly strict when it comes to code quality lately.

However, the end result will hopefully end up meaning less code which is easier to read, maintain and enhance in the longer term.

Oh and v1.1.8 was relased and committed to Blender too.

Over to you Clock.

5 Likes

Feck! More explaining to doā€¦ So Mrs. C asked me to do a poster to help sell some tea-towels she had printed for her church, I only go to this church to repair things and make new things out of wood, etc. In light of this I am not particularly versed in the ways of the congregation, so I came up with this:

Some redaction has taken place in line with government practices. I thought it would work, but Mrs. C has asked me to ā€œtry againā€.

Refactoring of PDT is progressing nicely, but I am now too tired & drunk to carry on tonight. I have moved all the function code from the buttons to the command line file so no duplication of code exists there, now I just have to add the uniques of buttons code into PDT Command Line, then test it properly, then sober up (maybe I need to look at the order there) then I can post something to be tested. There will be no new functions in this process BTW.

Mr. ermo (he insists on no capitals in his name) is a very strict task master, so my code will need much revision to keep him happy with variable names, etc. Hopefully it will be easier to maintain and augment!

Cheeeeeeeeersh, Clock - hiƧ - :cocktail: :tumbler_glass:

Edit:

Here is an example of some refactoring:

    # ---------------------
    # Cursor or Pivot Point
    if operation in {"C", "P"}:
        # Absolute/Global Coordinates, or Delta/Relative Coordinates
        if mode in {"a", "d"}:
            vector_delta = vectorBuild(self, context, pg, obj, operation, values, 3)
        # Direction/Polar Coordinates
        elif mode == "i":
            vector_delta = vectorBuild(self, context, pg, obj, operation, values, 2)
        # Percent Options
        elif mode == "p":
            vector_delta = vectorBuild(self, context, pg, obj, operation, values, 1)

        if vector_delta is not None:
            moveCursorPivot(self, context, pg, obj, verts, operation,
                mode, vector_delta)
        return

This replaced about 1,5million lines of code across 1,247 py files (may be slight exaggeration hereā€¦)

4 Likes

A question on Python protocols (to resolve a discussion I have been having with my co-defendant @ermo)

Are nested if loops acceptable in Python/Blender Add-ons?

So, example: I have three main criteria for a function, therefore I use an if elif else construct.

But in say the first major criterion I have four sub-options, so I add a new if elif elif else chain to that part. Then say the first option there has three choices again, I would add a new if elif else chain, making a three deep nest. Is this the best way, or should I make a serious of un-nested if and constructs. I am keen to reduce the processing to only the necessary conditions, rather than look at every combination of conditions to see if it applies.

I hope that this drivel is decipherable!

Cheers, Clock. :laughing:

Not 100% sure what youā€™re asking, but I think it boils down to a matter of preference. personally, I use and/or, but I find it far more readable. Additionally, if it goes over one or more conditions I usually wrap everything in parens and break it up over multiple lines:

if condition_a and not condition_b and condition_c:
    # not super readable IMO.

if (condition_a
    and not condition_b
    and condition_c):
    # more readable for me, personally.
2 Likes

I also generally avoid nesting too many if/else, as I find it not readable enough.

1 Like

Sure they are ā€œacceptableā€. Are they desirable? As others say, it is a matter of taste but IMO you should prefer optimizing for the reader of your code rather than the writer. Which way is easiest to comprehend, in your opinion? If you really have nests upon nests of options, another thought might be to separate out some of the processing into separate functions that handle a cohesive set of things.

1 Like

While I may not have used those exact words, this is more or less the position I support FWIW.

1 Like

Thanks for the replies chaps! Interestingly I find code easier to read if I donā€™t have to chase through many separate functions, that might be in separate files. This can entail looking at the imports to see where the function is stored, then reading the two files in juxtaposition to see what is going on.

I agree that separate functions make sense when the code in the function is called many times, in fact that was the way I was taught to programme so many years ago, hint here that I may be seriously out of date in my methods.

We, @ermo & I, have done a lot of refactoring of the code in V1.2.0 on our GitHub, maybe someone could look at that and see if we are going in the right direction, or not. This version entailed a lot of work and I donā€™t want to do much more if I am ā€œbarking up the wrong treeā€ with the formula.

Also, what I donā€™t want to do is spend many hours refactoring the code, only to find that it is not more readable for me and therefore more difficult for me to maintain and augment. I appreciate that others will need to be able to read the code also, so this is a balancing act.

This is indeed a difficult conundrum to resolve!

Cheers, Clock.

EDIT:

In v1.2.0 we have removed most, if not all of the duplicated code from PDT Design and PDT Command Line, so that nearly everything can be done from both sub-sets without code duplication. For example; Intersecting two edges to place the cursor can either be done by setting Operation to Cursor, & clicking Intersect button, or using command line ā€œcintā€ (Cursor INTersect). This version is not complete yet BTW.

the easiest thing would just be to follow pep-8. I find that strict adherence to that standard forces me to write cleaner and more legible code.

1 Like

We certainly have tried to adhere to that, I have just the-read this guide and can find no reference to nested if loops, however, I will try to make the code as easily read as English as possible. Feel free to correct me on any errors.

We are using black and Pylint to check our code. I canā€™t guarantee absolute compliance yet as this was not the case when I started this projectā€¦ We are looking at every .py file as part of the v1.2.0 release to check for readability, code duplication and standards compliance.

Cheers, Clock. :skull_and_crossbones:

Yeah, looking again it seems that Pep-8 doesnā€™t really have any recommendations on branching logic, it would seem that linters like Pylint take the pep-8 guidelines and then add their own best practices on top, either way- itā€™s a good way to ensure youā€™re writing code that is concise and easy to follow. The default settings in pylint will warn you if there are more than 12 branches in any given function.

I find that by following the recommendations pylint is warning me about inevitably ends up saving me time down the road because a lot of time if I have a large block of branching logic and move it out to its own function Iā€™ll end up calling it again, saving me from code duplication and eventual refactors.

2 Likes

One little problem:

  • I type 0.4 into an input box on my UI.
  • I Click a command and look at what has been taken from this input box.

I see that 0.4000000059604645 has been used. Que!

In the code I add the figure as a string to a command line input, using this:

pg.command = f"fi{pg.fillet_radius},{pg.fillet_segments},{pg.fillet_profile}"

Here is the command submitted:

Screenshot 2020-01-28 at 12.28.18

Fillet Radius is the one in question here, so why does the typed value of 0.4 become 0.4000000059604645? It is worth noting that the value of 0.5 is left aloneā€¦ Very curiousā€¦ I seek enlightenment!

Cheers Clock.

This page might offer enlightenment: FloatConverter
ā€œThis page allows you to convert between the decimal representation of numbers (like ā€œ1.02ā€) and the binary format used by all modern CPUs (IEEE 754 floating point).ā€

1 Like

Thank you, so this falls under the heading of ā€œExpected Behaviour for Computersā€ hmmmmm, I will get over it in code, so at least I know why 0.4 gets FUBARED and 0.5 doesnā€™t. :laughing:

I have added a ā€œRoundingā€ setting to PDT, so you can decide how many decimal places you want to work to, and inputs will be confined within this setting. So rounding a Vector is done like this:

pg.cartesian_coords = Vector(([round(i, val_round) for i in (vector_b - vector_a)]))

With val_round being a number of decimal places to work to, just thought I would share the code that also does some vector maths, so you can either see how it is done, or tell me a much better way to do it. :wink:

Cheers, Clock. :tumbler_glass:

1 Like