Any particular reason you didn’t post either an example code snippet showcasing the feature or a link to one?
1 Like
Yes, @kaio, it would be nice if you could post the code you used to make the GIF above. Thanks! I can’t find a reference to what you have done there.
3 Likes
So, over a long period of rest and relaxation over Xmas, Ha! I came up with this:
Two things to note:
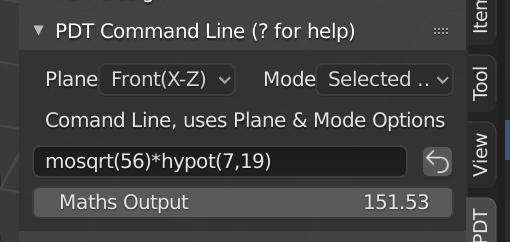
- We now have a “re-run last command line value” button by the command line input (the LoopBack icon).
- We can now output the maths calculation to the Maths Output field.
In the example shown above I entered the command mosqrt(56)*hypot(7,19) thus making the Maths Output 151.526 - to use this simply float your cursor over the box and press CMD+C (Mac), or CTRL+C (Other), then you can paste this wherever you like, no don’t tempt me… ![]()
This will be on the GitHub once I have proven to myself that it will not break anything.
Cheers, Clock. ![]()
7 Likes
Update from the Atacama Desert:

Guanaco: Happy New Year strange two-legged creatures! ![]()
Clockmender: Thanks Dinner! v1.1.8 PDT branch is now on GitHub. ![]()
5 Likes
Happy New Year all!
@clockmender, do you think the fillet function can work more like AutoCAD’s fillet? Where we can select two disconnected edges (or 2 vertices on 2 separate edges) and fillet them?
Correct me if I’m wrong, but the current implementation in PDT requires the edges to be connected and the function fails silently if separate edges are selected.
Another thing I think would be nice is if the input boxes honored blender’s scene unit setting.
Say, for example I have my scene unit set to 1, and units are in mm, I could type in 100 (for 100mm) in the radius input box instead of 0.10.
P.S. Thank you for all your hard work! Been following this since its start as an AN script!
1 Like
happy new year guys! 

2 Likes
Yes you are correct, this is what happens. So there are two solutions:
- Use the Intersect function first, then fillet the corner - not ideal as this is two operations.
- I modify PDT so it checks that the edges can be intersected, then it does this first, then makes the fillet.
We use the bpy.ops.bevel() function to make the fillets, so they must intersect and you only need select the corner vertex in the examples you have shown.
So, I could look at the edges selected, then check that they intersect in the working plane, do this, then fillet them using the intersect vertex as one operation. Let me do some experimental coding…
To Intersect, select two edges, set Operation to Move, set All Selected checkbox as below:
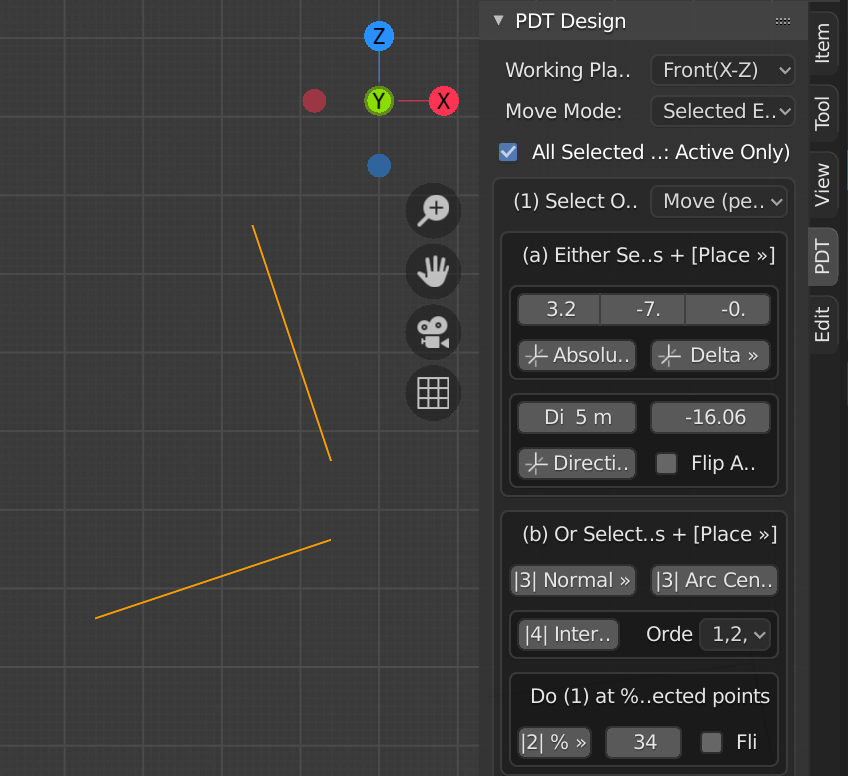
Then click Intersect button.
I will also look at the Units thing, we have tried this in the past and found some issues here, I will look back through my notes to see what they were.
Cheers, Clock.
2 Likes
Et Tu Brute ![]()
1 Like
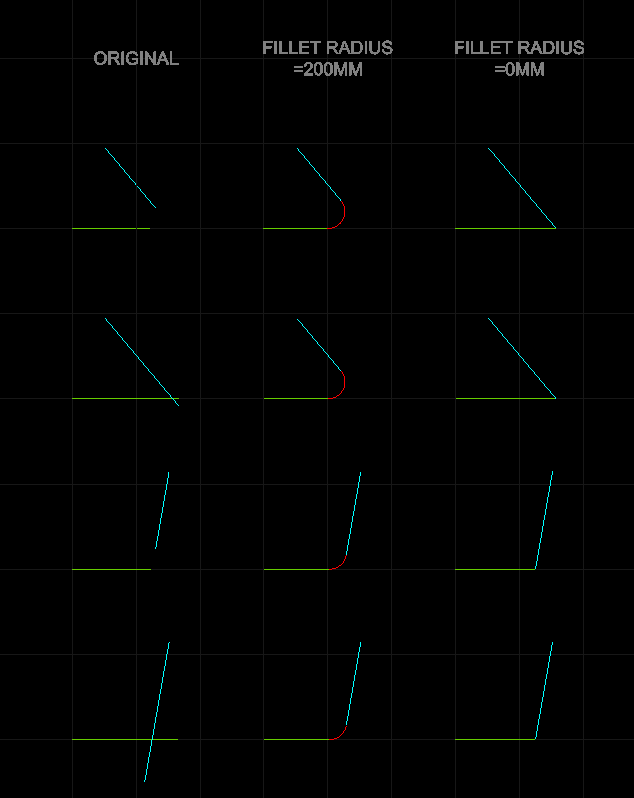
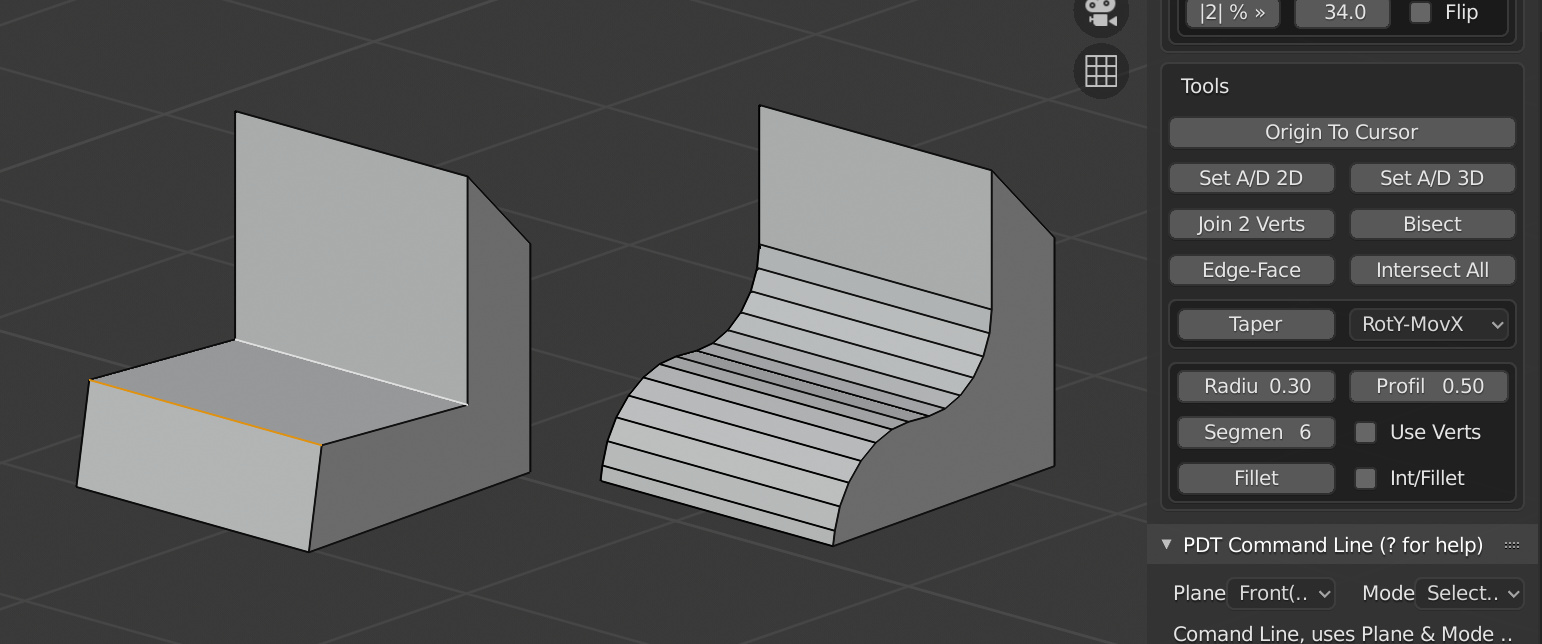
OK here is one method, the check box Int/Fillet is active, Use Verts is not used here:
You can see the originals on the left and filleted on the right, top row used 0 radius, bottom row used a value.
Or, I can do this as two buttons, which would you prefer? Let me know then I will upload this modification.
This method checks that two edges made from four vertices are selected, making sure they aren’t connected. I will look further at the method, but it seems to work OK. You can either select the edges, or the vertices BTW. The closest vertices to the intersect point are used automatically.
I am not sure it would be possible to just select the two vertices you want to intersect, I can also look into this at some point, it could be fraught with danger if the vertices are used on more than one edge…
Cheers, Clock.
PS. One issue I have in making this automatic is that if you have two edges on an extruded mesh selected, you would not want them to be intersected first, so it has to be an optional extra button, or a checkbox to force this behaviour. example below:
2 Likes
I think the checkbox would be fine, that way we can leave it on and just mash on the single fillet button rather than click two buttons every single time.
Well, in my case I wouldn’t run in to this problem because I have grown used to doing my profiles first before extruding, but that’s just me. You’re probably right, making it automatic might be asking for trouble.
1 Like
I was thinking one button to Fillet as is and another button to Intersect/Fillet, you would only click one or the other, never both.
1 Like
Oh, I see. If that’s the case I’m still with the checkbox and the original fillet button. That way it’d just be an option to the default behaviour.
IMO Having another button with the word fillet in it would be confusing.
2 Likes
I agree - hence my choice of checkbox, but it is nice to hear what others think, rather than just jumping in with my own ideas, I will upload this to my v1.1.8 branch on GitHub later today, once I am happy there are no bugs. ![]()
I’ll link it here once it’s up there…
1 Like
This back and forth between developers and users is what I love about open source development. Normal peeps like us are heard and we can watch our tiny contributions manifest in the software we love - without waiting years for a tiny papercut or a feature request.
Thank you for your hard work! 
7 Likes
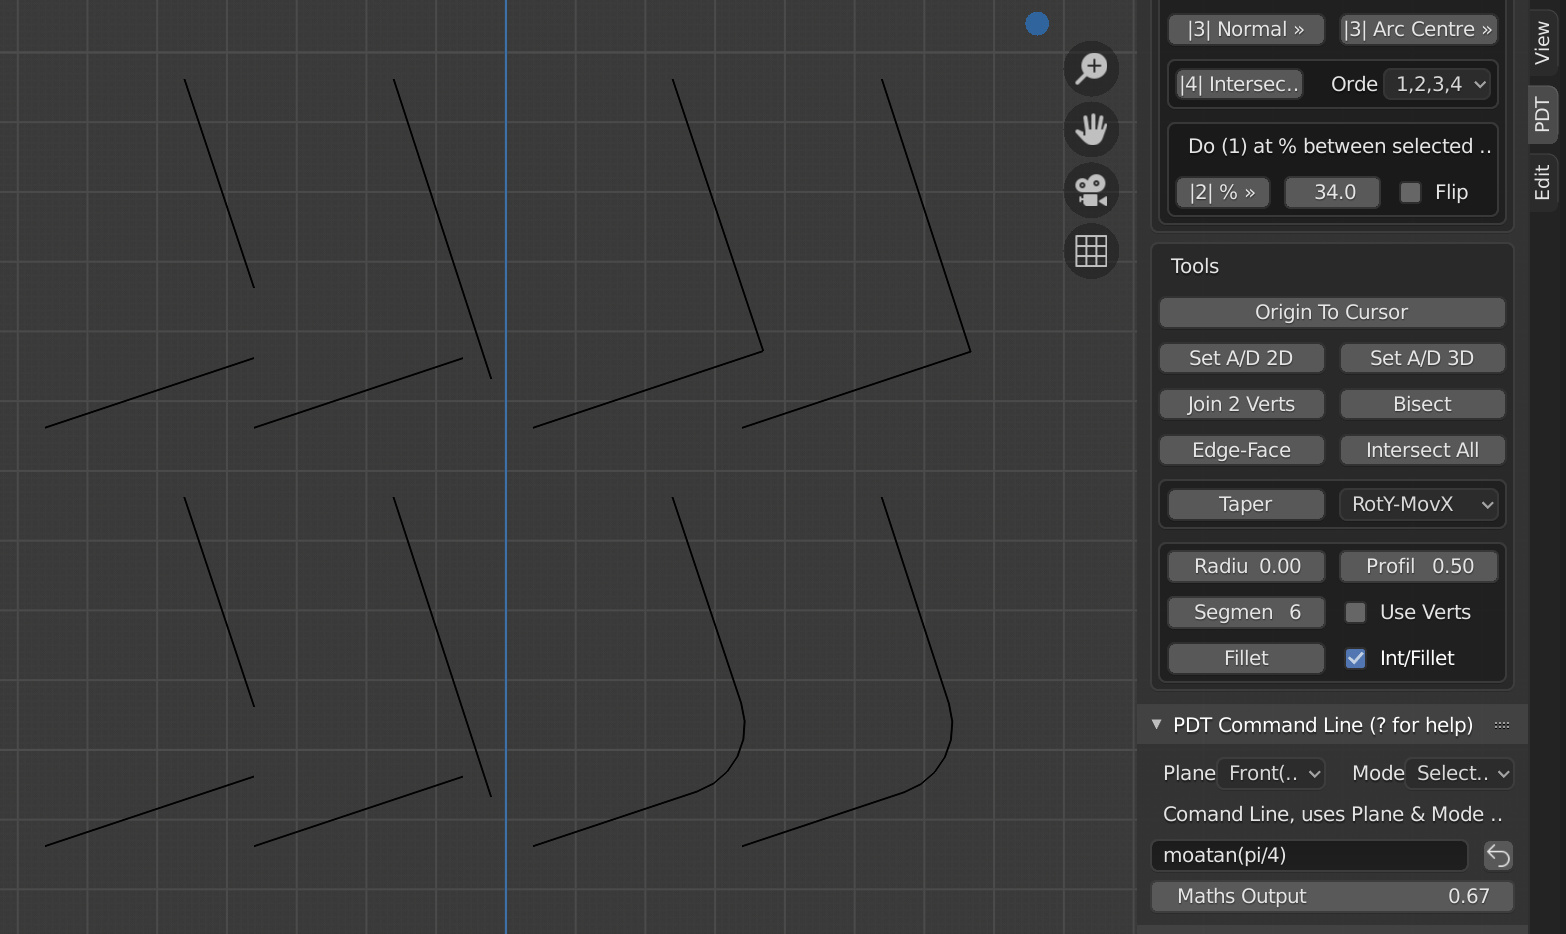
OK that is all checked and done, here is an example done with the Command Line (before on left, after on right):
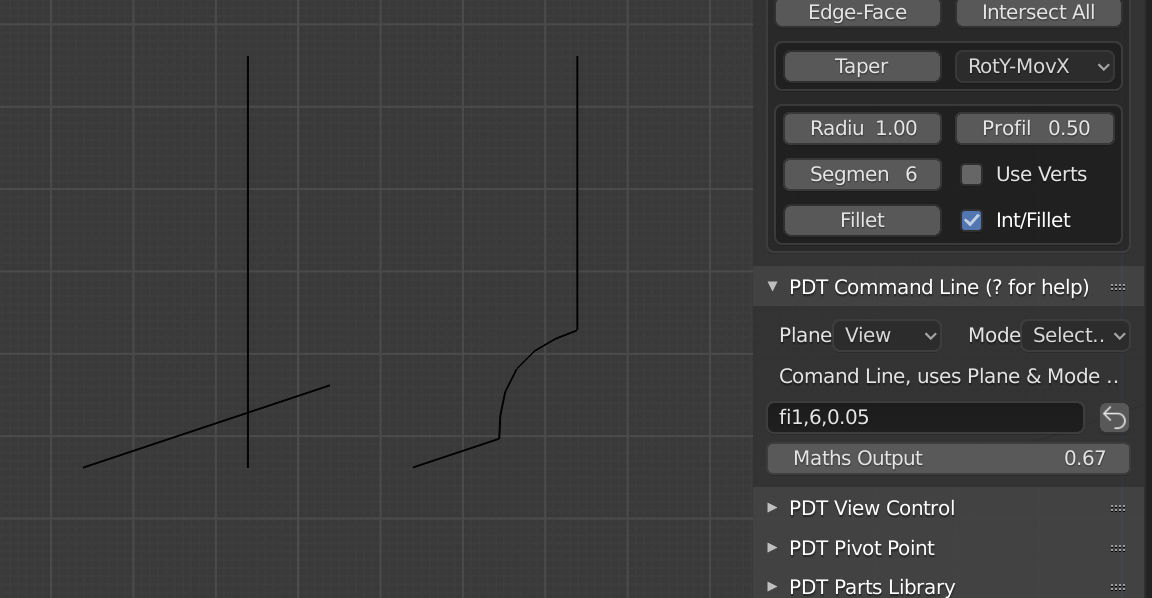
The command was fi1,6,0.05 so: Fillet, Intersect, 1m radius, 6 segments, Concave profile.
New files are now on GitHub v1.1.8 Branch, just replace those into your addons => Precision-Drawing-Tools-master folder with the new ones. We will make a new release shortly, but there may be other things to do here first.
Cheers, Clock. ![]()
![]()
PS. Feedback like from @rlamorato really helps us to drive this forward with what users want! We can’t always guarantee such a rapid response, but we will do our best. ![]()
8 Likes
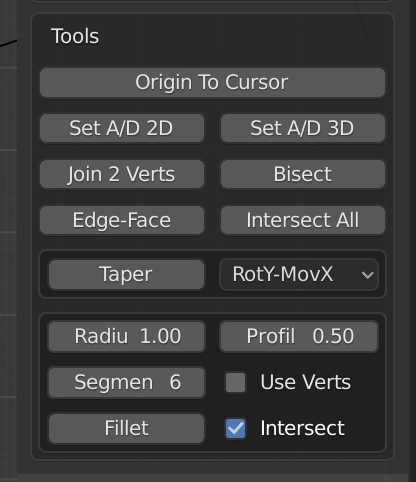
This kind of intuitive “two operations in one” could really speed up a lot of tasks!
One small thing: given that the checkbox is in the “fillet” area anyway, its text could probably just read “Intersect.” It’s nice to avoid abbreviations wherever possible in my opinion.
6 Likes
Quite happy to do that!
6 Likes
I could’ve sworn I posted the code ![]()
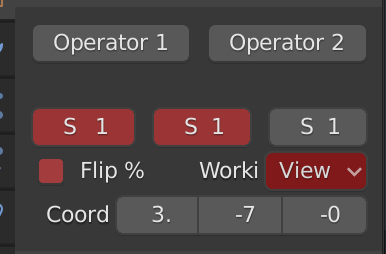
It works by storing alert states for each sub-layout that belongs to a particular ui group. When the mouse hovers over an operator, its description method is called with a predefined group parameter (set on the operator) which sets the highlight state for the corresponding group.
A particular sub-layout can be highlighted red using its alert property, and in the draw code we can control it using this state. The states themselves are stored on the class (I used a list). Each time a panel is redrawn, it gets re-instantiated, inheriting any alert state from the class itself (this is why self._ui_groups works), although __class__._ui_groups works just as well.
The description method implemented by Alexander Gavrilov allows for using a callback when an operator’s tooltip is triggered. With this it’s possible to change the states and simulate a highlight.
In the description callback (defined on the operator class) highlight() is called with a predefined ui group, which sets the initial attribute to True, and register a timer to set it to false after a second. This produces a 1 second highlight. Toggling the attribute alone doesn’t redraw the region, so I’m passing area.tag_redraw as a function since the correct context is already provided by the description callback.
As the panel gets redrawn, the attributes are checked and the sub-layouts are colored accordingly.
Some info about the new description method
https://developer.blender.org/rB9ecbd67d
https://wiki.blender.org/wiki/Reference/Release_Notes/2.81/Python_API#Operators
https://docs.blender.org/api/master/bpy.types.Operator.html#bpy.types.Operator.description
The example creates a panel in the object tab of properties editor.
import bpy

class OBJECT_PT_hello(bpy.types.Panel):
    bl_label = "Hello World Panel"
    bl_space_type = 'PROPERTIES'
    bl_region_type = 'WINDOW'
    bl_context = "object"

    # Sub-layout highlight states
    _ui_groups = [False, False]

    def draw(self, context):
        layout = self.layout
        ui_groups = self._ui_groups

        row = layout.row()
        # Set ui group to alert on hover
        row.operator("object.op", text="Operator 1").ui_group = 0
        row.operator("object.op", text="Operator 2").ui_group = 1

        layout.separator(factor=10)
        col = layout.column()

        # Each property needs its own sub-layout
        # This way, alert works per property
        row = col.row()
        row.alert = ui_groups[0]
        row.prop(context.scene, "frame_start")

        # Share highlight across multiple groups
        row = row.row()
        row.alert = ui_groups[0] or ui_groups[1]
        row.prop(context.scene, "frame_start")

        row = row.row()
        row.alert = ui_groups[1]
        row.prop(context.scene, "frame_start")


# Runs when operator's tooltip is triggered
def highlight(ui_group, redraw):
    ui_groups = OBJECT_PT_hello._ui_groups

    # Highlight
    ui_groups[ui_group] = True
    redraw()

    def set_false():
        ui_groups[ui_group] = False
        redraw()

    # Turn off highlight after 1.0 seconds
    bpy.app.timers.register(set_false, first_interval=1.0)


class OBJECT_OT_op(bpy.types.Operator):
    bl_idname = "object.op"
    bl_label = "Dummy Operator"
    bl_description = "Operator Tooltip"

    # Identifier for ui group
    ui_group: bpy.props.IntProperty(
        default=-1, options={'HIDDEN', 'SKIP_SAVE'})

    def execute(self, context):
        return {'FINISHED'}

    # Operator ui tooltip callback
    # Here just passing the redraw function and group
    @classmethod
    def description(cls, context, self):
        if self.ui_group != -1:
            redraw = context.area.tag_redraw
            highlight(self.ui_group, redraw)
        return cls.bl_description


classes = (OBJECT_OT_op, OBJECT_PT_hello)

if __name__ == "__main__":
    for cls in classes:
        bpy.utils.register_class(cls)
I guess it’s possible to use other visual queues like blinking text labels, changing the sub-layout embossing, or toggle an operator’s depress to blink blue, using the same method.
7 Likes
This doesn’t seem to work for FloatVectorProperty() items in the menu. I can get it to work on single properties, like IntProperty(), but not multi properties.
Here is the code in the menu:
col = row.column()
        col.operator("pdt.viewrot", text="Rotate Abs").ui_group = 0
        row = box.row()
        row.alert = ui_groups[0]
        row.prop(pdt_pg, "rotation_coords", text="Rotation")
        row = box.row()
        col = row.column()
        col.alert = ui_groups[1]
        col.prop(pdt_pg, "vrotangle", text="Angle")
        col = row.column()
        col.operator("pdt.viewleft", text="", icon="TRIA_LEFT").ui_group = 1
        col = row.column()
        col.operator("pdt.viewright", text="", icon="TRIA_RIGHT").ui_group = 1
The prop “rotation_coords” is an FVP. Which is a bit of a bugger as I have four FloatVectorProperties in the menu… Have I done something wrong, or is this a limitation? I can even get Labels and Operators to colour.
Cheers, Clock.
EDIT: This example works for Booleans & Enumerators also:
But not FVPs grrrrrrr ![]()
1 Like
Hmmmm, so this works:
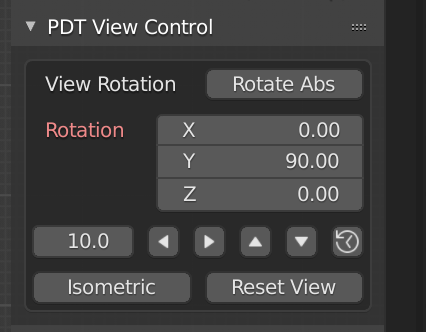
When one floats the cursor on Rotate Abs, The Rotation label glows red, I suppose this will help…
Now, as the “Deputy to the Re-Arranger of the Deckchairs on the Titanic” I have made some mods to the menu, so that when its width gets below a certain threshold (Set in PDT Add-on Preferences), it breaks the lines that are crowded with too many things, example below to compare with the image above:
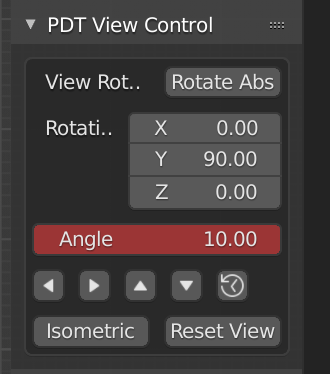
You can see Angle is now on its own line and glowing red because I floated the cursor on one of the buttons underneath. This signifies that the button in question uses Angle input. I must now do this for the other menus…
Cheers, Clock. ![]()
3 Likes