Layered Textures Design Feedback

Yes thanks, Blender supports cages but not skews I believe. If the Cycles team can support that it would be an important feature.

Hm, I would expect from a system level leaving the trim/atlas workflow up to plugins would be right approach. You want the base system to support the core functionality, not be a kitchen sink. And tiliables should come along for free (it’s already easy to do in Blender)

Smart Materials would be great addition, but I think they’re already covered by the Asset system with this. For example, if you create a Texture Node with layers (probably getting the nomenclature wrong but this is all WIP anyhow) in the Asset Browser, but with empty slots, you should be able to hook those up easily. I’m doing exactly that right now with geometry nodes.

Nice idea, but maybe fruit salad. Procedural geo (geo nodes) are orthogonal to procedural texturing (Texturing nodes) - keep them separate and the user can intermix as they wish.

On further thought, bake groups would make more sense. They would have an UI/ UX like vertex groups, UV maps, etc. That removes the need for non-texture/ shader related nodes that would otherwise add unnecessary clutter.

I got a small question, seeing as how this whole design document is in its early stages.

Since the undelaying system is as important as the UI visual design, could we perhaps expect a “Preview texture” node option ?

It would be quite crucial when making procedural textures etc. to have it visualised on a “per node” basis, like the Substance designer does.

Without it making procedural textures would be hard, at least it’s hard for me without any visualised help, i’m sure many people also feel the same :smiley:

2 Likes

Bake groups are a possibility, however you still have problem of how to indicate low/hi poly. Could just internally do a poly count but that seems like a bad idea. Also what if you have three more more items in your bake group, what then? They also lose all sense of hierarchy, it’s useful - even if just for the artist, to see “this piece is a part of that piece”. Finally, since collections are ‘groups of objects and other collections’, having a bake group is redundant with that concept, and it doesn’t help with the naming issue (you want high poly’s to have a related name to the low poly to help you sort it out. My example above makes it clear)

So it doesn’t seem like a bake group is like a vertex group very much at all.

Yes, naturally a preview texture node, or if you adopt the idea I spell out above, thumbnails as part of your nodes would solve it better (hover to get a bigger popup version), since it’s built in and is always clear whether you need a bake or not

For reference here are the procedurals which we use on a regular basis

  • Blur (radius input)
  • Curves (on Albedo, Rough, Metal, etc, choose channels to adjust)
  • Gradient Map (set a gradient on a map(s) - Albedo, etc)
  • Hue/Saturation (same)
  • Invert (just invert the map)
  • Levels (kind of a gradient adjustment)
  • Sharpen (strength, radius)

For filtering the input to a following node, or level in the stack

  • Color Selection (mask out by UV island, bake ID, Object ID or Group ID)
  • Curvature (find the curves - Intensity, Contrast, edge thickness, etc)
  • Direction
  • Dirt
  • Occlusion
  • Scratch
  • Thickness

Procedural layers/nodes

  • Cellular
  • Checkered
  • Clouds
  • Gradient
  • Perlin
  • Tiles
  • Turbulence
  • Voronoi

And then for each layer, for each map control of the blending and opacity
Blending modes

  • Standard
  • Add
  • Multiply
  • Overlay
  • Screen
  • Lighten
  • Darken
  • Color Dodge
  • Color Burn
  • Linear Burn
2 Likes

For workflows the most common things we do …

First, select by a color (often UV island or Group ID, meaning you obviously need to texture the handle of a weapon differently from the stock)

  • Edge wear - everything practically gets this
  • Scratch - roughen a surface
  • Overall gradient - subtle effect but put a top down slight grad (light->dark), gives a naturalistic effect of looking slightly sun weathered. Also combined with a bottoms up grad to avoid it looking procedural
  • Stamps - Normal stamps for bolts/grooves etc is very common
  • Adjusting the strength (= contrast) of a map in a level. For example texturing plastic, grab a pebble material, only keep the normal then pulling it down to give a slightly bumpy texture. Reusing textures like this gives infinite possibilities and greatly reduces to total number of materials you need

The top steps are part of a smart material (asset browser) we drop in on every item. Then it’s a matter of adding in other materials on various placeholder nodes. e.g. base material often layered with others achieve something new (e.g. the last step - pebbles on plastic), scratch/edge mask textures to their points on the stack, and adjusting the settings/levels all over until final result is achieved.

From the blog post

Blending, masks and modifiers simultaneously affect all channels in a layer.

This isn’t sufficient except for a basic system, it needs to have per channel blending, masks and modifiers. Best to build this in initially else it’ll be an architectural problem later.

2 Likes

I would imagine the Preview’s would look like this ?

6 Likes

Yes exactly, except it should provide the capability of seeing either the node by itself with no input (e.g. what does the Blur look like by itself) or the combined effect of it as the texture data is passing through the nodes (e.g. after the blur is applied). So add a drop down triangle to declutter the interface if you don’t care to see it at all, and also add a “local | applied” toggle and you have it.

This also nicely shows you also if you need to bake because you’ll get blanks, and also aids debugging and doing this quick.

Edit: Also good to show an example of curves in that example. Instead of a Blur or Noise texture node, a curves where the curves are directly editable in the node.

I hope this is ok ?

I did add 2 buttons that split Applied/Local view of a node and a minimised option.

2 Likes

Yes something like that, looks great. For the triangle drop I was thinking of it being an option only on the image in addition to the triangle minimize all nodes have, so you can hide just the texture if you wish since it takes up so much space. But at any rate that shows the idea - thanks for doing it!

Basicly this project is just a rewrite for some part os shader editor ?

1 Like

For people who don’t need a visual aid or at certain points find that the preview windows are space consuming there should be a “Global Button” under the N-Panel that disable’s the preview in the edit viewport.

It would be a elegant solution for those that Want or don’t want previews :grinning_face_with_smiling_eyes:

4 Likes

Hm, I would expect from a system level leaving the trim/atlas workflow up to plugins would be right approach. You want the base system to support the core functionality, not be a kitchen sink. And tiliables should come along for free (it’s already easy to do in Blender)

I feel as though that part was misunderstood. The Baker should be flexible enough to set those up rather than asuming the geometry the material is applied to will be part of the bake. As I understand it the plan currently is just to have it be similar to fetching geometry data through fields which while reusable simply won’t cut it for the cases stated above.

3 Likes

I’m excited that texturing in blender will get some love but after reading this discussion I am deeply concerned. I’m really really sorry for harsh words but unfortunately, in my opinion, this is flawed design. :frowning:

Problem with this proposal is that it tries to solve multiple different things at once but in result may end up as sum of all kinds of limitations of various systems and will be extremely hard to implement and maintain.
I think further discussions doesn’t matter unless we address those two quotes:

This may sound like a great feature but in reality it’s extreme limitation that will backfire. Bakes and textures hardwired to meshes basically eliminates ‘High-poly to low-poly’ workflow and other standard workflows (Tiled textures, trimsheets, atlasses). We are talking about majority of texturing use cases in games, and significant chunk in animation/ film production.

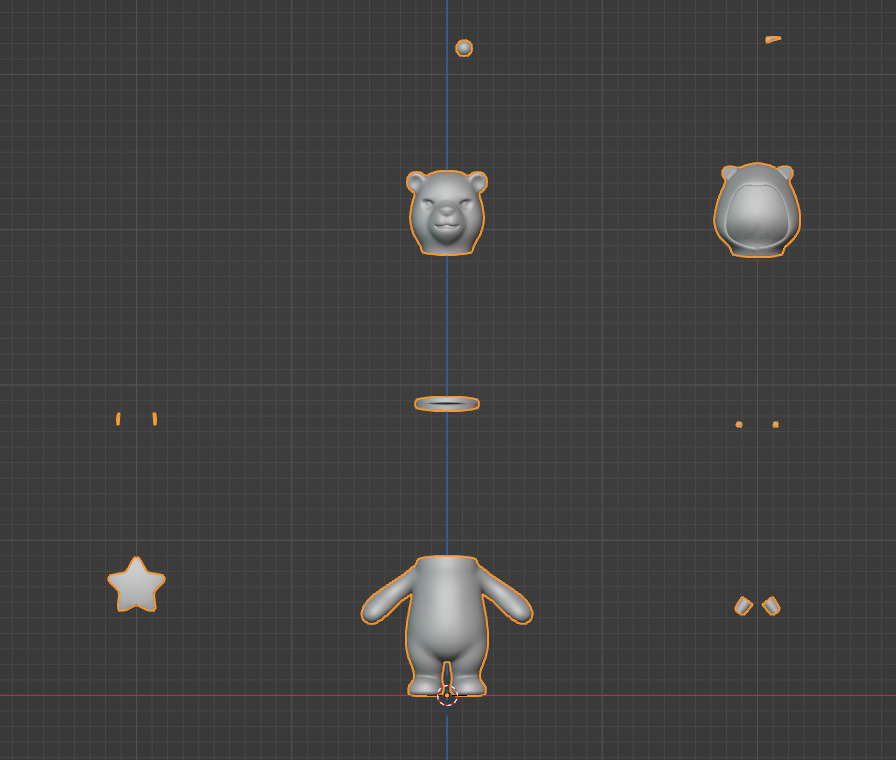
In typical ‘High-poly to low-poly’ workflow there are many variants of low-poly meshes. They share same UVs but geometry is prepared for different stages of pipeline.

In order to bake correct data maps (Normals, AO, Curvature…) we have to deal with rays overlapping on surfaces with close proximity and intersections between geo. It’s a craft, no baking system can or ever will be able to solve this automatically. We use “exploded” low poly meshes and move high poly to corresponding positions. Some programs allows to use multiple low poly meshes with names matching to high poly meshes so moving geometry is not needed. We often use cage meshes too. All those meshes to create single or few Texture Sets.

In texture authoring we arrange low poly geometry to see surfaces that are hard to reach and conveniently paint masks, select geometry etc. (Note duplicates sharing UV)

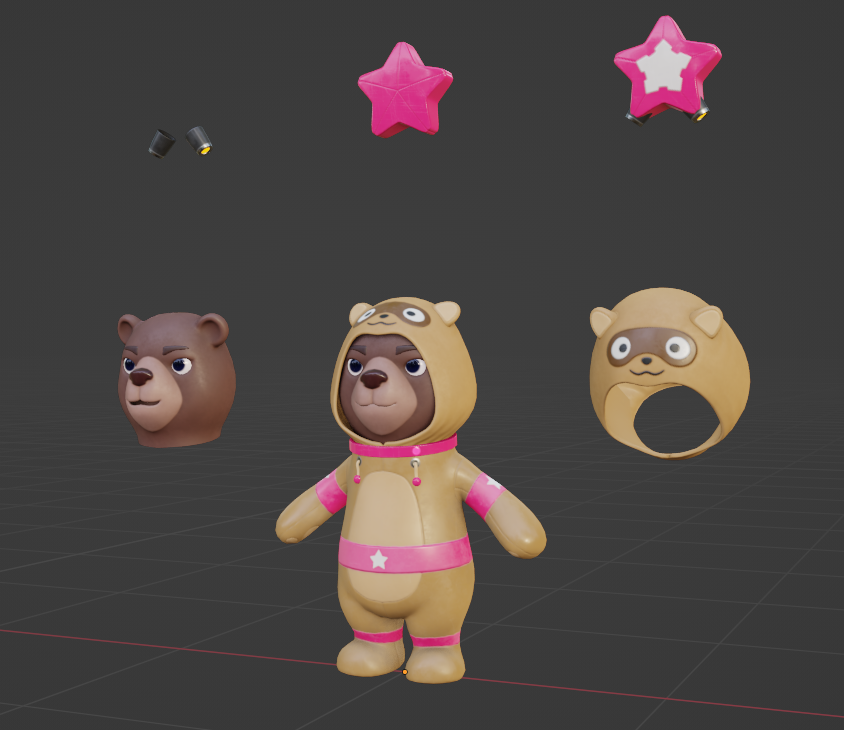
Final asset assembly may incorporate duplicating parts, geo for different shaders, additional geo with project-shared materials, detail maps applied in shaders etc etc.

Those are basics of modern texturing workflow, nothing fancy at all.
And yet none of this will be possible with proposed system if we hardwire textures to meshes.

I’m all for questioning workflows and researching novel ways but it’s not the case here. Current proposal doesn’t addresses today’s workflows (from other programs) and don’t present better alternatives.
I think we need to step back and rethink goals of this project. Layers functionality is fantastic but apart of that this system looks currently more like some kind of image cashing solution for improved rendering speed and not actual texturing toolkit.

Again, sorry for being such a downer, frustration speaks through me probably. I’ve been researching texturing application and workflows a lot in past 11 years and I’m not particularly happy with current state of them. I’d be in heaven if Blender challenged the status quo. Can I help with that?

25 Likes

I feel as though a big problem here is a lack of commitment to raster based textures. They feel like they are more treated as a caching mechanism for procedurals in this design.

If the design is focused around procedurals I also question it’s value. Why is it not just a generic function node group with expected inputs and outputs?

3 Likes

Actually I’m wondering if an “explode” node in geometry nodes would do the trick. Houdini has one, and it’s helpful for that because you can turn it on and off procedurally. That way you can send different meshes for baking.

1 Like

The thing about physically exploding locations of parts is that it is not ideal for ambient occlusion and positional baking. Its better to have certain rays pass through parts which don’t belong to a pair.

3 Likes

You can limit the exploding with selections I would imagine, so you could probably get setups that are acceptable. Or still no?

We should focus solely on figuring out how to implement “Bake by Mesh Name” as Substance Painter provides. It is fluid, accurate, clean and efficient. All it requires is that the Artist names all meshes according to the suffixes of the _low and _high meshes that start with the same name to one another. Regardless if the high poly has many merged objects/floaters,etc. That differ to that part of the low poly.

To then bake only to the low poly by matching names. No exploding has to be done. Instead it looks at the loaded mesh collections in the list of their sub-model (parts) name and bakes those that match the same. Anything it doesn’t find corresponding to the suffix, it ignores. Pretty simple.

In this case, have a system that a user can create and utilize “Collections” say there’s a character_low & character_high collection set.


Collection: “Character_Low”

  • head_low
  • helmet_low
  • radio_low
  • vest_low
  • body_low

Collection: “Character_High”

  • head_high
  • helmet_high
  • radio_high
  • vest_high
  • body_high

The user loads up the baking parameter window, or probably in this case a tab docked to the right. Selects the collections they’d like to bake. Press a check box that states “Bake by matching names” if not copying 1-1 on Substance. Select check boxes of desired map types to bake (AO, Cavity, Curvature, Position, Thickness, Normal, Bent Normal, World Normal, etc.), and press “Bake”.

This can give artists the flexibility to edit and update those collections the more they so choose to add to, or refine anything within them. Same thing can go for the suffix they so choose (_high, _h, _hp / _low, _l, _lp, etc.), as long as it matches on load to bake.

7 Likes

What about being able to save metalness map on the normal’s map blue channel? or roughness on the albedo’s alpha channel? Many game engines use this kind of textures.