Will Blender’s adaptive subdivision need some love when baking displacement in this new baking workflow?
Baking isn’t good… realtime is better for something
I really like the design, just like I imagined the system of layers in a blender, there are no complaints and suggestions. but there is a question: will a brush drawing materials and a decal brush be added? if the brush of the material is not so important in principle, then it will be very difficult without a decal brush, or an alternative solution for applying decals to the model
I’m worried that this new setup will make NPR work more difficult. It seems very good for reaching high-quality PBR shaders very quickly, but the lack of flexibility(processes broken into individual nodes) makes it harder to achieve certain stylized looks.
1 Like
Just some feedback here. I imagine the texture layers are intended to be visible in the panel on the right of the screen toggled with the “n” key (“n” panel) on the Texture Node editor window. So, with regard to the painting of the images layered into the texture data block, it would be great if the texture layers are also exposed, visible and accessible in “n” panel on the image editor rather than having menu drop downs similar to render slots or passes. Even better would be if the image editor would show or be able to visualize the layered images with a “Texture Output” option in the image drop down similar to the “Viewer Node” option but with the possibility of being able to use the painting tools in the image editor and paint on the layered image selected on the layer stack in the “n” panel. Thank you.
Adaptive subdivision would be good to improve but it’s not part of this project.
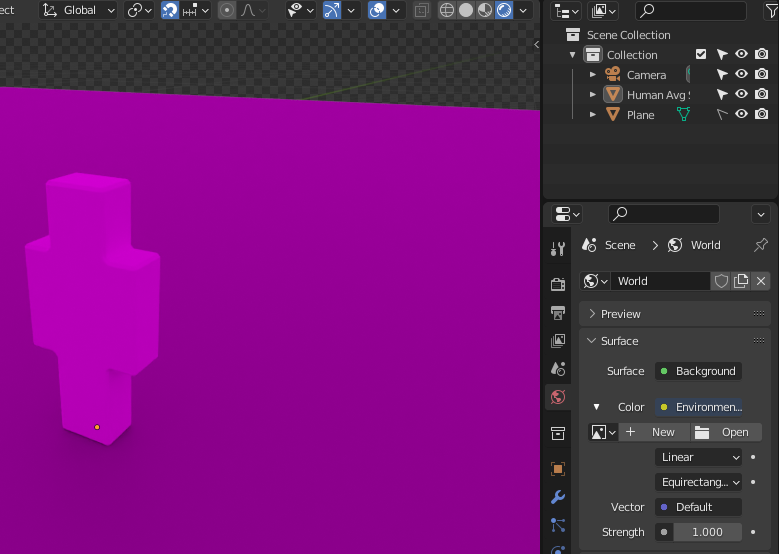
It’s not a default texture, it’s a background to show alpha transparency.
The purpose would not be to signal missing input, but to actually show the effect of e.g. blur which would not work for a flat color.
Anyway, I’m not really convinced that this feature is well defined or would be all that useful in practice, compared to other potential improvements for previews (for example a viewer node as suggested below).
Texture painting brushes and tools are not part of this design, these would be useful features but it’s not something that’s being decided on here.
This makes texturing more powerful both for PBR and NPR, for example texture nodes could have a filter for a painterly texture look that would be impossible to implement with shader nodes. It should not make NPR shading and lighting more difficult (or easier) as the shading nodes are not changing.
The proposal only talks about a layer stack in the properties editor. In the node editor you’d likely edit just nodes instead. I don’t think there would be a stack in the image editor either.
Ideally the 3D viewport and image editor should be able to display and paint the active texture node selected through either the properties editor or node editor. There is a mechanism like that now for image texture nodes and the 3D viewport, but that would need to be extended.
3 Likes
A viewer node is easy programming-wise, and solves the use case, but is more trouble because it’s yet another node to be hooked up. And then you still have to solve the same problem of what do you show if there’s no valid input, which isn’t a problem in my mind as there are plenty of candidates. Finally the ‘viewer in every node’ is already being done by the other two major DCC apps which use similar approaches, so it’s not like we’re going out on a limb here. Texturing is a repetitive series of steps that have to be done many thousands of times in a studio, everything that reduces a step or makes it a little simpler is for the best.
That’s enough, I’ll stop talking about the image node, and as an experienced texture artist just highlight the importance of this feature, and the even bigger importance of minimizing the total steps to debug and get your texture working.
3 Likes
On the Flamenco 3 RFC I put in a request to support not just rendering but modifier stack operations too. Those aren’t parallelizable but it would be very helpful to be able to farm out long modifier stack operations.
For example, for hard surface texturing work we use a stack of Subd-Remesh-CorrectiveSmooth-Decimate for a perfectly beveled and shaded hard surface high-poly. Only issue it’s it’s slow, and debugging it (e.g. making sure you’re creases are correct) takes a long time. This is a big time sink for texturing too as those meshes take a long long long time for Blender to calculate.
Anyhow if that could be part of Flamenco 3 then it would make this much easier, as you could farm out the high poly and continue working. FYI
I think the viewer in every node is important, it’s the the Local / Applied option that I’m referring to.
1 Like
Ah, understood, yes that wasn’t fleshed out. The common way to do it is something like to have a drop down list of options
- Albedo
- Roughness
- Metalness
- Normal
- Bump
- Ambient Occlusion
- Mask
- =========
- Selected Node
- Composite
So what you see is a combination of one element from above the ==== line, and one below. Typically you need to check say just how the Normal is doing, select that, then you can see the composite effect, or just the selected node by itself (if available)
For usability, if there’s enough space on the node use checkboxes so you don’t have to pull down a drop down. Abbreviated strings is fine.
1 Like
What I think is ill defined is what “the selected node by itself” means, and how useful the answer to that can really be. And my guess is, not useful enough to spend any time on given other potential features.
The ability to pick which channel to display makes sense.
Ah ha, OK, well not to belabor the point, here’s the most common use case in my experience which is texture blending. You want to have a library of base materials (metals, plastics, bricks, woods, etc) which you then blend together. Say you’re texturing a plastic toy that was burned in a fire. You’d start with plastic (bottom layer), blend in say a pebble/rock texture but just keep the normals (for a bumpy bubbled look as the middle layer) then on top layer in a grunge mask for the burned bits. And if it’s important then maybe some hand work on top of that.
If you’re not getting the result you want - say you’re not seeing bump at all, I’d check the normal map of the pebble node to make sure it’s bumpy enough. There needs to be a slider available to push that normal map if needed. The only point about seeing the node itself, is if that is available I can see how far I’m pushing the normal of the pebbles (maybe they start to distort too much - or maybe you didn’t realize the normal won’t work as it’s basically flat anyhow), while elsewhere I can see the final effect on the mesh at the same time. Just helps debugging getting your result. What distinguishes a good DCC to a less good for texturing is the speed at which you can get results, and how easy it is to debug (all this layering can be difficult sometimes to find which control you need to push to get results).
So that’s the workflow over and over. Combine materials, selecting parts from each, pushing/pulling the effect of that into the blend, plus procedurals to then blend those in with the characteristics of the mesh (e.g. find edges, curvature, etc).
So that’s the use case however the best way to address it.
1 Like
It should be possible to see the normal map preview in the node editor and the fully shaded meshes in the 3D viewport at the same time. But I’m not sure what a Local / Applied option on every node has to do with this. My understanding is that for the Local option it would replace the pebble normal map input with some default normal map, which doesn’t seem useful in this example.
Speaking of Viewer Node. I don’t see any discussion of Colour Management in the proposal. What thought has been put into the working colour space of the system and explicit colour transforms of images coming in and bakes coming out?
I tried to find the Local/Applied part in this thread and for what I understand, we are talking about “effect” nodes and what the node thumbnail preview is supposed to show if no input is plugged.
Am I correct? If that’s the case, there is probably no need of a local/applied toggle:
If a valid input is plugged, show the result of the effect node so far, if not, show a default picture that gives a hint of the effect with a clear indication that that is a placeholder, in my mockup, Text inside the icon, and an arrow that shows before and after the effect:


In this case I made the blur node and a Hue Shift node, but I can think about RGB Mix node, with a symbolic Icon (like a vortex blending 2 colors).
If I completely misunderstood, sorry ![]() I hope the mockup can still be useful!
I hope the mockup can still be useful!
3 Likes
OK, I think I don’t understand the design exactly at this point, so will wait until we have a more precise proposal of what you are thinking to comment further.
Ah here’s the difference. To me local means 'the effect of this node before application to the input. It’s the same concept as pre-fader and post-fader in audio. So you have a scratch layer, which means you take a scratch texture with controls (e.g. contrast). In the absence of an input this will result in a visible texture by itself. In applied mode, it will show the effect of it being applied to the input. It doesn’t break new ground, other DCC’s have this concept, and as mentioned in other domains like audio DAW’s.
I think one point of confusion is also between pure procedural nodes, and nodes which include a texture as my example in the previous paragraph. Some DCC’s are pure procedural, others are combination (e.g. a scratch layer starts with a scratch texture of your choice, with procedural controls). In my experience the combination approach works the best to get you the results the fastest. Pure procedural takes more work to get realistic effects (and bigger node trees!)
What do you envision here - pure procedural nodes, or nodes which are combination to one degree or another? If the latter then there’s usually a texture that comes alone with it. For the combination architecture there still are pure procedural nodes (e.g. blur), in that case it’s good to distinguish them from the other nodes, as ‘Effects’ or ‘Input Processor’ because they’re fundamentally different in that they require an input.
The system should use existing color management rules for shader evaluation and image saving + loading. That means evaluation happens in scene linear color space, and the Image datablock color space defines how to convert the colors in the file to/from that.
For saving out baked float/vector texture channels, we should be able to automatically default to the “non-color data” color space rather than the manual configuration now.
2 Likes
Ohh, now I’ve got it! So we are still talking about what we see in viewport. Ok, maybe Solo/Composite (as opposed to Local/Applied) is a valid and perhaps clearer name for the option?
1 Like
I imagined the 2D preview of the texture output (not talking about the effect default preview thumbnail) to be displayed in the image editor, so you wouldn’t need to preview anything if you didn’t need to in the nodes themselves. Also, it is a dedicated 2D viewer, with more room and better tools to inspect the output. It would also fit better in a mixed workflow that combines procedurals and hand painted layers.
For the viewer node, I was thinking it could be good to have a split output (could be two inputs in the same viewer node): One for the 2D view and one for the 3D viewport, so you could be tweaking some nodes and see them directly in the image editor( like a blue, or a slope blur), and still be outputting the final result to the 3D viewport (and viceversa)
1 Like