I had a similar issue and it seems that the most recent version now works for me as expected.
1 Like
May 19 Cycles X release works fine on me.Its 2-3 seconds even faster. I didnt notice any issues for the time being
Looks like the just released OIDN 1.4 will already gives much better detail preservation without any tweaking: https://twitter.com/attila_afra/status/1395167038465773571/photo/1
Edit: better detail when using pre-filtering
3 Likes
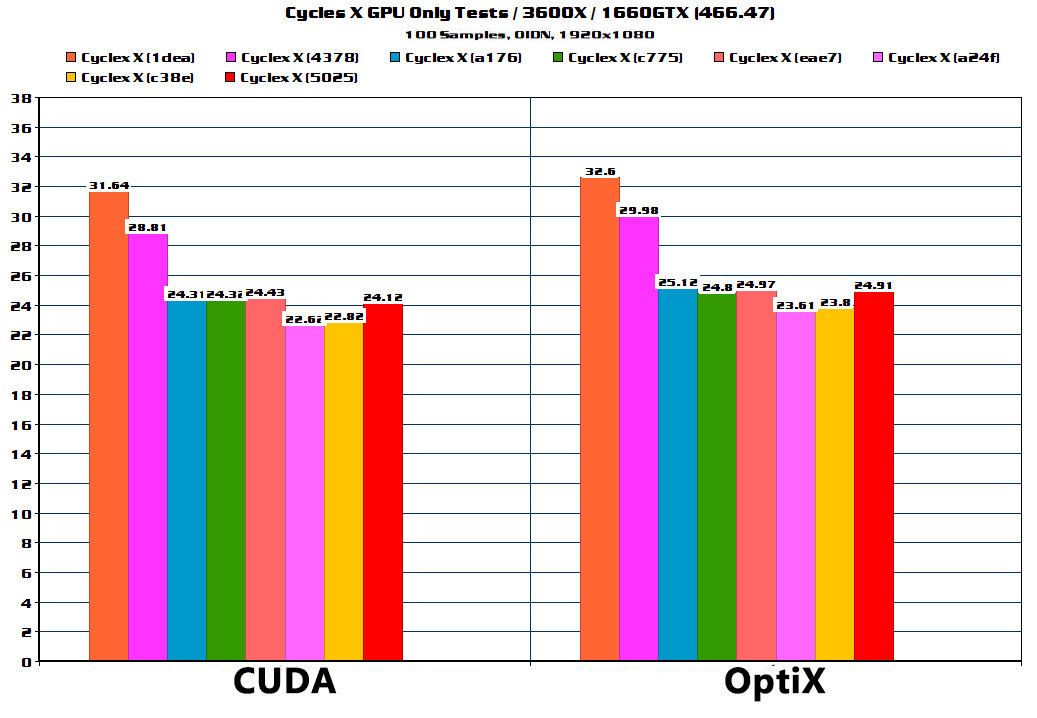
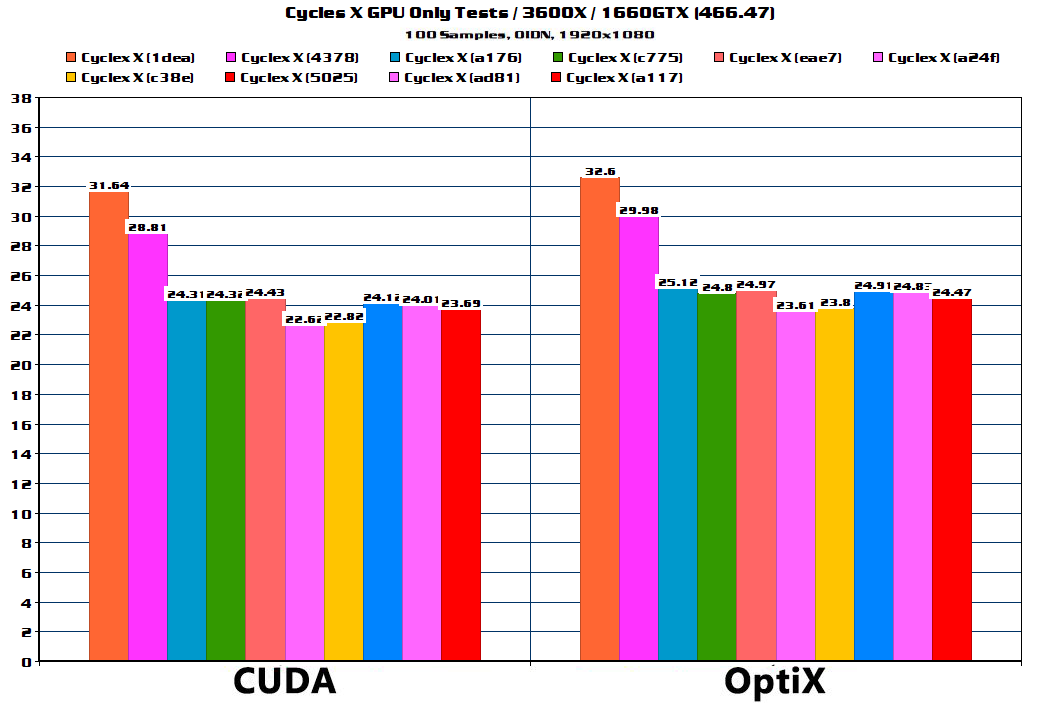
Rendering slower is probably caused by this patch https://developer.blender.org/rB17774afed1a3f17f32eddef48155c6ed65e03099
It is noted that the change can lead to a small performance increase or decrease depending on scene.
As for the viewport being faster, that’s caused primarily by this patch https://developer.blender.org/rB3336bc6af66a1b9f0e15d6816aa59f3880d4ae44
3 Likes
If anyone has example .blend files where OpenImageDenoise is poor at maintaining detail compared to NLM, it would be useful to post them for testing OpenImageDenoise 1.4 and the new parameters it provides.
The comparison image looks promising, but results at low samples are not necessarily indicative of what happens at high samples.
This is amazing. Implement 1.4 as fast as possible into the Cycles-X branch please. Let us test it in the field. The prefiltering can also be computed by GPU?
1 Like
And how can we know what OIDN version is currently in use by blender branches?
1.4 pre filter looks amazing!
Current version of ODN for blender is 1.3.0, you can keep an any on this ticket for any movement in library updates for 3.0
1 Like
It is impressive that with so little render samples it preserves so much detail in the texture.
What does that pre-filtering mean? Will we have new GUI options for OIDN 1.4? Or is it transparent to the end user?
Afaik it takes the albedo tex and normal buffer for pre filtering,to keep the albedo texture details.
(read on BA post)
1 Like
OpenImageDenoise 1.3 assumes that the albedo and normal passes might contain noise (for example from motion blur or depth of field). That means it can misidentify texture detail as noise and blur it out.
With 1.4 you can denoise the albedo and normal passes through prefiltering, and then denoise the final image assuming those passes are noise free. Of course prefiltering could also misidentify texture detail as noise, so you could still lose texture detail. But I guess they found the prefiltering to be better at this. We’ll have to see how well it works.
Potentially we can also use the variance of the albedo and normal to influence the prefiltering. In areas without motion blur and depth of field where we are confident there is no noise, we could disable or reduce the influence of prefiltering.
11 Likes
Noticed that Ambient Occlusion Node in shader editor isn’t working properly in
blender 3.00 Alpha Cycles-X Hash: ad81074fable from 21.05.2021.
Not showing AO at all, just a mix between b/w (grey) but non noticable AO.
Same scene and AO works in all olther versions (2.92, 2.93, 3.00 Alpha)
Layer weight node and Pointiness from the Geo Node are working fine for edge masking/detecting or overlay.
(Node setup: AO -> Color Ramp -> Mix Node together with a second color ramp for color -> base color from Principled BSDF)
Hope the discription is OK.
This is occuring because the AO node has not been re-implemented into the Cycles-X branch yet.
You can find the task with a list of most of the features that are missing from the Cycles-X branch that need to be added to make it on par with Cycles-Master. https://developer.blender.org/T87837
1 Like
THX
A bit confusing to find all the relevant up front info ! 
@statix I’d be interested in hearing more about how you’re handling temporal denoising with the vector pass. We just completed work on a film and ended up running everything through Resolve. Its temporal denoise was better than Neat Video but if we could do this in Natron or Nuke, that would be fantastic. Would you be willing to elaborate on your workflow for temporal denoising?
3 Likes
Hi Steve,
I replied to someone else about this workflow so let me copy paste the response below.
I might do a series on denoising on youtube at some point. There are many ways of squeezing details out of renders in comp.
Ok both of these are more centered around compositor tasks using Nuke, Fusion or Natron. Blenders built in compositor doesn’t support log-space but it can be hacked.
Often when dealing with high contrast HDRI / float images and doing 2d transforms or reposition in comp you want to reduce the amount of filter hits as much as possible to avoid any unnecessary degradation in the image. Most 2d transform filters (lancos, bicubic etc) were not developed with float values in mind, so if you convert a linear float image to a log, perform the transform and a log2lin back again you often get much nicer and gentle filtering (if you know what to look for).
In terms of the conversation on denoisers, we’ve had some minor success in creating an even sharper result by doing the same thing, expose down, gamma up, denoise, then gamma down and expose back up. You then force the denoiser to look at the image in another way.
In terms of temporal denoising, its actually super easy. You can do this in blenders compositor or natron but I use fusion and nuke.
What you need to do is match the previous frame and next frame to the current frame, so basically a timeoffset of -1 and +1 frame.
For both of these offset frames you want to 2d displace it with the vector pass, instead of adding motion blur you “push” the pixels into the current frame using the displace node in 2d. And in terms of the +1 frame you push it back into the current frame.
So you now have something that almost looks like 3 identical images, and if you now perform an average of them (frame-1 + current frame + frame+1 / 3) or a median you get basically 3 times the samples pr frame (excluding the very first and last frame of the sequence since you’re missing -1 frames at the very first frame). (this is all assuming youre rendering with different seed values for the noise pr frame, doesnt work with static noise)
Not only is there much less noise but its also temporally more stable. If you increase the frame count to 5 frames you can get super smooth results.
This works really really well, we’ve been using it on feature film vfx for decades now in some way or another.
It breaks down when you have fast moving objects (but at that point you can denoise using motionblur, which is another technique) and it breaks down when there aren’t motion vectors available (for instance things in reflections etc)
Hope that helps
5 Likes
EDIT: Discussion of THIS topic is NOT to happen in this thread. Brecht has answered my question. A more technical explanation of different aspects of working with colours can probably be given to help me understand what’s going on better, however this thread is for Cycles-X feedback, not discussing colour science.
This probably isn’t the best place to ask, and I really don’t want to start a big discussion about it in this thread, so moderators of the site, feel free to split this off to a new topic.
With the new shadow catcher in the Cycles-X branch, indirect light is caught for use in compositing. Only one issue remains for me. How are you supposed to composite this in Blender?
It seems straight forward, just make a setup like this:
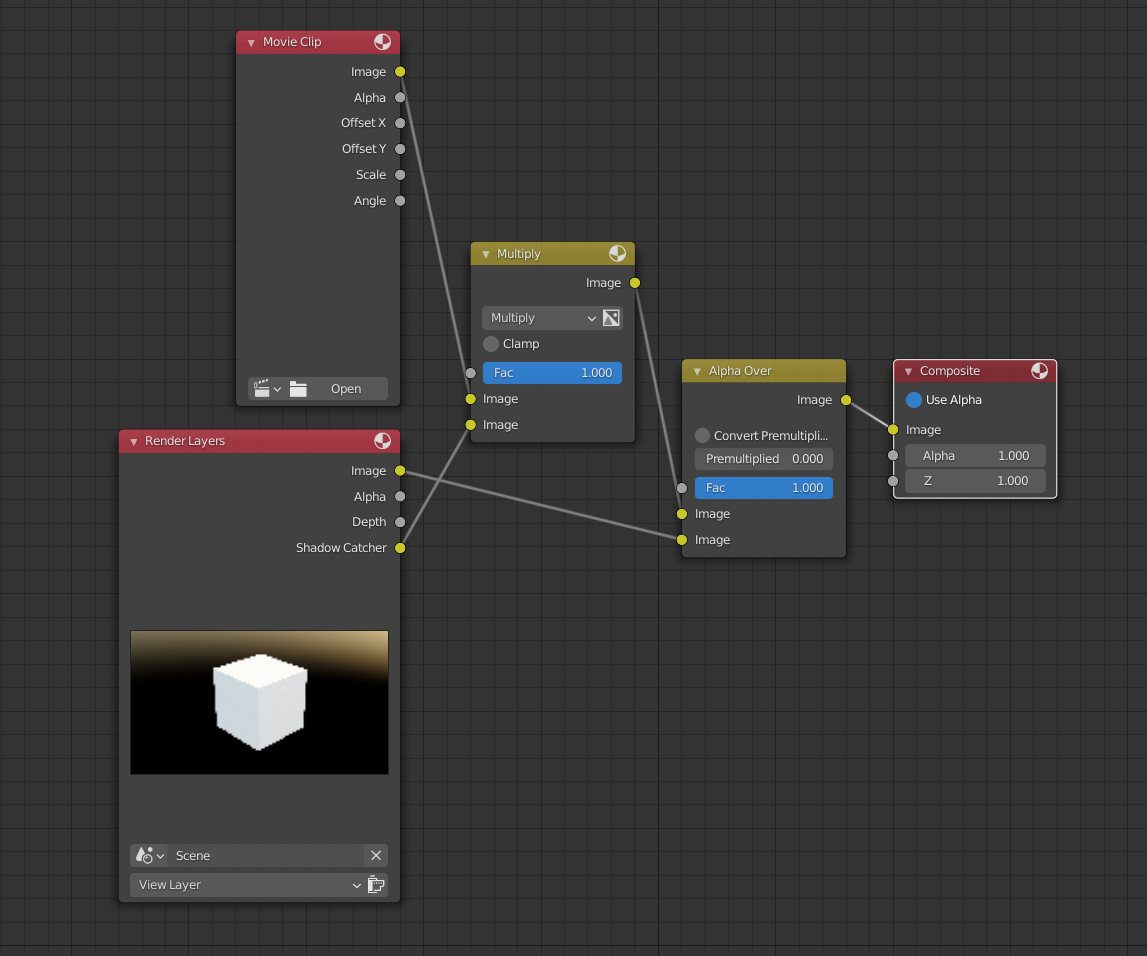
This issue is to do with colours. In theory for the shadow catcher to work CORRECTLY in this situation, the video or image from the real life camera has to match the colour and lighting format of Cycles (Scene referred lighting in a linear colour space?)? Or am I missing something? Is there a way to get “correct” shadow catcher compositing with more “standard” image formats such as the MP4 or JPG with display referred lighting and brightness’s compressed the range 0-1 with pre-applied tone-mapping/view transforms such as what you’d get from a phone or a consumer dedicated camera?
While doing research I also read somewhere that shooting in LOG can help in this scenario as it allows you to kind of get scene referred lighting once you apply certain transforms to the image, but I’m sure there’s extra steps required to get this to work properly in Blenders compositor than just loading the image into the setup shown above. What are these steps?
Does anyone have any information that they could share that might help?
EDIT: See top of post as to why you shouldn’t answer these questions here.
The footage and render output need to be in the same linear color space for correct compositing, same as before. How to achieve that is not a question for devtalk, but for a user support forum.
Let’s keep this thread on topic, the discussion about denoising workflow also does not belong here.
3 Likes