What about people that save exr files and do all those other grading and compositing stuff in other software? You’re already assuming a certain workflow here
1 Like
Of course compositing is going to use linear color values under the hood, that goes without saying. I’m talking about the final output, that’s going to be viewed by humans. Basically if you see too much noise in Blender, you’re going to see it in any compositing software, no mater which view transform you use. That’s the whole point of view transforms - to make sure that your digital content looks visually similar on any display device.
That’s why it’s important to measure perceptual noise, and that can only be done during rendering by taking into account gamma and exposure.
Are you aware we can change view transform post render straight up in Blender? “Standard” view will convert to sRGB differently than “Filmic”. The contrast Look mode you pick would also change the sRGB image wildly.
Never mention there are people using third party OCIO config that offers different transforms and looks.
If you want the noise threshold to measure the sRGB transformed value, you just have to assume it, there are so many ways to to it, and they can be changed after the rendering process as well.
I don’t understand why you would think measureing scene linear data would produce more noise. This should not be the case. It’s backwards, if you measure the transformed sRGB data probably the parts that are not obvious to human eyes in that assumed transform are going to have more noise, which is why I am against it. Scene linear data is basically light emission levels and in my understanding it should be more neutral, and measuring the noise threshold in linear should have more evenly distributed noise.
I have heard similar proposals happening in the Cycles chat channel but the reason was that “the highlight part that goes overexposed should not have the same noise level, we should make it noisier because human eyes cannot see them” I was against that because AFAIK the end exposure of the final image is determined after the rendering process by view transform, which means the rendering algorithm needs to make assumption about which parts are overexposed. In fact he said he was going to treat all value above 1 to be overexposed which is completely not true if you are using Filmic.
This is like backwards with what you are suggesting here. So I don’t think measuring the noise threshold in transformed sRGB would reduce any noise, worse, it might increase noise.
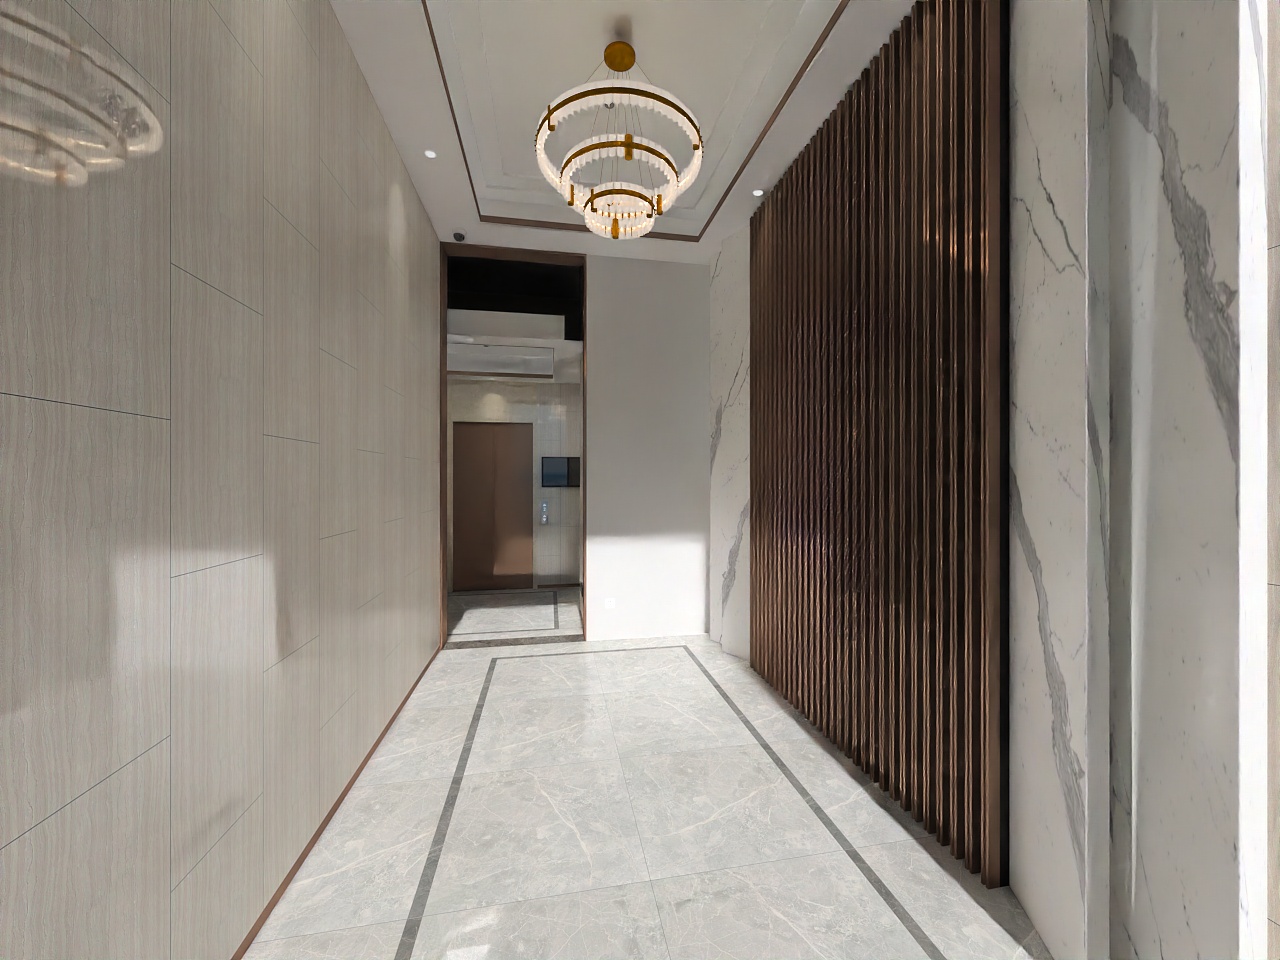
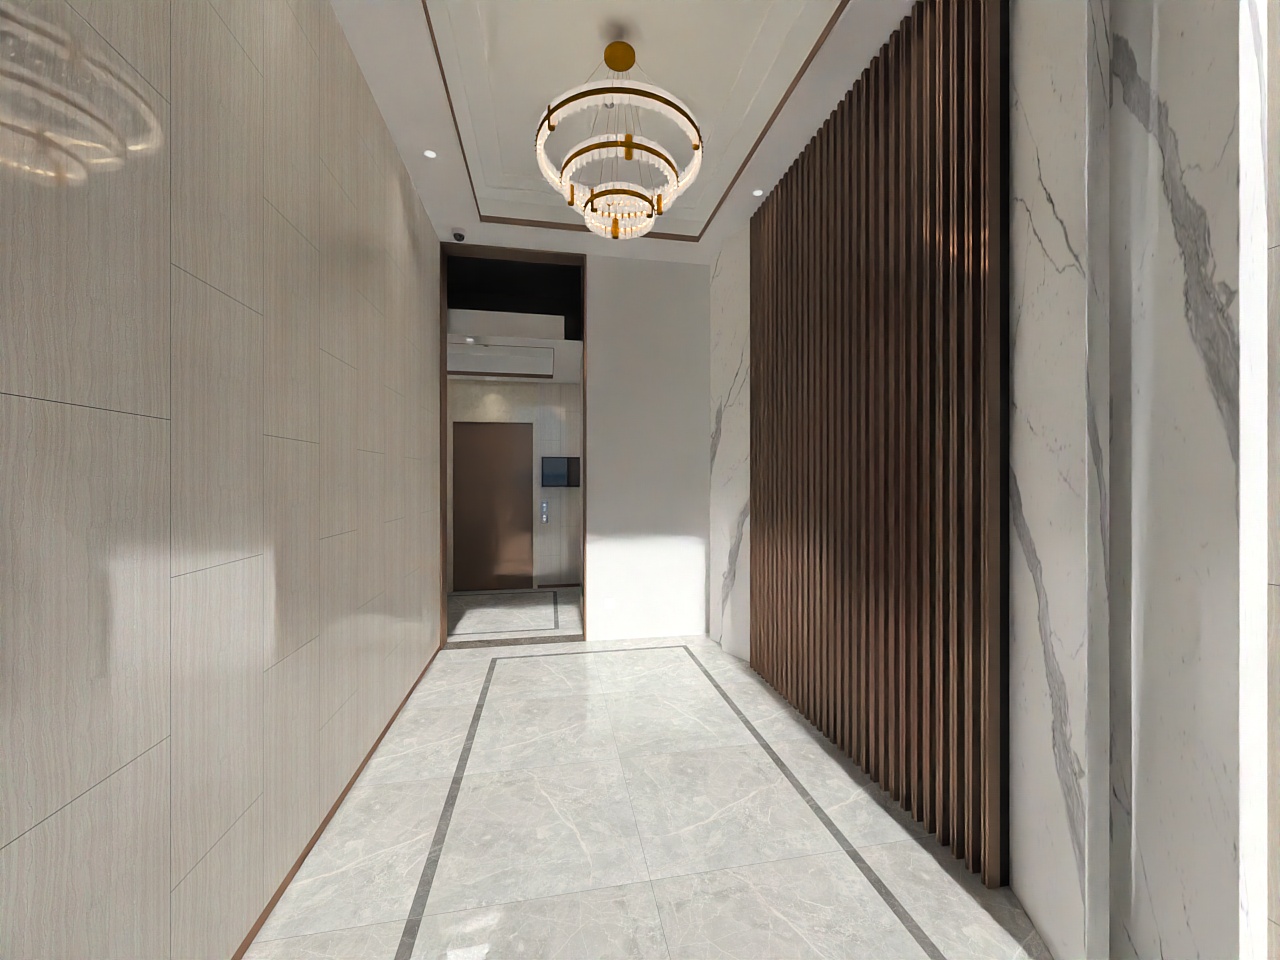
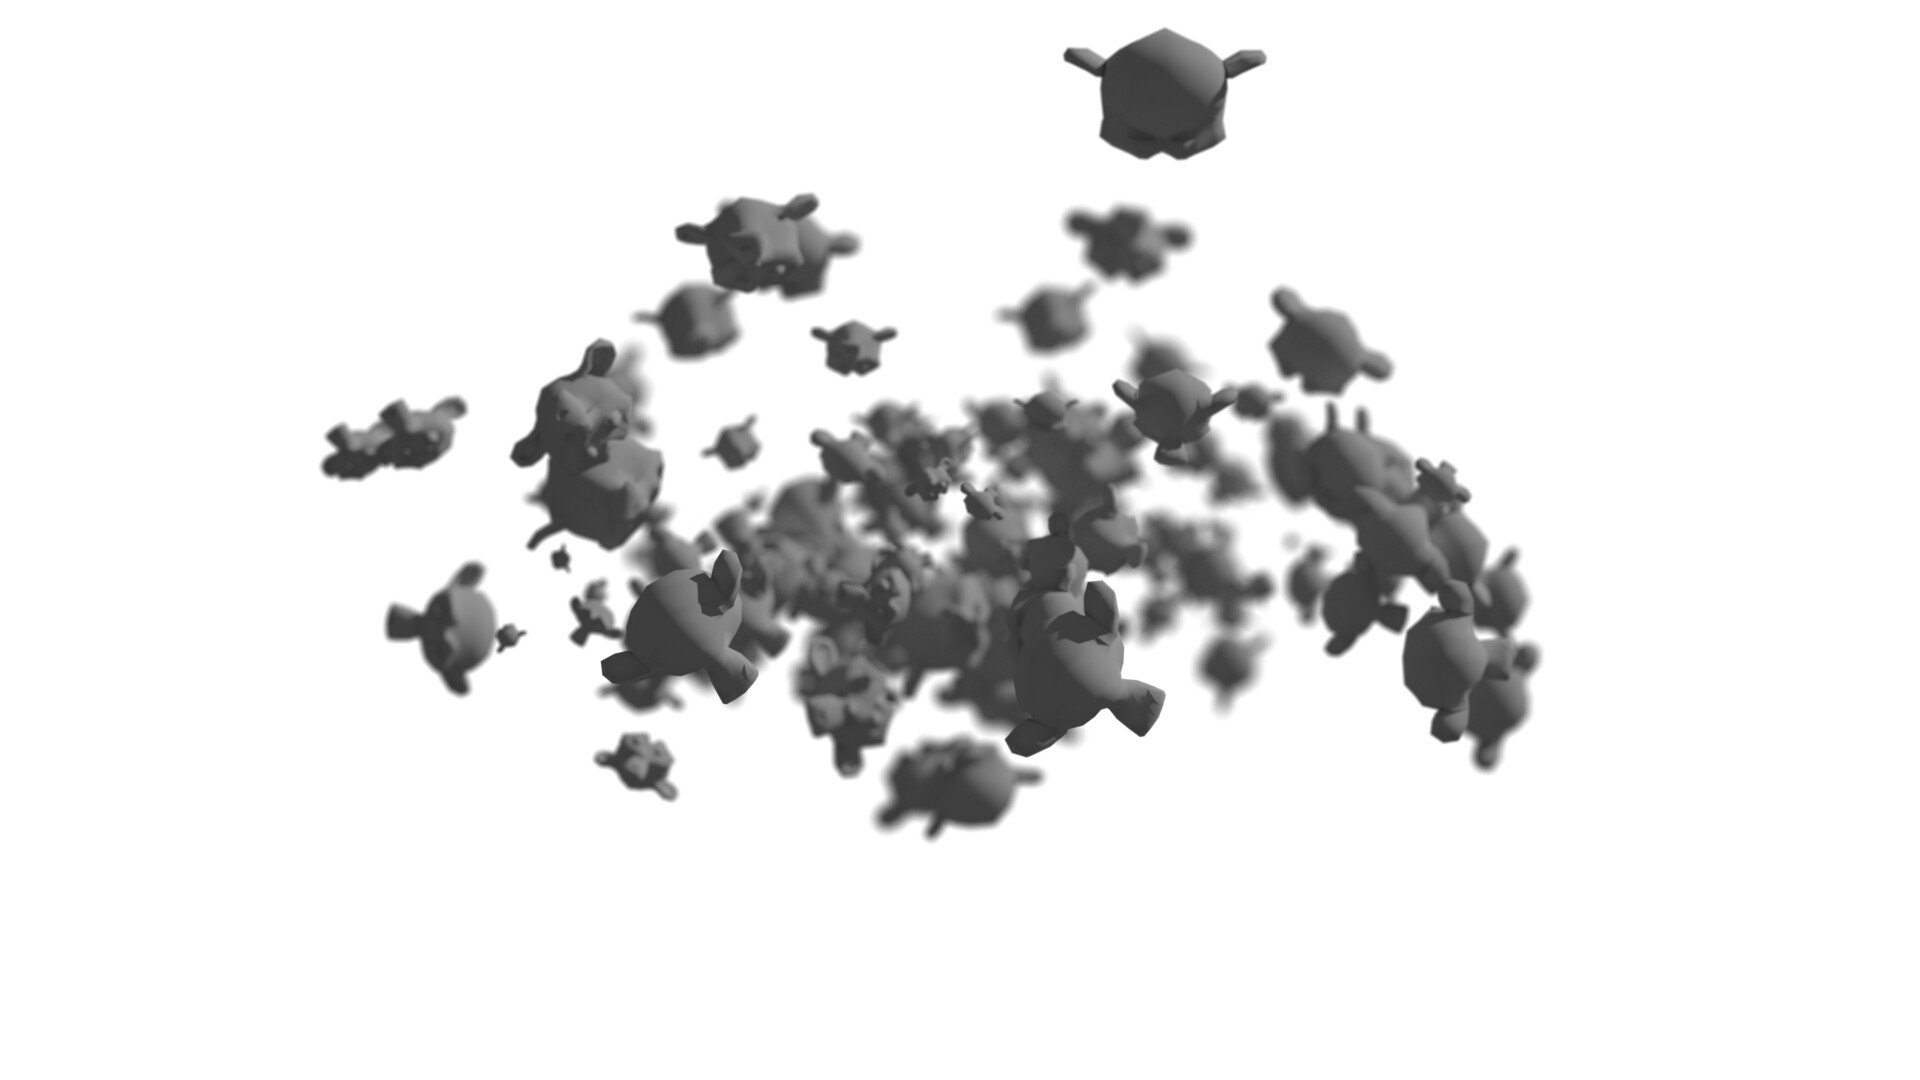
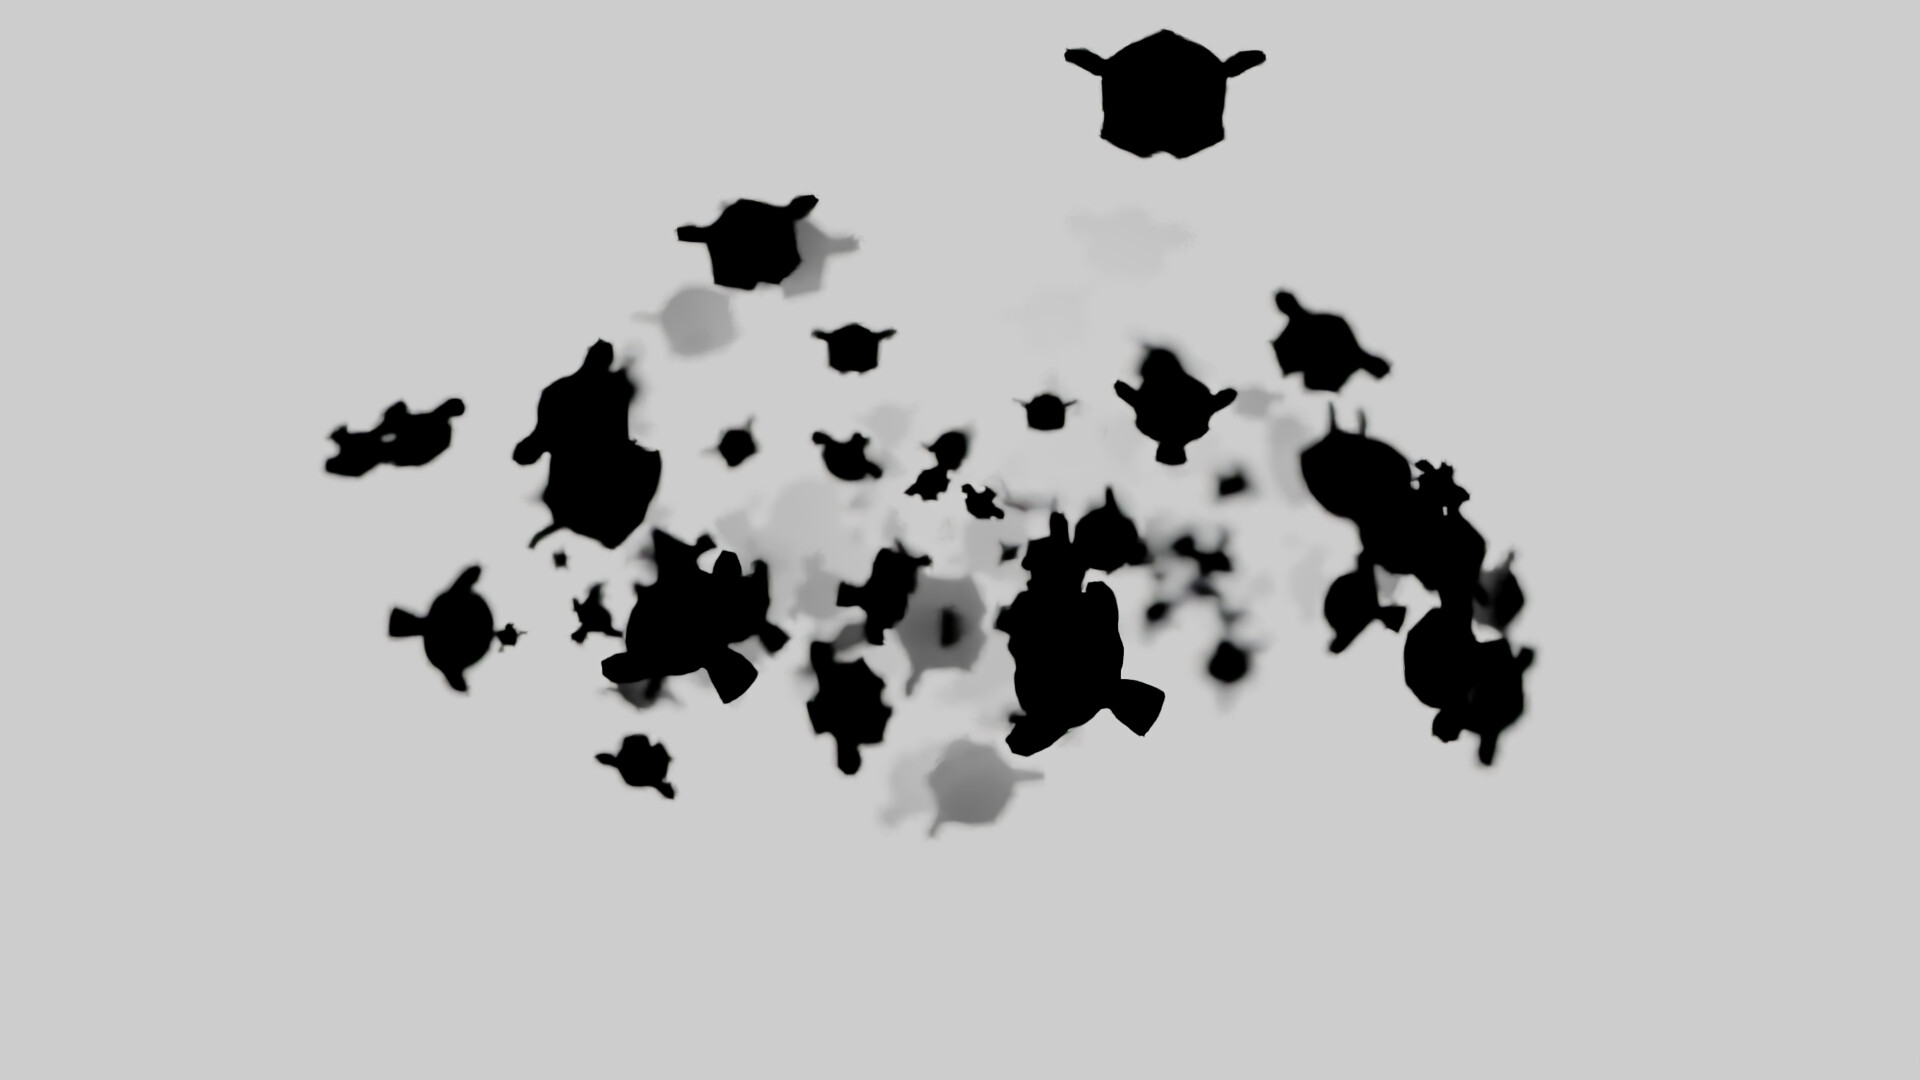
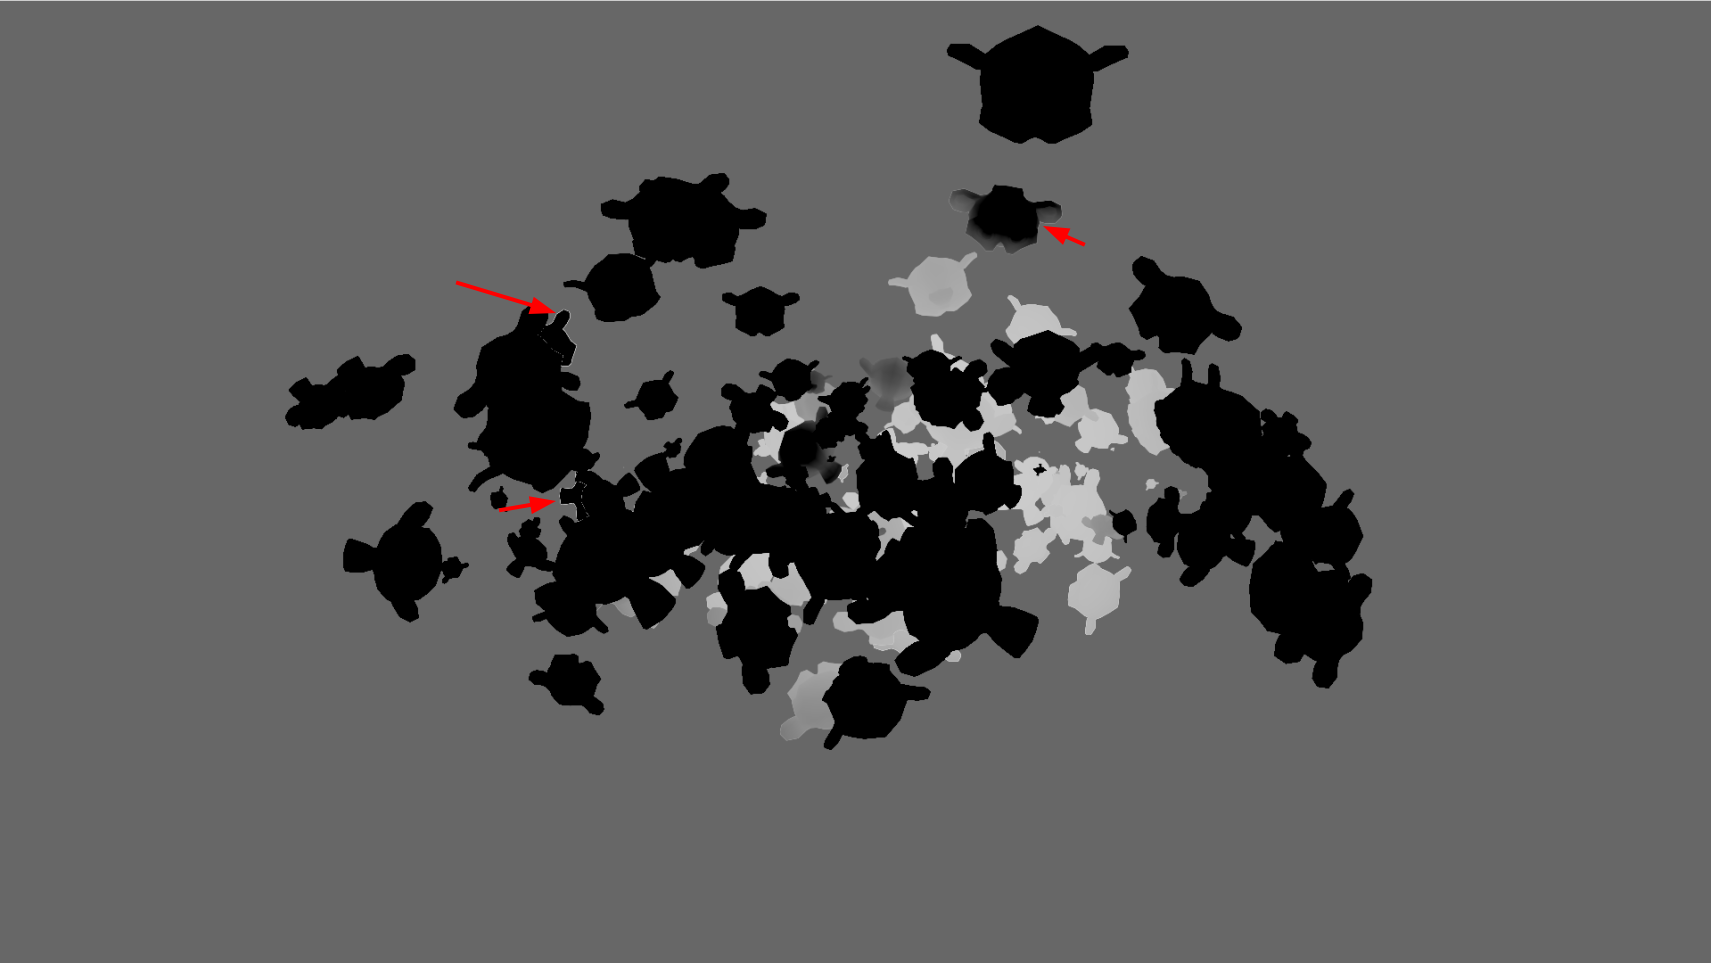
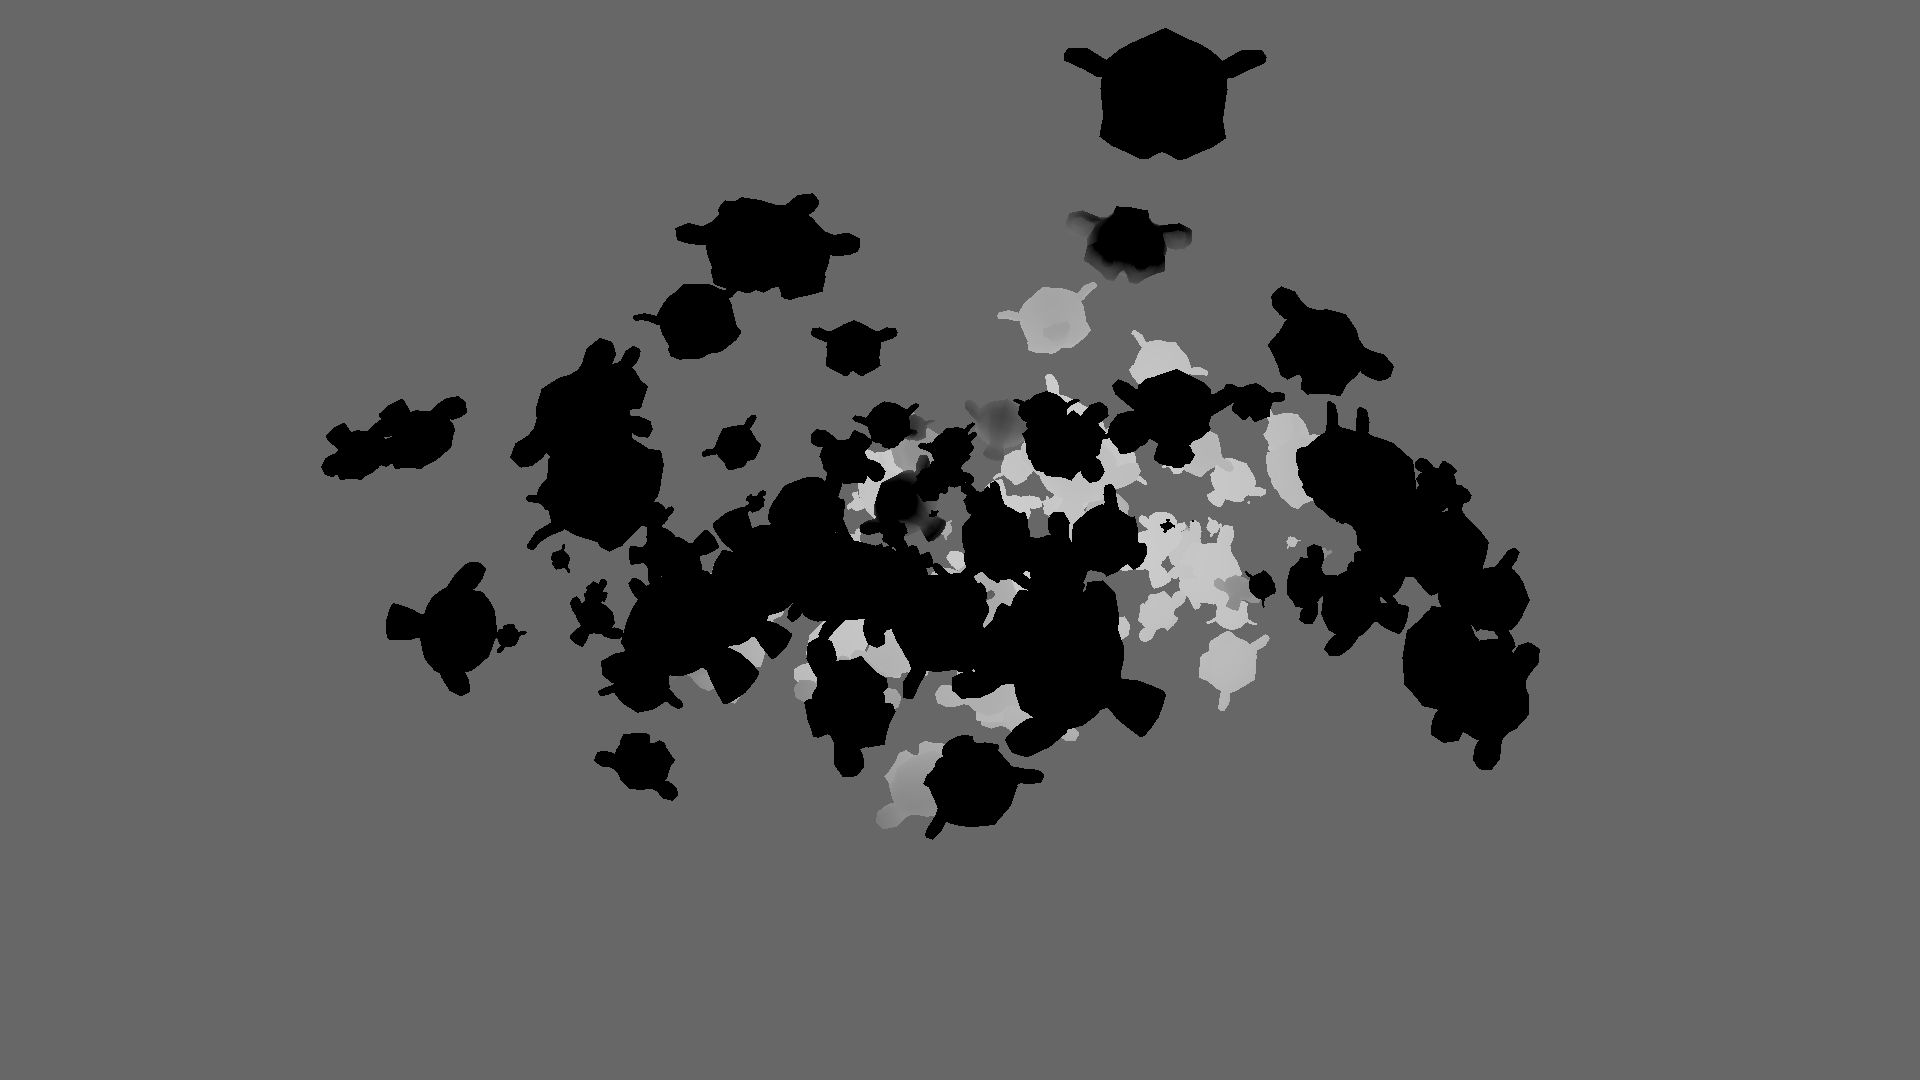
Ok, let me illustrate. Here’s the same image saved with sRGB and linear colors.
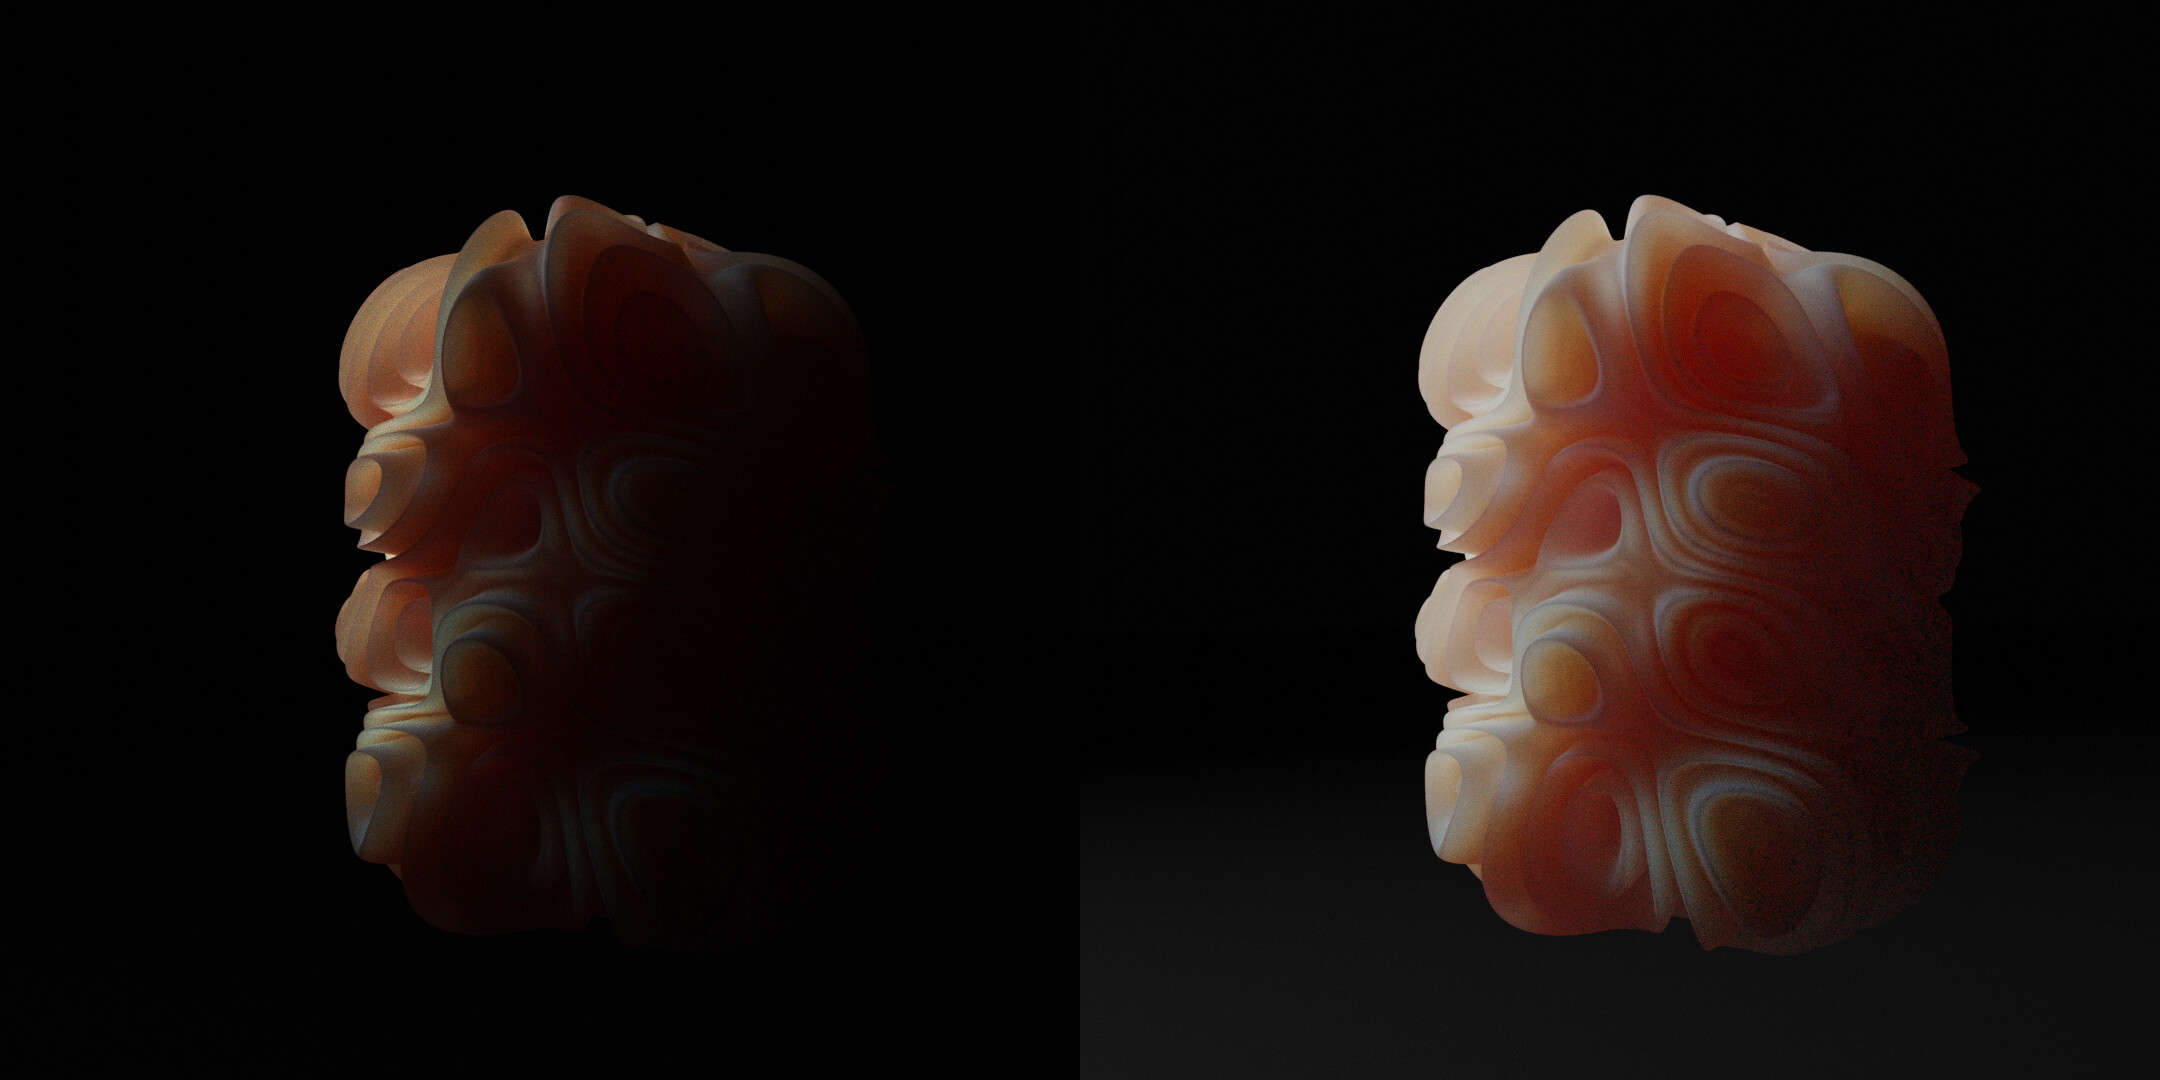
If you measure noise in the left image it looks mostly uniform, and since part of the image is pitch black, there can’t be any noise visible there, so no need to sample that part. However in the sRGB image, which is the intended color space in this case, shadows are much brighter and you can see all the details and the noise that is still there. So you get uneven noise distribution with shadows looking much worse than the rest of the image. That’s why adaptive sampling needs to measure noise in the color space that you set, because that’s how the image is intended to look like. It doesn’t have to be sRGB, I’m just using it as an example because it’s by far the most common.
And even if you export linear EXR and change exposure in post, you still want the initial image coming from Blender to look as good as possible. As I mention before, this type of noise actually causes denoising artifacts, and they are going to be visible, no matter what you do in post.
1 Like
I don’t think this is how it works, you cannot just view linear data like this, both of these images are already been converted to display in different ways, the left one I guess is with “Raw” which is the most brute force way; the right side one I guess is Filmic. So none of them can atually represent the noise level in the original linear state.
This does not make sense. Denosing happens before the linear to sRGB transform. Have youi noticed the HDR checkbox on the denoise node? That’s what it is for. It denoises the image in liner state.
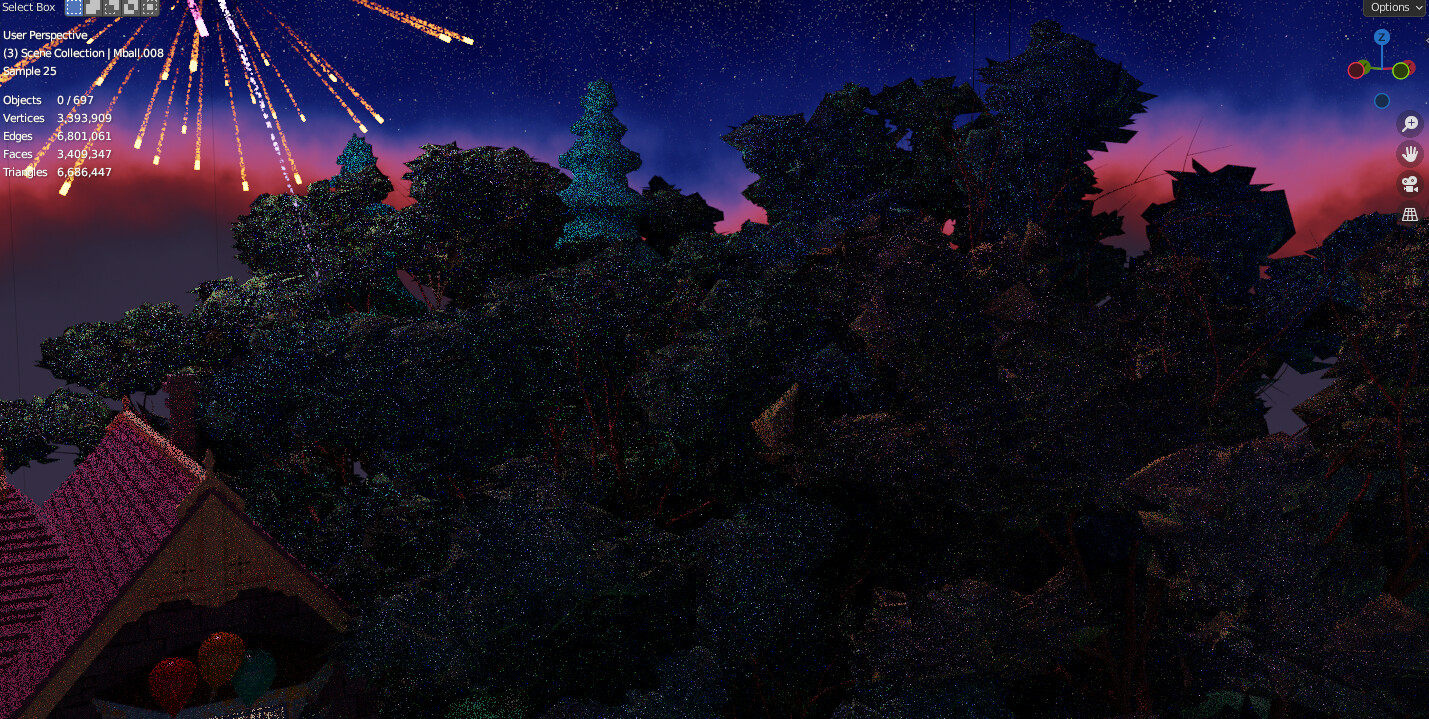
I just downloaded your scene and took a look, it seems you have time limit set to 40 seconds.It can very well be the case that none of the parts in the image has reached the noise threshold when it reached the time limit and stopped, therefore the adaptive sampling did not make the effect it intended to have.
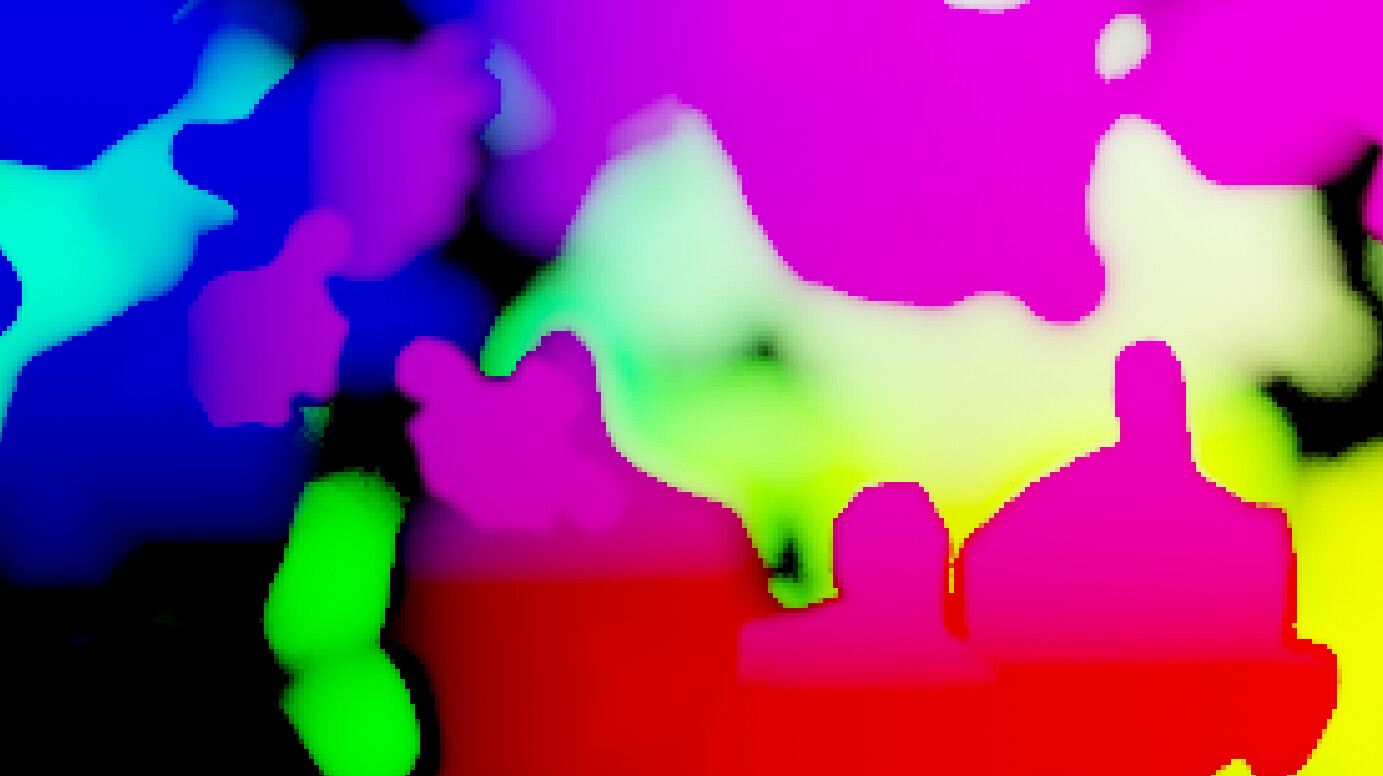
It was supposed to work like this:
The easier areas reach the noise threshold first, and Cycles stops sampling for the easier part, leaving the harder part continue rendering. What happens here is that the render stops before the easier part reaches the noise threshold, leaving the image with unevenly distributed nosie.
2 Likes
Some other production renderers with adaptive sampling offer to specifiy a color space for adaptive sampling. From the manual of a “competing renderer” (where they call adaptive sampling “variance antialiasing”):

This would help a lot in darker scenes. A colleague of mine is currently fighting with rendering a very dim scene in another renderer (that also doesn’t support specifying a different color space for adaptive sampling) and worked around it by rendering everything much brighter and after that grading it much darker in comp again which is a very dirty and unintuitive workflow.
2 Likes
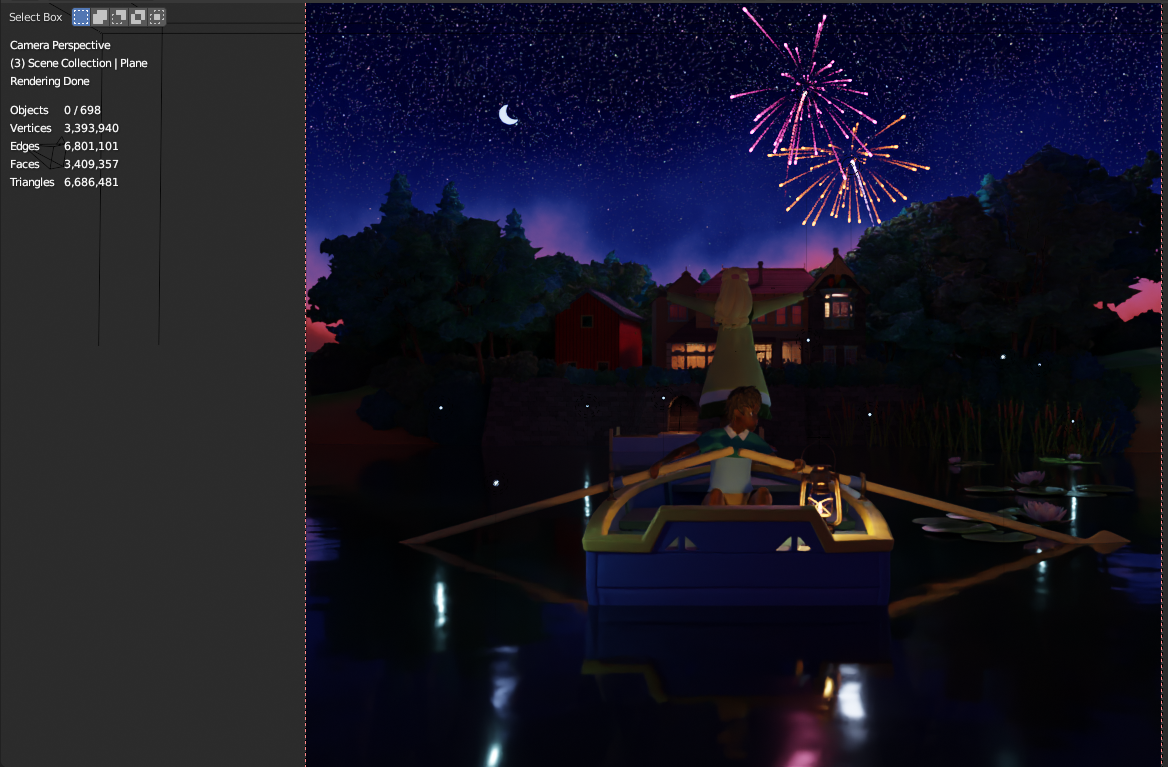
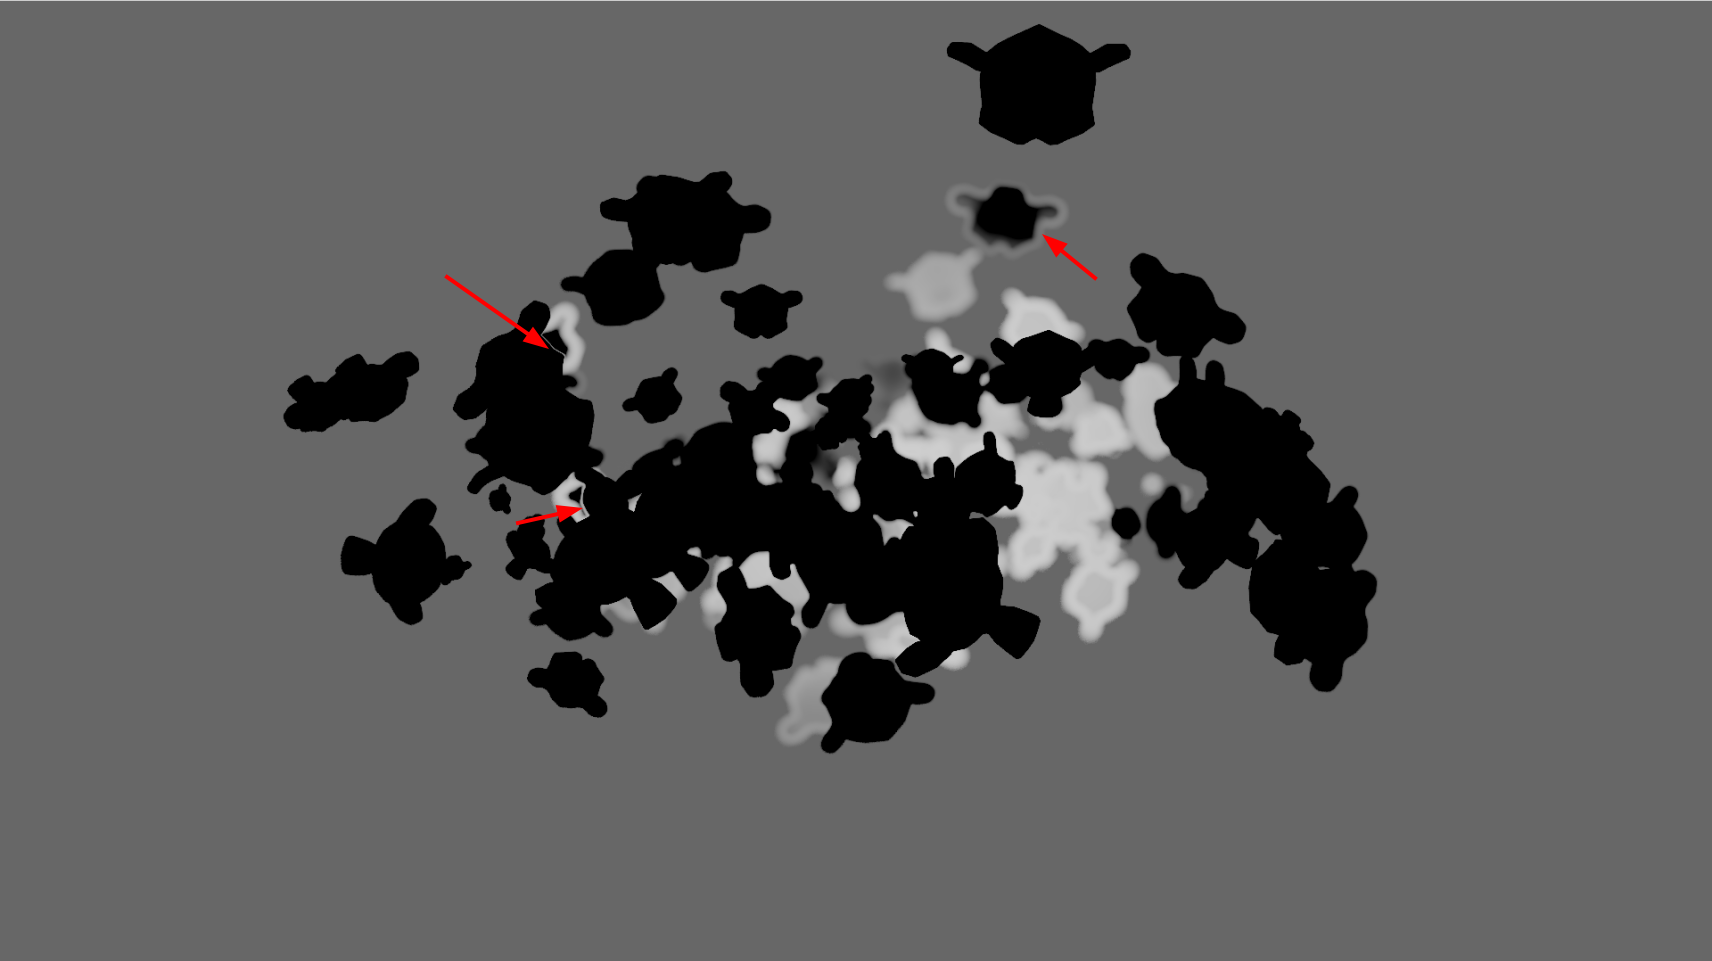
I didn’t use time limit in my last example, so parts of the image reached 4k samples. Just not the parts that needed those samples the most. You can try various setting yourself and see how adaptive sampling behaves.
Well I wish it worked like that, but in my example it’s doing the opposite - ‘harder’ part that is in the shadow somehow reaches the noise threshold first and stops sampling, while lighter parts keeps receiving samples.
Bottom line is that adaptive sampling doesn’t work correctly in some cases, Brecht actually confirmed that. I’m not 100% sure that problem is connected to the color management settings, I just hope it gets fixed. ![]()
That could be a solution. Although I don’t see why such setting couldn’t be automated. If you choose sRGB as a Display Device, you are implicitly telling cycles which color space you are targeting.
Yes, of course. I was e.g. very sure that many years ago when I used V-Ray, it also offered to manually specify this color space but now in the documentation of V-Ray 5 it’s missing. So I guess they just set it automatically and hide it from the users, which isn’t that bad in this case.
Same goes for Karma. While Mantra offered the option, it’s successor Karma is missing the option.
I have heard similar proposals … In fact he said he was going to treat all value above 1 to be overexposed which is completely not true if you are using Filmic.
Ok, let me explain myself more vividly.
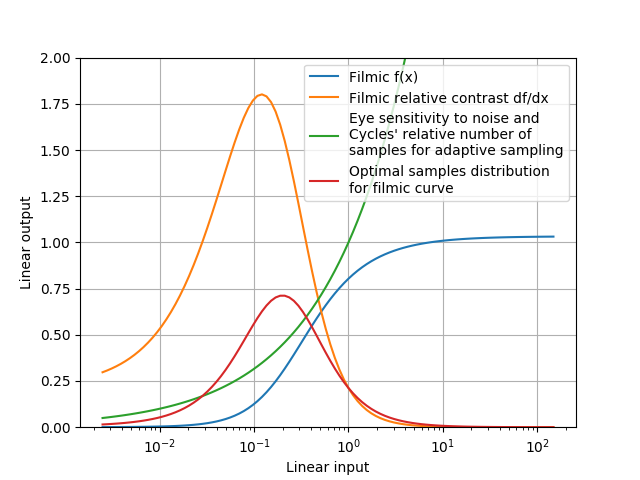
Here’s a typical filmic curve f(x), it transfers linear rgb to linear rgb, which then in turn will be encoded to sRGB image by using gamma-compression, but decompressed back by the display before showing it to you. I’ll deliberately ignore this sRGB compression-decompression part - BT.601 and BT.709 transform functions were invented only for more effective image compression, and that’s why it is irrelevant here.
Filmic curve is there to compress wide lightness range into a narrow range of what’s your display is able to reproduce. It’s similar to what all digital cameras do, and in turn similar to what all film cameras did in the past. Filmic compresses the lightness range by lowering contrast of darks and highlights. Since the resulting contrast here is 5-8 times lower, we can get away with 5-8 times higher noise in input linear values, which means 25-64 times lower sample count.
There’s also eye’s sensitivity function - it is subjective and thus not easily measurable, but overall it is assumed as sqrt(x). Cycles adaptive sampling follows this function when deciding if it has reached noise threshold. As you can see, it demands higher number of samples in highlights, even in zones where it will be compressed by filmic.
That’s why it is important to take the final color transform into account, but doing so accurately requires also taking into account Blender compositor and all downstream transforms. It’s possible to implement, ofc, but it also can get computationally more expensive than adding some samples. That’s why it is unpractical. What actually can be done, is assuming color transform function a bit more accurately, since it can bring huge benefits in render quality/time. For example, if we assume filmic transfer function, the optimal sampling count will be much lower in highlights (as shown in the picture). My suggestion actually was less radical - to limit sampling rate to a plateau in highlights, so that it wouldn’t get disproportionally more samples than mid-tones.
That’s on color transforms from the point of light intensities. There’s also a possibility to benefit over lower eyes chromatic sensitivity - but that’s another long story =)
3 Likes
I just think generally assuming these kind of things might not be a future proof idea. It might look obvious now but there are future possibilities where the assumption will fail.
For example, XYZ space in Blender assumes D65 white point. It seems a very reasonable assumption. Most color spaces use D65, Cycles has been using D65. Other white points are generally rarely used.
But it just happens to cause problem for the Spectral Cycles branch, which needs the equal energy Illuminant E white point for unbiased color behavior.
Assuming filmic might seem reasonable for now, but I fear this assumption might also fail someday…
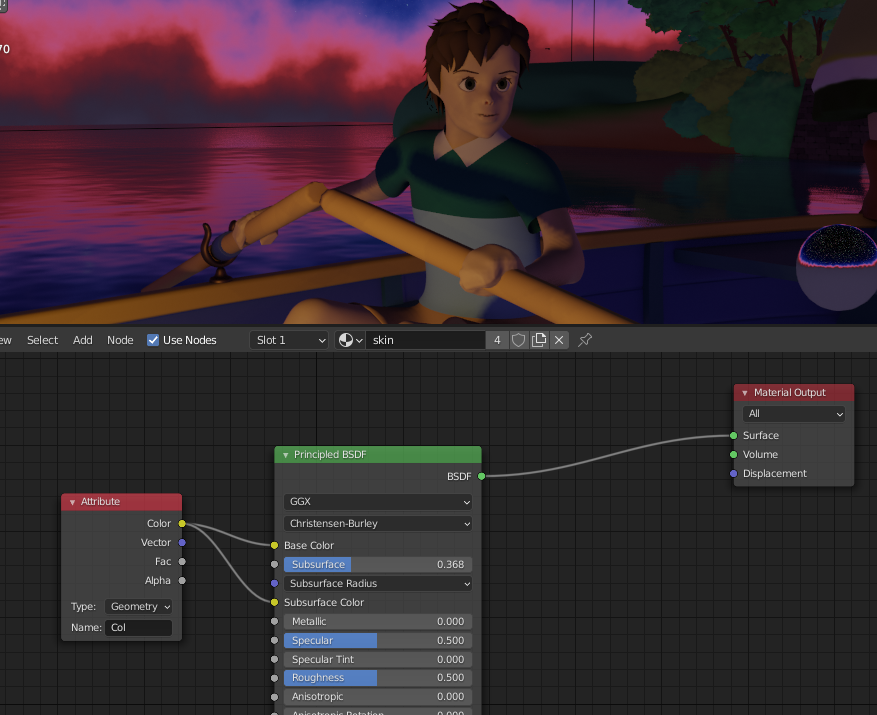
There’s some problem with subsurface scattering in CyclesX. Using the latest experimental 3.0
CyclesX
Eevee (how it used to look in Cycles 2.9)
(sorry but I cannot put more than 1 image and 2 links in 1 post)
media discordapp net/attachments/225622072963891202/899452293223706694/unknown.png
I’m not a racist, but this girl is supposed to be white
and she used to be white in the earlier version of Cycles.
in fact, she is still white in Eevee (and I hope will remain white)
please, address this issue.
I’m using Windows 10, CPU render, Intel Xeon E5 2620-v2
blender-3.0.0-alpha+master.452c78757f44-windows.amd64-release
blender-3.0.0-alpha+cycles-x.94caae981738-windows.amd64-release
There is a bug report here that reports of sub-surface scattering behaving weirdly on scaled objects with their scale not applied. You might be experiencing this issue. ⚓ T92255 Christensen-Burley rendering differences on scaled objects
I used cycles X for the first time in the latest alpha version. Great to see tiling on GPU to help with memory on larger renders. However, it also seems that the tiling produced some strange artifacts when it was denoising on an area that was near the edge of two tiles.
Tiles:
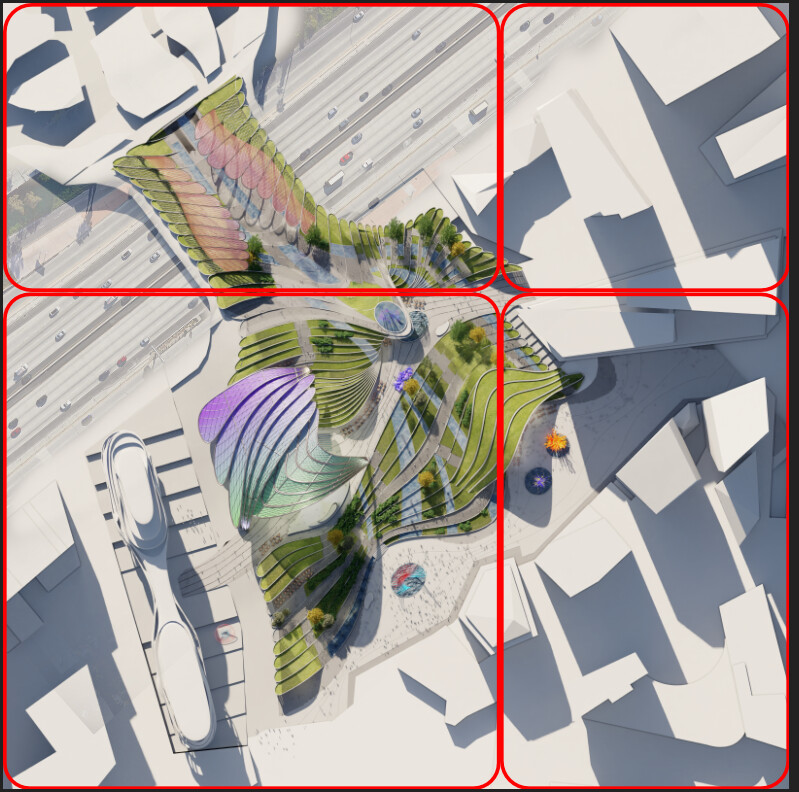
Problematic area:
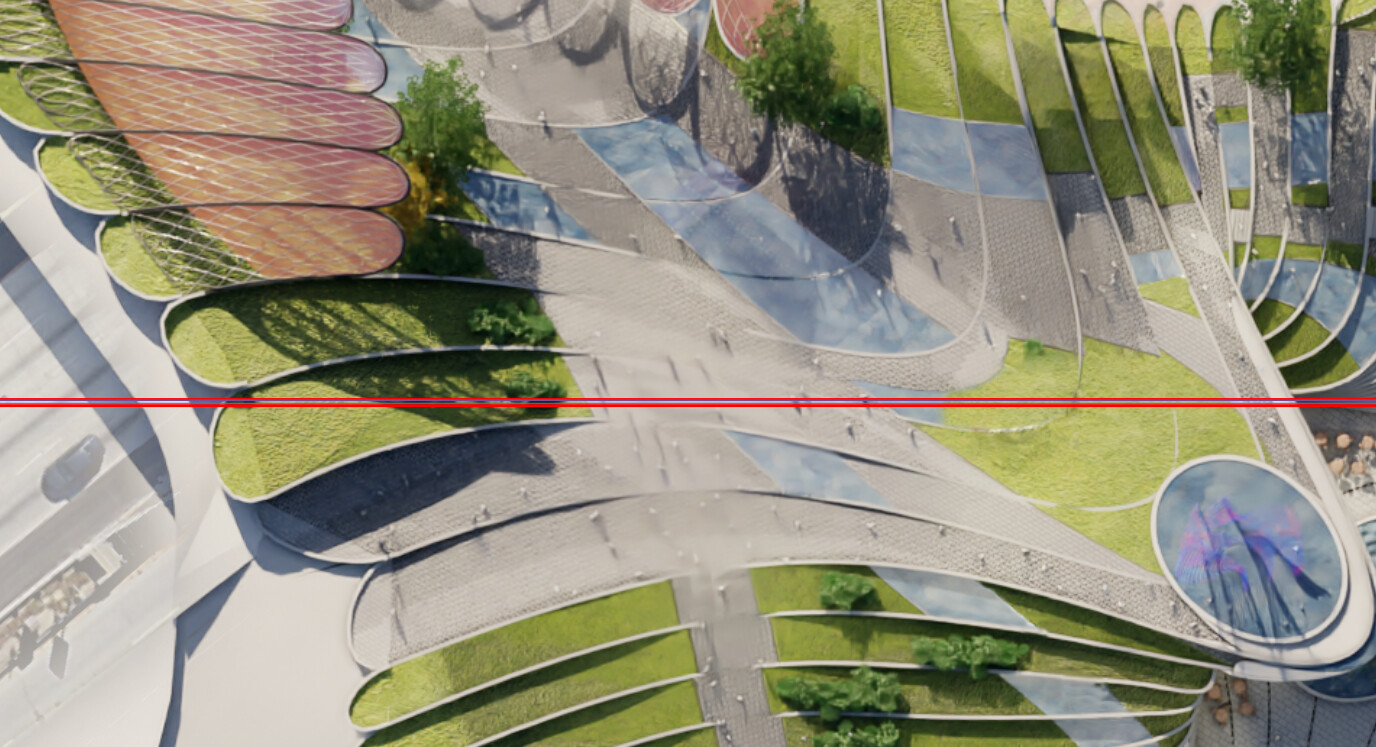
It seems there is extra blur where the tiles are patched
Blender Version: blender-3.0.0-alpha+master.4a00faca1a5e-windows.amd64-release
Specs: Win 10, RTX 2080 Max Q 8GB laptop
Render settings:
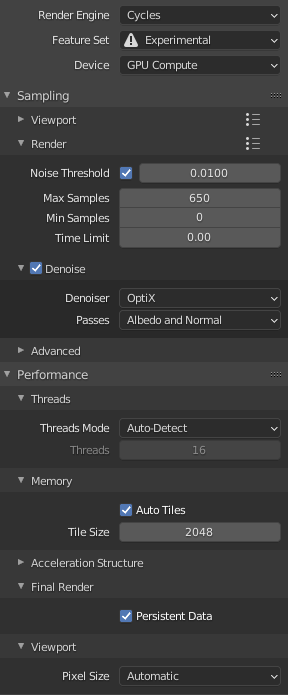
Render Image size is 3240 x 3240 px
I am personally unable to see the seam/blurred line along the boundary of a tile, possibly due to compression applied to all photos uploaded to this site (as pointed out by Brecht). I am also unable to reproduce this issue with my own testing. However the two most common causes for this issue has been fixed in Cycles-X. The two common causes are:
- Inconsistent adaptive sampling on tile boundaries - Fix with rB6e268a749fee
- Denoising occurring in tiles (I believe Cycles-X doesn’t do denoising in tiles)
There is still the potential that OptiX is tiling the denoising after rendering to save VRAM. However I’m not sure if this is happening.
Would you be willing to provide a file that demonstrates this issue for testing purposes?
I am using the latest Alpha. However, I can confirm that Optix denoising happens after all the tiles are rendered, which is strange because I would think that then the tiles are stitched pre-denoising.
I can’t share this given file but will try to work up a simpler example to share.
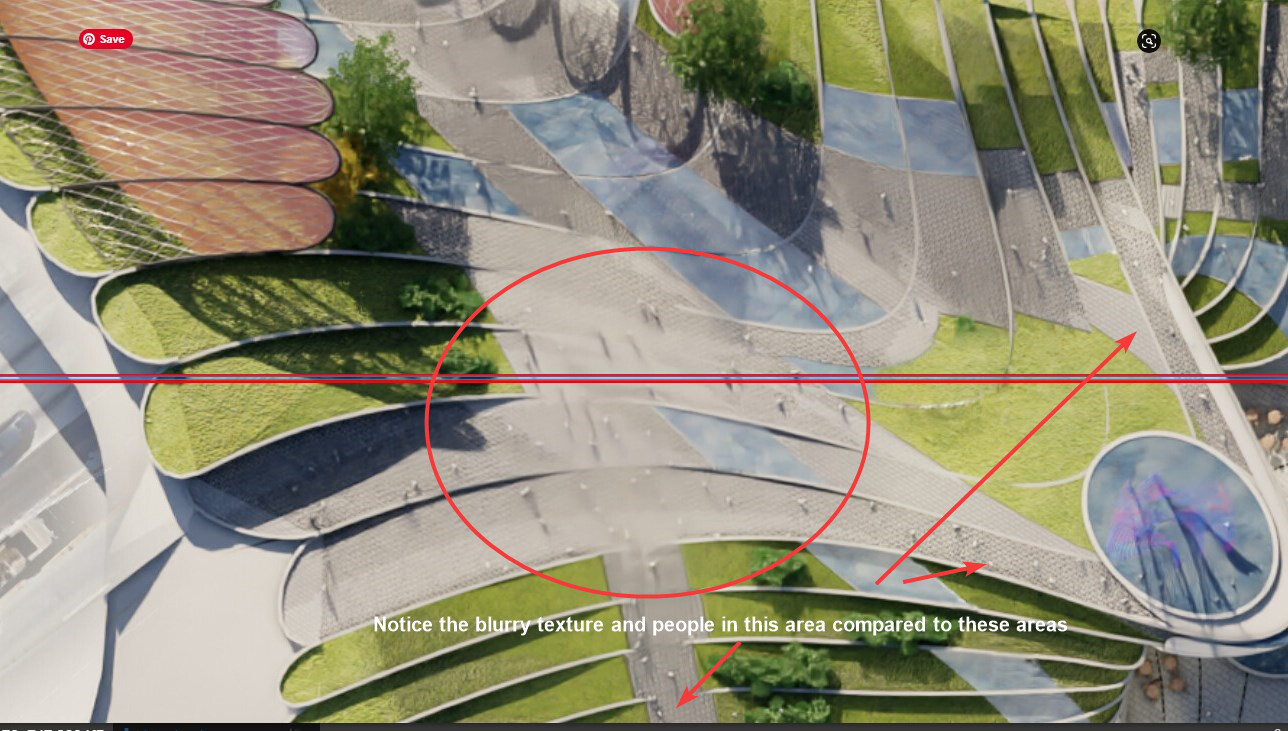
Here is where the strange blurriness is happening. You can see how the texture and the small dots which are people are blurred in an area with no shadows or something else special happening that should require more samples in the circled area compared to the neighbouring areas with more clarity
@dimitar
This is an Optix problem. I have the same spots and blurry areas as in your example.
Try using ODIN as a denoiser in 3.0, it gives much better results. If it has to be Optix, set Passes to None instead of Albedo or Albedo+Normals.
Optix has significant problems with gradients and fine lines/structures, and probably tiling in Blender is the cause.
The problem with the denoisers in 3.0 is that not everyone has a CPU with SSE 4.1 support, and thus is dependent on Optix, and he is currently in Blender so not to use(!) = Dilemma
2 Likes
TL/DR:
1- The position pass is anti-aliased, meaning it causes artifacts in a lot of/most usecases. Currently, the only way to get an aliased position pass is by setting the samples to one, meaning that a separate render layer is required, thus making the workflow with the new exposed pass not much better/different that manually the material override one. It would be great to have access to the aliased position pass.
2-The built-in position pass is currently unable to drive the offset of the texture node in the compositor, while the material-override generated position pass can.
3-The texture node is exhibiting weird behavior, and resets if it’s connections are changed.
The Full Story
Hey @brecht , @sergey , @Alaska and everyone! I was trying out the new position pass (what an exciting addition to have directly as a pass, we always had to go through a separate render layer and material overrides to generate ours at the studio!). I noticed that the pass was anti-aliased, and couldn’t figure out if there was a away to have the aliased pass other than creating a separate render layer with 1 sample set. For most purposes, the position pass acts like a world-space depth pass, with extra control on all axes. And like the depth pass, in most cases it needs to be aliased, as the anti-aliasing can generate weird edges of false values on the edges of stacked objects at very different distances.
EXAMPLE 1: USING POSITION-BASED VOLUMETRIC FOG SETUP
Here is the example scene:
As mentioned above, the position pass is anti-aliased.
Here is a close up of the position pass:
The problem here is that the anti-aliased values are completely arbitrary, and will cause artefacts when using the position pass as we will see afterwards. I am using a node setup that generates “volumetric” spheres into the world-space of the render thanks to the position pass.
Here is what it looked like when I use the new built in position pass:
As the pass is anti-aliased, some white edges appear when I apply the position-based volumetric node setup.
Here is the same result when samples are at 1:

And here it is denoised:
Here it acts exactly like the Depth utility path, giving out accurate data, with no interpolation or averaging creating white fringes. Here are the same examples without depth of field.
Position pass which is anti-aliased, white edges apparent:
1 sample aliased position pass:
Once again the aliased one gives the accurate expected results.
EXAMPLE 2: MAPPING TEXTURES USING POSITION PASS
Here is another example when mapping a textures using the position pass, which other than the problem of anti-aliasing, shows what is potentially a bug with the position pass.
Here is my node setup, when using the position pass generated with material overrides:
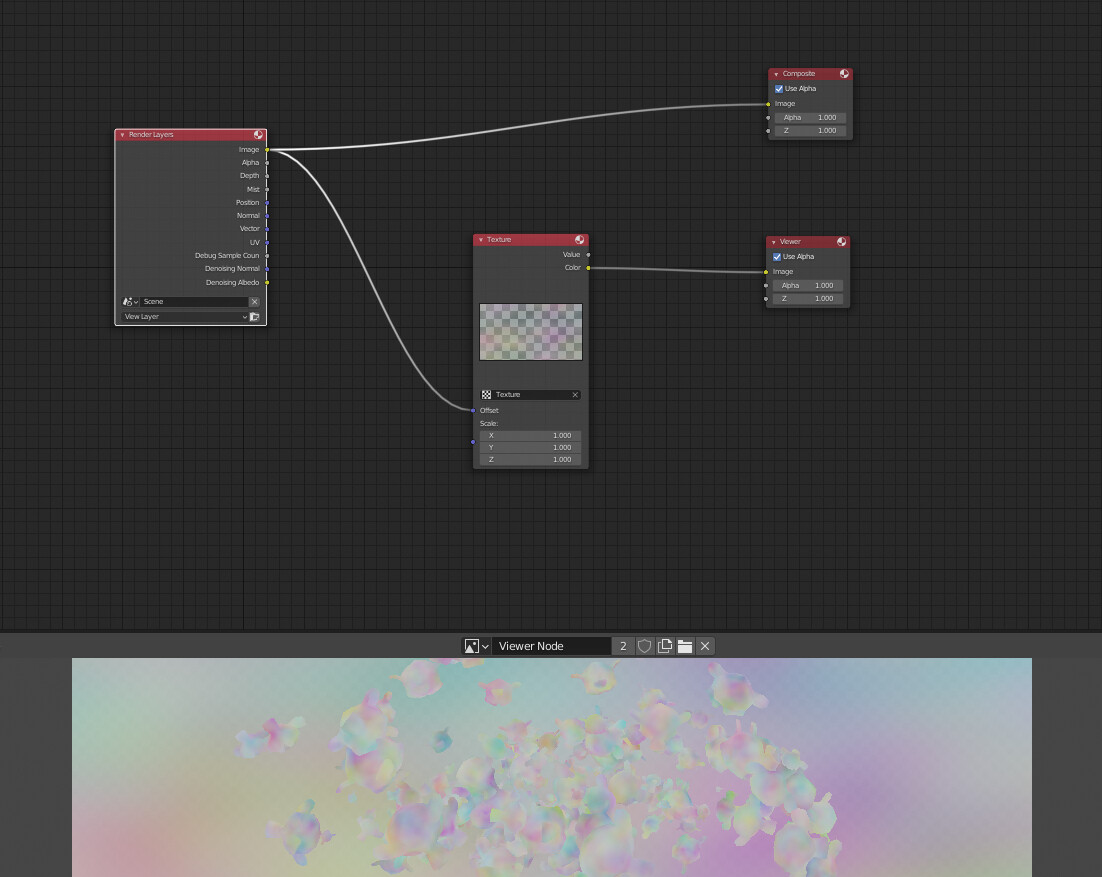
Here is the result:

here it is when samples are higher/it’s anti-aliased, there is fringing on all edges:

BONUS BUGS:
Bug 1:
While doing my testing, I discovered that trying to drive the offset directly via the position pass does not work:
Bug 2:
There is something weird happening with the texture node: If it is not plugged during render, it does not take into account the material-override based position pass. Removing and adding a connection also resets it:
3 Likes
Hi,
Can you create a bug for this if you have not already done so? I looked for one but was unable to find one.
Regards,
William
1 Like