Using Adjust Strength for Spacing should be a good idea but there’s likely something wrong with the formula that’s being used to control the strength. I think we should just disable it for 4.3
Noticed in the latest beta that strength remains consistent across all brushes (change the strength of one and it will be the same regardless of brush).
I don’t think this is a great idea. Each brush has drastically different purposes and different requirements for strength (strength 1.0 may be great for clay but will be too much for creasing, for example).
When sculpting I switch through a handful of brushes constantly with a different strength setting for each one. This has that workflow screeching to a halt.
Not sure if this was the intended behavior but really not a fan of it if so.
Noticed in the latest beta that strength remains consistent across all brushes (change the strength of one and it will be the same regardless of brush).
The change in behavior for the unified strength was an unintended side effect of a recent commit. I’ll have a PR reverting this shortly which should be in one of the next few daily builds.
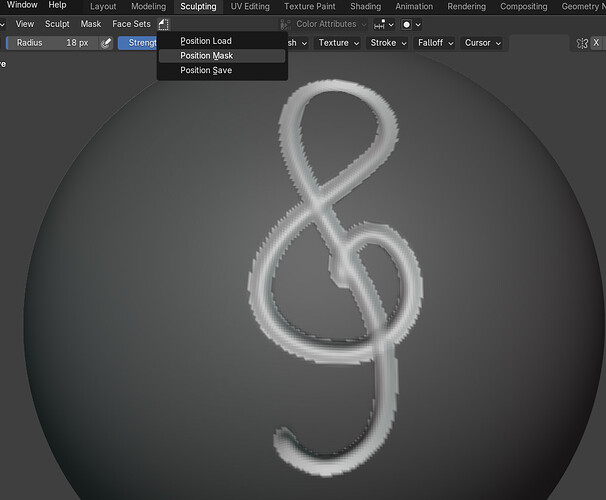
This isn’t strictly about brushes, but about the recently released brush thumbnail style guide. There’s an automated way to paint in those dark areas on the mesh, which could save a lot of time.
Geometry Tools in 4.3 can create sculpt masks, so you can make a pair of simple tools to mask unchanged areas of the mesh:
- run
Position Savebefore doing anything to the mesh. - sculpt the thumbnail shape
- run
Position Maskto mask any unchanged vertices
I think it would be worthwhile to include this automated method in the guide.
I’d upload a .blend, but they’re not allowed?
That’s a really great tip! Thanks @tolkfan
I’ll test this out and see if I can add this to the thumbnail creation file in the repo.
Mentioning this in the style guide would be really helpful too if an asset library author is batch creating a lot of thumbnails ![]()
If it isn’t too late to at least discuss a change to Texture Paint defaults with the brush texture/brush mask texture assignment I’d like to point to a suggestion I made today on RCS. Right-Click Select — Blender Community
I field questions from new users in texture paint on blenderartists, blender.stackexchange and sometimes on X and FB, and this is a suggestion based on correcting the immediate feedback that the user expects.
I don’t want to change the way Sculpt immediately uses an alpha as default, but the texture paint mode users seem to accidentally use a black image texture as default and have no idea how to fix it. I do think the change of mapping default for the texture could be helpful, but again, I don’t want to adversely affect the sculpt users here.
I think the change in behavior on the texture data block is out of scope for the brushes themselves.
The mapping default was recently changed to ‘View’ and for sculpt mode to ‘Area’. That is usually more aligned with what users expect.
Can you link to some of these discussions?
Today I responded to this one
One from awhile back where the solution was that the user had black image on brush mask by mistake
Here a user had set a brush texture with a uv grid to their brush and it was easier to know what they had done wrong. Here a user had their UV mapped texture target as their brush by mistake.
Here a user had their Normal map image texture set to their brush texture. Here a user did the same, loading their target image texture as their image texture on their brush.
Here a user found they had accidentally assigned an image texture to their brush.
Here a user had a black image texture on their brush.
There are other instances that I have had discussion with others, but I cannot find them now. Mainly the default image texture loaded as a black texture can get in the way if the user has added it themselves mistaking it as part of the UV process, or if they added it as a texture but didn’t realize how textures affect the brush output.
Started digging in to remake my texture brushes and I noticed a concerning thing - only the Brush and Fill tools have access to the falloff custom curve object while Blur, Smear, Clone and Mask do not have them. I am a heavy user of falloff curves in all my brushes, and now these four tools will not work with them. Was this an oversight or a design decision?
They do have the custom falloff. The button at the top is a dropdown to choose between mathematical presets or a custom curve.
Ah, I see now that the tools in question have been set to a ‘smooth’ curve preset that is not adjustable on the fly as is the default custom falloff that is on the other two tools. So, this is a matter of me setting new presets to get rid of the new default, got it.
The issue I have with the dropdown of presets is that they are not represented visually in the same curve object window like the default Custom falloff - but these in the dropdown are the same as the six little presets under the Custom falloff, except for the three additional like ‘Smoother’, ‘Inverse Square’ etc. Would be cooler if those in the dropdown were just under the Custom falloff draw window and the names appeared from the hover, then no need for a dropdown.
I know that’s a proposal and not a bug, so maybe later when Texture Paint gets to the forefront more. Thanks for the response.

