Taking a look at OptiX 7.3 temporal denoising for Cycles

I have found this documentation from nvidia about motion vectors or optical flow:
https://developer.nvidia.com/blog/tag/motion-vectors/

And this:

I don’t know if it could be useful to you, I don’t understand a word :slight_smile:

Yes, it’s not really about that directly (though the use of pmj sampling may show more or less splotchy patterns; I haven’t been a fan of pmj really). The goal is to understand at what noise threshold the denoisers become… “acceptible”. Adaptive is the only tool we have right now to measure some form of matematical noise level during a render. And it may be the primary tool of the user in the future.

Having the raw sample counts from your experiments is still useful, but they’re not transferable to other scenes directly and it’s difficult to understand how much further you’d have to go to get acceptible results.

Okay, that makes more sense. I’ll look into that once I’ve figured out this motion vector thing.

1 Like

That looks way more like what OptiX is expecting. I’ll investigate it further and see what I can get out of it.

I’m going to be honest, I’m lost. Changing motion vectors to Optical flow is probably what we need to do to resolve this motion vector issue. And Tobias Weis has a guide for this (as YAFU pointed out), I just don’t know how to use the python snippet to process a image. Because I have very little knowledge of python.

I just thought I’d add some information here that’s a combination of what I’ve found out myself and what I’ve read from others.


  1. The motion vectors produced by Cycles contains two sets of motion vectors. This is mentioned in the Blender manual and Tobias Weis’ article on how to generate computer vision data from motion vectors from Cycles.

Vector:
Motion vectors for the Vector Blur node. The four components consist of 2D vectors giving the motion towards the next and previous frame position in pixel space.

Source: Blender manual https://docs.blender.org/manual/en/latest/render/layers/passes.html

Important information: The flow-values are saved in the R/G-channel of the output-image, where the R-channel contains the movement of each pixel in x-direction, the G-channel the y-direction. The offsets are encoded from the current to the previous frame, so the flow-information from the very first frame will not yield usable values. Also, in blender the y-axis points upwards. (The B/A-channels contain the offsets from the next to the current frame).

Source: Tobias Weis’ article http://www.tobias-weis.de/groundtruth-data-for-computer-vision-with-blender/

Looking at this in Blender this seems to be true. And just to simplify and explain things, here’s a quick summary:

The motion vectors generated by Blender are 2D motion vectors. The 2D motion vectors describe the motion of a pixel along the X and Y axis based on its speed. These X and Y axis are saved to the motion vector pass using colour channels.

Red=X axis (Horizontal motion)
Green=Y axis (Vertical motion)

Blue=X axis (Horizontal motion)
Alpha=Y axis (Vertical motion)

There are two sets of X and Y axis saved. One describes the motion vectors from the current frame to the previous frame and one describes the motion vectors from the next frame to the current frame.

Note: The motion vectors can be saved with negative values (E.G. -10) to describe movements in the opposite direction. Hence it is important to save the motion vector pass in a float image format, like an EXR.


  1. OptiX temporal denoising expects a 2D motion vector pass and from looking at the example scene provided by Nvidia, the 2D vectors are saved to the Red and Green channel of the EXR files.

Red=X Axis (Horizontal motion)
Green=Y Axis (Vertical motion)

This lines up with Cycles. So why do the motion vectors behave differently?
Because of one thing. According to the OptiX documentation OptiX expects the motion vector pass to describe motion from the previous frame to the current frame. Cycles provides a motion vector that describes the motion from the current frame to the previous frame (plus extra for future frames). In theory the “plus extra” part (Blue+Alpha channels) should be ignored by OptiX, it only needs the Red and Green channel, so that should be a non- issue, but the fact the direction of the motion vectors is reversed is a issue. All the motion produced by Cycles is backwards (according to OptiX).

In temporal denoising modes, pixels in the two-dimensional flow image represents the motion from the previous to the current frame for that pixel. Pixels in the flow image can be in one of two formats:

So, how do we fix this issue? I believe it’s just as simple as flipping the direction of the X and Y values for the current frame to the previous frame motion vector and saving that. In the process, I’m also going to get rid of the motion vectors for the next frame as OptiX doesn’t need it and I want to be on the safe side. This can be done with a few approaches, but here’s two that appear to work:

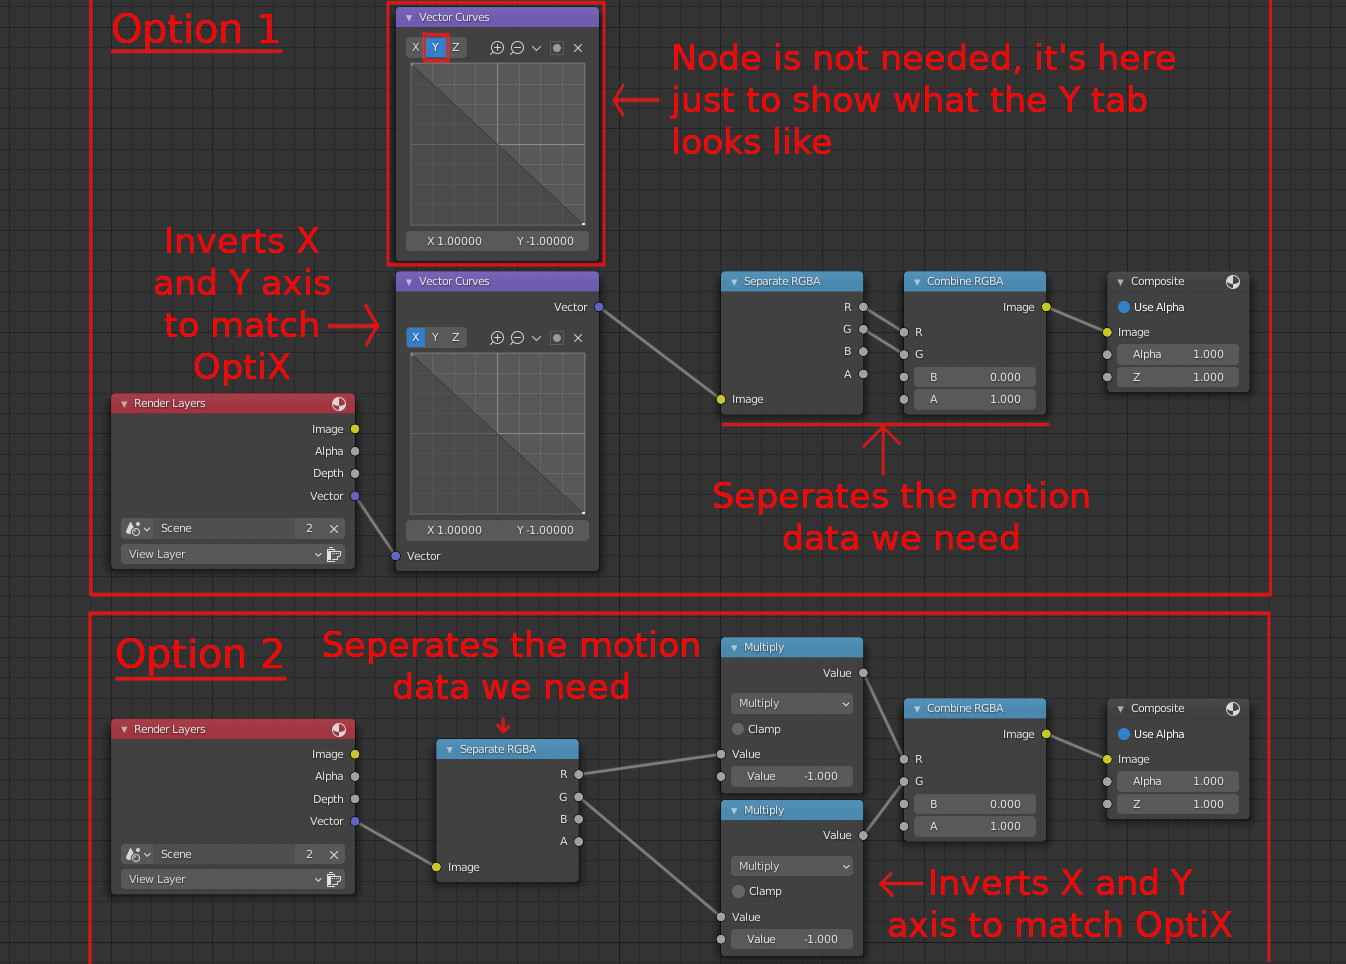
The results from these appear to match the general format expected by OptiX. The last thing I’m unsure about is if the magnitude is correct, but I believe it is.

I believe I have run some denoising tests using these new motion vectors (I’ve done so many tests I can’t be 100% sure about it) and I didn’t notice much of a difference. Will give it another try some time soon.

On another side note, the OptiX documentation says this about temporal denoising

The OptiX SDK provides the OptixDenoiser sample which could be used to verify properly specified flow vectors. When invoked with -z, the tool looks up the position in the previous frame of each pixel using the flow vector. The pixel value from the previous frame position is looked up in the current frame position and written. When denoising a sequence with the -z option, frame N with motion applied should look similar to frame N+1 in the noisy input sequence. There should be no major jumps when comparing these images, just shading differences as well as differences due to disocclusion and so forth.

Source: Nvidia OptiX documentation: https://raytracing-docs.nvidia.com/optix7/guide/index.html#ai_denoiser#temporal-denoising-modes

But the most important part to me is this:

When denoising a sequence with the -z option, frame N with motion applied should look similar to frame N+1 in the noisy input sequence.

Does this mean the noisy input should have very little variance between the previous frame and the current frame? As in, animated seed should be turned off? Or does it mean that the overall noise should be low so the differences between the previous and current frame are small? If it’s the latter, then that would explain why we don’t get great results. 100 samples still produces a lot of noise which can cause issues with the denoiser deciding that the scene is too different and thus doesn’t apply the temporal information?

Or am I just mis-interpreting the wording and instead it’s basically trying to say “temporal stability will be increased when using temporal denoising”.

1 Like

@deadpin I’m currently working on rendering and testing scenes with various noise thresholds to see what setting is required to make the animation temporal stable with:

  1. OptiX standard
  2. OptiX temporal
  3. OIDN

I will post results and probably a video when I’m finished.

2 Likes

I might save you some time: OIDN is terrible at temporal stability. I found myself reintroducing some of the original noise (RGBMix .6 or .7) to avoid the “frying-pan effect”

Thanks for the heads up. I’ll still test it anyway. I can just reuse the albedo, normal and beauty passes needed for the OptiX temporal denoiser to get the OIDN results.

@deadpin and anyone else interested. I rendered out the classroom animation at various noise thresholds and tested the temporal stability of OIDN, OptiX, and OptiX temporal denoising at each of the noise thresholds.

The end bit of the video is of my own personal opinion. You may have a different opinion to me and that’s fine.

Also, watch in 4k if you can. The renders aren’t in 4k, they’re 1080p, but the video was upscaled to 4k as 4K videos on YouTube have higher bandwidth than lower resolutions.

Also sorry for any spelling mistakes or grammatical errors.

Note: The sample count for these renders was 2000 with adaptive sampling turned on.

1 Like

Hmm, what was your Render sample count set to for this – looks like 128 still in the video?

[Edit] Answered below :slight_smile:

Sorry, should of included that information.

The scene was rendered at 2000 samples initially with adaptive sampling turned on. I will edit this into the original comment.

I did save the “debug sample count” pass if you’d like me to run them through a python script to find out the distribution? I’ll just need to know what the python script is and how to use it.

Ah, cool :slight_smile: Interesting result for sure. It’ll provide a good starting point for other scenes I think. And yeah, the results are quite acceptable at the levels you mention. The new optix does seem to give a slight uplift in results too so at least there’s that.

Only thing left is to at least confirm the motion vector / flow items. When this is integrated in blender proper who knows how it’ll work. For instance, enabling camera motion blur disables the ability to output the motion path pass. So there’s that little hurdle to get past at least too :slight_smile:

I can provide the script over on blender.chat probably later tonight. Don’t want to muddy the thread too much.

Yeah, it increases temporal stability, but a little nit pick I have is that it reduces detail. For some people, this will be fine (for myself it’s fine, most of the animations I render in Blender are posted online and get compressed so this small loss in detail doesn’t really matter) but for others this could be a deciding factor between using a temporal denoiser or using a normal denoiser potentially with a higher sample count.

I’m fairly sure I’ve figured out the format. The only thing I’m unsure about is if the magnitude of the flow pass generated by Cycles is the same as what OptiX expects.

I was planning on submitting a patch so people could make custom builds of Blender with the (hopefully) correct flow pass for OptiX temporal, but I have basically zero knowledge in C++ and couldn’t figure out what parts of the code I needed to modify to get the results I want.

If you or anyone else wishes to take a look at it, here’s what I believe needs to be done:

At the moment the motion vectors pass in Blender produces a “file” with all four “colour” channels used, RGBA. OptiX only cares about the information from the Red and Green channels, but Cycles seems to produce them in reverse to what OptiX expects. So to fix this, you need to take the Red and Green channels of the Motion vectors and multiply them by -1 (or in a more “correct mannor”, compute the motion vectors in reverse). OptiX may also require that the Blue and Alpha channels are removed/set to 0 and 1 respectable I’m not 100% sure on this part (but I did this anyway through compositing for my tests just to be safe).

Along with this “multiply by -1” thing, for the patch to be accepted by the Blender foundation I’m pretty sure the “vector blur node” and such in the compositor will need adapted to understand the new format.

I have a better write up on the differences between Cycles and OptiX motion vectors here: Taking a look at OptiX 7.3 temporal denoising for Cycles

Just a heads up for everyone, I’m planning to do another temporal denoising test with all the different denoisers but on a scene with a moving and rotating camera and moving and rotating objects. It probably won’t make much of a different, but I thought I’d check it out anyway.

I also plan to do more tests with static and animated seeds. It may take a while to get all the renders done.

If anyone wants to know what the scene is, it’s a modification of the “Danish mood” scene from Luxcore examples page.

2 Likes

I finally got OptiX temporal denoising working on Linux (The driver update required is now officially available on my distribution). As such, I have written myself a python script to help with creating the commands required to denoise animations with and without the temporal information.

The script isn’t perfect, there are quite a lot of hard coded things and there are areas you where you can break the code easily. It’s also designed with Linux and its file structure in mind. As such, it probably doesn’t work on Windows. I’m ignoring MacOS as OptiX 7.3 isn’t available on MacOS.

It can be made more user friendly by giving it a GUI and skipping the last step (The last step is: “Here’s the command I generated for you, copy and paste it into a terminal”). But I basically wrote up this entire script based on the knowledge I found from google searches over the last day and as such, you can probably guess I’m in-experienced with python and probably won’t be doing that myself.

To run this script, save it to a python file and I personally run it in the terminal with
python3 '/PATH/TO/SCRIPT'

Here it is in a .txt format. Just change the format to .py and it should work:
OptiX command generation script.txt (2.8 KB)

Here’s a video giving an example of how I use it:

correct_answer1 = 0
correct_answer2 = 0

print("Hello and welcome to the OptiX standalone denoiser assistant")
print("Let's start off by collecting information needed for denoising")
print()
print()
print()

optix = input("Please enter the path to the OptiX denoiser: ")
print()

beauty = input("Please enter the path to the Noisy pass: ")
print()

albedo = input("Please enter the path to the Albedo pass: ")
print()

normal = input("Please enter the path to the Normal pass: ")
print()

output_path = input("Please enter the path to the Output folder: ")
output_path = output_path[:-2]
print()

output_name = input("Please enter the name of the Output file (E.G. Denoised): ")
print()

while correct_answer1 < 1:
	animation = input("Are you denoising a animation? (y/n) ")
	print()
	if animation == "y":
		correct_answer1 = 1
		beauty = beauty[:-10]
		albedo = albedo[:-10]
		normal = normal[:-10]
		start = input("Please enter the number of the First frame in the animation (E.G. 20): ")
		start = int(start)
		print()
		end = input("Please enter the number of the Last frame in the animation (E.G. 150): ")
		end = int(end)
		print()
		while correct_answer2 < 1:
			temporal = input("Is the animation being denoised with Temporal Denoising? (y/n) ")
			print()
			if temporal == "y":
				correct_answer2 = 1
				flow = input("Please enter the path to the Flow pass: ")
				flow = flow[:-10]
				print()
				print("Copy the command below and paste it into a terminal:")
				print()
				print()
				print()
				print(fr"{optix}-F {start}-{end} -a {albedo}++++.exr' -n {normal}++++.exr' -f {flow}++++.exr' -o {output_path}/{output_name}++++.exr' {beauty}++++.exr'")
			elif temporal == "n":
				correct_answer2 = 1
				print("Copy the commands below and paste it into a .sh file and run it:")
				print()
				print()
				print()
				while start < end+1:
					if start < 10:
						print(fr"{optix}-a {albedo}000{start}.exr' -n {normal}000{start}.exr' -o {output_path}/{output_name}000{start}.exr' {beauty}000{start}.exr'")
						start = start+1
					elif start < 100:
						print(fr"{optix}-a {albedo}00{start}.exr' -n {normal}00{start}.exr' -o {output_path}/{output_name}00{start}.exr' {beauty}00{start}.exr'")
						start = start+1
					elif start < 1000:
						print(fr"{optix}-a {albedo}0{start}.exr' -n {normal}0{start}.exr' -o {output_path}/{output_name}0{start}.exr' {beauty}0{start}.exr'")
						start = start+1
					elif start < 10000:
						print(fr"{optix}-a {albedo}{start}.exr' -n {normal}{start}.exr' -o {output_path}/{output_name}{start}.exr' {beauty}{start}.exr'")
						start = start+1
	elif animation == "n":
		correct_answer1 = 1
		print("Copy the command below and paste it into a terminal:")
		print()
		print()
		print()
		print(fr"{optix}-a {albedo}-n {normal}-o {output_path}/{output_name}.exr' {beauty}")


Edit:
I’ve updated the script to better suite my needs.

It’s still probably Linux only, and now on Linux there’s support for outputting the command straight to a terminal (in some situations), however it’s limited to terminals that map to “x-terminal-emulator” which I believe is dictated by your distribution? This code should be a bit more robust than the old one and offers better efficiency for one of the things I like to do (denoise multiple animations by changing a small number of variables)

import os #Import os functions for accessing the terminal later

#Set some default values for variables
optix_path = "NO_PATH"
beauty_org = "NO_PATH"
albedo_org = "NO_PATH"
normal_org = "NO_PATH"
flow_org = "NO_PATH"
out_path_org = "NO_PATH"
out_name = "NO_NAME"
is_animation = "NO"
is_temporal = "NO"
start_frame_str = "0"
end_frame_str = "0"
out_to_term = "NO"


start_frame = 0
end_frame = 0
exit = 0

print("Hello and welcome to the OptiX standalone denoiser assistant.\nLet's start off by collecting information needed for denoising. \n")
while exit == 0: #This creates a while loop to make sure the script only exits when the user decides.
	is_digit_test_exit = 0 #This resets a value so the script can loop without issue.
	power_of_ten = 10
	print (f"\nop - OptiX Path: {optix_path}\nb - Beauty Path: {beauty_org}\na - Albedo Path: {albedo_org}\nn - Normal Path: {normal_org}\nf - Flow Path: {flow_org}\no - Output Path: {out_path_org}\nna - Output File Name: {out_name}\nan - Is Animation: {is_animation}\nt - Uses Temporal Information: {is_temporal}\ns - Start Frame: {start_frame}\ne - End Frame: {end_frame}\nc - Output Command to Terminal: {out_to_term}\n")
	change_variable = input("Would you like to change any of these variables, (g)enerate a command, or (q)uit? ")
	print("\n" * 100) #Clears the screen to remove distractions
	if change_variable == "op":
		optix_path = input("Please input the OptiX path: ")
		optix_path = optix_path.strip()
	if change_variable == "b":
		beauty_org = input("Please input the Beauty path: ")
		beauty_org = beauty_org.strip()
	if change_variable == "a":
		albedo_org = input("Please input the Albedo path: ")
		albedo_org = albedo_org.strip()
	if change_variable == "n":
		normal_org = input("Please input the Normal path: ")
		normal_org = normal_org.strip()
	if change_variable == "f":
		flow_org = input("Please input the Flow path: ")
		flow_org = flow_org.strip()
	if change_variable == "o":
		out_path_org = input("Please input the Output folder path: ")
		out_path_org = out_path_org.strip()
		out_path_org = out_path_org.rstrip(" '")
	if change_variable == "na":
		out_name = input("Please input the file Name: ")
	if change_variable == "an":
		if is_animation == "NO":
			is_animation = "YES"
		else:
			is_animation = "NO"
			is_temporal = "NO" #Temporal information can NOT be used without animation data
	if change_variable == "t":
		if is_temporal == "NO":
			is_temporal = "YES"
			is_animation = "YES" #Temporal information can NOT be used without it being a animation
		else:
			is_temporal = "NO"
	if change_variable == "s":
		while is_digit_test_exit == 0:
			start_frame_str = input("Please input the first frame of the animation: ")
			is_digit_test = str(start_frame_str.isdigit())
			if is_digit_test == "True":
				start_frame = int(start_frame_str)
				start_length = len(str(start_frame))
				is_digit_test_exit = 1
			else:
				print("\n\n\nSorry the input value is not valid, try again.\n")
	if change_variable == "e":
		while is_digit_test_exit == 0:
			end_frame_str = input("Please input the last frame of the animation: ")
			is_digit_test = str(end_frame_str.isdigit())
			if is_digit_test == "True":
				end_frame = int(end_frame_str)
				is_digit_test_exit = 1
			else:
				print("\n\n\nSorry the input value is not valid, try again.\n")
	if change_variable == "c":
		if out_to_term == "NO":
			out_to_term = "YES"
		else:
			out_to_term = "NO"
	if change_variable == "g":
		beauty = beauty_org.rstrip(" .exr'")
		albedo = albedo_org.rstrip(" .exr'")
		normal = normal_org.rstrip(" .exr'")
		flow = flow_org.rstrip(" .exr'")
		out_path_org
		digit_test_exit = 0
		digit_count = 0
		pluses = ""
		while digit_test_exit == 0: # while loop for counting the number of digits on the end of the files
			temp_character_saver = beauty[-1] 
			is_digit_test = str(temp_character_saver.isdigit())
			if is_digit_test == "True":
				digit_count = digit_count + 1 
				beauty = beauty[:-1]
				albedo = albedo[:-1]
				normal = normal[:-1]
				pluses = pluses + "+"
			else:
				digit_test_exit = 1
		digit_test_exit = 0
		if is_animation == "YES" and is_temporal == "YES":
			if start_frame >= end_frame: 
				wait = input("Sorry, it seems the input frame range is invalid. Try again. (PRESS ENTER TO PROCEED)")
			if start_frame < end_frame:
				flow = flow[:-digit_count]
				command = fr"{optix_path} -F {start_frame}-{end_frame} -a {albedo}{pluses}.exr' -n {normal}{pluses}.exr' -f {flow}{pluses}.exr' -o {out_path_org}/{out_name}{pluses}.exr' {beauty}{pluses}.exr'"
				if out_to_term == "YES":
					os.system(fr'x-terminal-emulator -e "{command}"')
					#os.system(fr'gnome-terminal -e "{command}"')
				if out_to_term == "NO":
					print(command)
					wait = input("\nCopy the command above into a terminal to run it - (PRESS ENTER TO PROCEED)")
		if is_animation == "YES" and is_temporal == "NO":
			if start_frame >= end_frame: 
				wait = input("Sorry, it seems the input frame range is invalid. Try again. (PRESS ENTER TO PROCEED)")
			if start_frame < end_frame:
				zeros = "0" * digit_count
				zeros = zeros[:-start_length]
				power_of_ten = 10 ** start_length
				command = fr"{optix_path} -a {albedo}{zeros}{start_frame}.exr' -n {normal}{zeros}{start_frame}.exr' -o {out_path_org}/{out_name}{zeros}{start_frame}.exr' {beauty}{zeros}{start_frame}.exr'"
				current_frame = start_frame + 1
				while current_frame < end_frame+1:
					if current_frame < power_of_ten:
						command = command + fr" && {optix_path} -a {albedo}{zeros}{current_frame}.exr' -n {normal}{zeros}{current_frame}.exr' -o {out_path_org}/{out_name}{zeros}{current_frame}.exr' {beauty}{zeros}{current_frame}.exr'"
						current_frame = current_frame + 1
					if current_frame == power_of_ten:
						zeros = zeros[:-1]
						command = command + fr" && {optix_path} -a {albedo}{zeros}{current_frame}.exr' -n {normal}{zeros}{current_frame}.exr' -o {out_path_org}/{out_name}{zeros}{current_frame}.exr' {beauty}{zeros}{current_frame}.exr'"
						power_of_ten = power_of_ten * 10
						current_frame = current_frame + 1
				print(command)
				if out_to_term == "YES":
					wait = input("\nSorry, outputing this command to a terminal is not supported\nPlease copy the command above into a terminal to run it - (PRESS ENTER TO PROCEED)")
				if out_to_term == "NO":
					wait = input("\nCopy the command above into a terminal to run it - (PRESS ENTER TO PROCEED)")
		if is_animation == "NO" and is_temporal == "NO":
			command = fr"{optix_path} -a {albedo_org} -n {normal_org} -o {out_path_org}/{out_name}.exr' {beauty_org}"
			if out_to_term == "YES":
				os.system(fr'x-terminal-emulator -e "{command}"')
				#os.system(fr'gnome-terminal -e "{command}"')
			if out_to_term == "NO":
				print(command)
				wait = input("\nCopy the command above into a terminal to run it - (PRESS ENTER TO PROCEED)") #This is used to generate a stopping point
	if change_variable == "q":
		print ("Quiting...")
		exit = 1
2 Likes

It would probably be very easy to do a python version that is OS agnostics, or at least compatible :slight_smile:

Probably would be easy to do that. Especially with a GUI that calls up the built in file browsers from various operating systems (and desktop environments) along with general calls for a terminal. But my python knowledge is limited… so… at the moment I’m sticking with what works for me, even if that reduces the usability for others.

One thing I was thinking about was potentially making a Blender add-on that allows the setup of OptiX temporal denoising inside Blender (until the feature is officially implemented). That way people don’t have to run a separate app/script and the GUI stuff is all handled by Blender. However, once again my knowledge of python is limited and as such I’m not sure I can make it without a lot of research and/or guidance.

It’s been a while but I’ve finally got around to reviewing the results for this Danish mood scene plus one with lots of foliage.

I’m sorry there’s no video to go with this comment, I find the process of making the videos a bit tedious. But here’s the results:

  1. The scene with foliage I’m just ignoring the results. I believe either the motion vectors were broken or the movement between frames was too large to produce good results with temporal denoising. On top of that, the image is already kind of mushy from the fact I’m denoising a lot of really fine detail objects.
  2. With the Danish mood scene, a lot of it lacks detail (E.G. White wall), and as a result the temporal denoiser did a good job in those regions. Shadowed regions seem to have more issues with the temporal denoiser, even if they’re on low detail surfaces (like the white walls). I did run tests rendering the scene with static and animated seeds, and the static seed produce a better result in my personal opinion in this scene.

As for what noise threshold you should use for OptiX standard vs OptiX temporal in this scene? I didn’t look into it that much, but I can tell you a noise threshold of 0.008 still isn’t that great, you’ll want to go for something lower like 0.004 or 0.002.

2 Likes

Good news! Patrick Mours is working on integrating OptiX temporal denoising into Blender:
https://developer.blender.org/D11442

7 Likes