Some Community Questions/Feedback for the 3.0 Shadow Catcher

Hello everyone, I shared a 3.0 shadow catcher tutorial here.
Let me know if any information can be added. I will add it to a pinned comment on the video.

Here are some of the questions/feedback from the comments and my own:

Questions:

  1. Is it possible to change the intensity of the shadows or reflections separately when using the shadow catcher pass?

  2. Does the shadow catcher have to be an “all or nothing” proposition? It would be nice to have reflections, shadows and lights separately if needed.

  3. When compositing with the filmic view transform, the imported background photograph is affected by the filmic tone mapping. This may be undesirable. The color shift of the background photograph can be avoided by using the standard view transform instead. But we then loose the better dynamic range of filmic on the 3D render. Is there a way to composite the shadow catcher pass using the filmic view transform for the 3D elements, without the filmic view transform shifting the colors of the imported background photograph?

Feedback:

  1. Shadow Catcher Pass name seems to cause confusion as it now supports indirect light. One user suggested interaction pass instead.

  2. Multiple users have stated the need for transparency with the shadow catcher for their product design workflow or compositing in other software.

thank you for your time

edit: added more user feedback

1 Like

I may be getting some of this wrong.

Usually when you record a video or take a picture with a camera, the resulting video/picture has a view transform applied to it. When you then import that video or photo into Blender, Blender then applies another view transform (filmic) on top of that which results in the image’s colours appearing “distorted”.

Ideally your real life image/footage should be in the same format as the Cycles render before you import it into Blender and have no transform to help work around this issue. However this isn’t possible for most people with consumer hardware, and I’m not 100% sure if it’s even possible even on high end cinema cameras.

You could go down the route of applying a view transform to your Cycles render then compositing it into your image or video in “standard” mode. This has worked for me in the past, but I’m not sure how accurate this is. You can achieve this effect in the compositor with this kind of setup (adjust the settings in the “tonemap” node to try and match the dynamic range of your render with your real life photo):

Another thing to note is that the “Shadow Catcher” pass only accurately works when multiplying it with an image in the same format as the Cycles render, (a linear scene referred file with no view transform?). In many scenes this won’t be noticeable, in others it will be very noticeable. Just like in the paragraph above, I’m not sure you can achieve this effect with consumer, or even cinema cameras.

I don’t know if this works at all at the moment, but I’d say that is a bug. If you import an sRGB image/movie (and you correctly set the format to sRGB) blender should do a sRGB → linear transform before working with it internally.

If you then export everything to filmic ofcourse it will apply the linear->filmic view transform to everything, that’s what you tell it to do!

So I don’t think it’s

sRGB input → filmic transform → output

but rather

sRGB input → sRGBtoLinear → internal linear format → filmic transform → output

Now this is all ‘theoretically speaking’ because I don’t think blender works completely in linear space internally? I did see 8 bit/channel textures passed into cycles, but maybe cycles does the sRGB->linear mapping on the fly? I’m not really sure how this works internally. If someone has better knowledge please correct my assumptions!

Anyway, moral of the story is: if you have a background image/movie in sRGB and you want to overlay your new layers on the original image you should output your layers in sRGB. Or convert your background image to linear, do the merging, and convert everything back to sRGB.

If you import sRGB and set the output to sRGB the result should be identical (except maybe for some slight rounding).

Hello @Alaska and @Baardaap thank you for your feedback.

I understand that tone mapping the 3D render can be a workaround.

To clarify my point 3 question:

I receive a print advertising assignment. The agency asks me to integrate 3D products in a photograph. In this case, it is expected that I match the 3D render to the photograph, without grading the photograph.

I can do this by using using the standard view transform.

The downside is, it gives contrasted results. Photographs have a high dynamic range, and the images sent for print are typically not high contrast to have them print nicely. The filmic view transform on the 3D elements would be more suited in this case.

My understanding is, that the imported image goes from sRGB to Linear, the compositing operations are done in Linear space, and then from Linear to Filmic. Thus highlights compression and color shifts from the Filmic transform are applied to the photograph.

I was wondering if there was a way around it?

Something I tested in Blender is to apply the inverse transform to the input photograph. Since there is no filmic option at the moment on the image node, I tried with filmic log:

Would this be an option?
Input photograph set to Filmic Log, Filmic Log to Linear, compositing operations in Linear, Linear to Filmic Log, no color shift?
The result is too low contrast on the 3D objects. But I was wondering, if we have the filmic option on the image node, wouldn’t the end result match more closely?

For this point the answer seems to be in the comments:

“usually when you comp shadows they are below one and reflections are above one. So if you want to reduce the reflections only you just have to reduce the values that are above one”

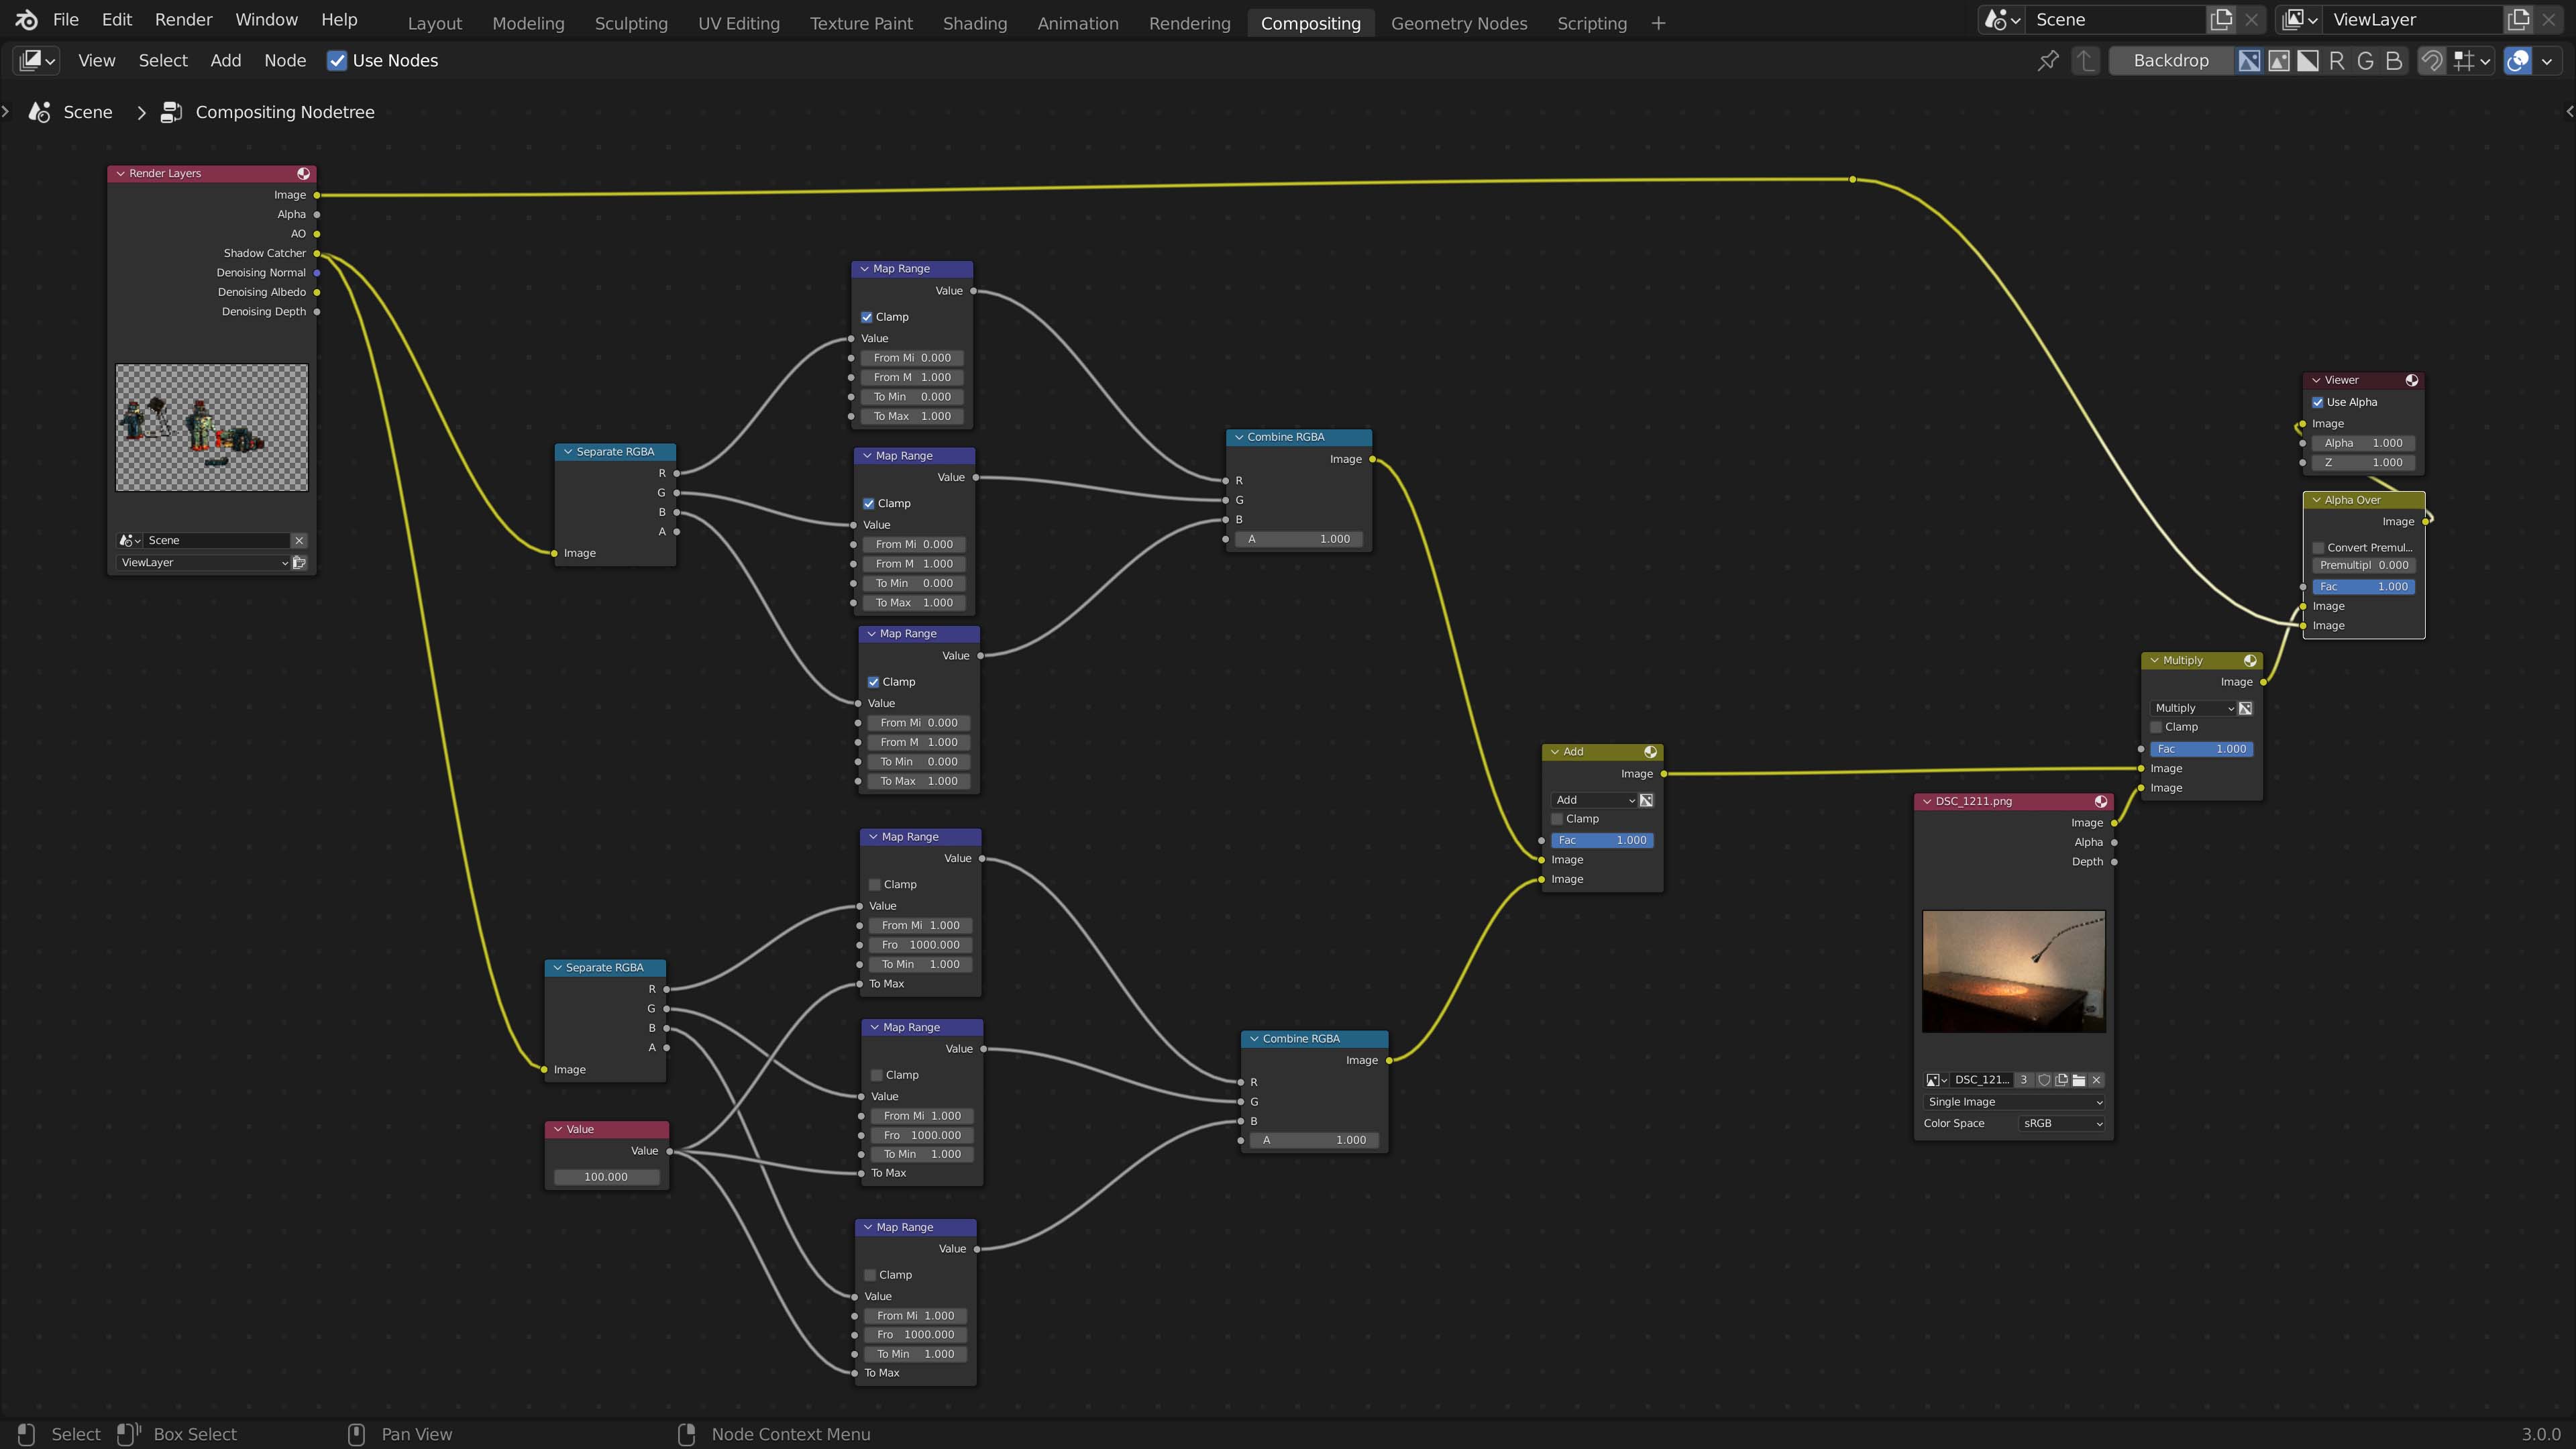
I tried to set it up in the compositor, with the issue that with my setup I am adding the 1 from the 0 to 1 range with the 1 from the 1 to + range, resulting in a wrong value of 2, when it should remain one:

Anyone knows how to set this up correctly?

It would be a good improvement to support separate shadows and reflections, it’s listed as an item in this task:
https://developer.blender.org/T71253

The accurate way to do this is to convert your footage to scene linear, do compositing there, and then apply the view transform.

How to do this is a rather deep topic. If you have a high end camera, then the camera manufacturer might provide some tools to get linear EXR images. There may also be other software or OpenColorIO configurations that help with this.

It would indeed be good to also support an inverse Filmic transform inside Blender to approximate this. It’s not really accurate since ideally you use an exact transform provided by the camera manufacturer, but may be good enough in many cases. There is a compositor node for color space conversion under code review, I think that would be the appropriate way of doing this.

3 Likes

thank you Brecht for the explanation. I shared the information in the pinned comment on the video.

Point 2 and 3 are answered. :white_check_mark:

For point 1, if anyone has the correct node setup that would be interesting. The idea is to be able to control the 0 to 1 range and the 1 to + range without affecting the values of 1. I asked the original poster in the comments how he would set it up but this might be difficult to communicate via a YT comment.

More User Feedback:

Multiple users have stated the need for transparency with the shadow catcher for their product design workflow or compositing in other software. I have pointed out that it can still be done in 3.0, without the shadow catcher pass, although it uses an approximation.

The comments:

  • “Oftentimes I use shadow catcher with transparency for product images, which can be used in powerpoint B2B sales pitch presentations. Product picture with slight shadow gives more depth and it looks professional on white (or just plain color) powerpoint slides. It would be great to get more control in compositor over shadow catcher pass, as today I have to render the shadows separately and additionally adjust them in photoshop. A nodes solution in combination with ColorRamp would be a huge time saver.”

  • To create product renders which then will be used on the web or in Photoshop. For that having a transparent png with nice shadows is really good

  • How would I get the shadow catcher layer to have transparency if I wanted to composite it using a different program?

  • My client always wants everything thing editable.

2 Likes

It’s unclear what exactly uses expect besides the transparency that’s already there when you disable the dedicated shadow catcher pass. It’s approximate but it has to be, there’s simply no way to store color in a single alpha channel for example.

There’s different types of passes that could be generated or different approximations used, that may work better depending on the render or the software used for compositing. But it’s all a bit vague without concrete examples.

I’m confused on how the catcher works. I can get a plane marked as a catcher to show shadows on the background object however if I place geometry under that plane, the plane covers the geometry. I have the transparent set for the catcher plane in film. Is a shadow catcher supposed to allow items under it to render or is this just for the background?

Objects behind a shadow catcher will not appear in the render since they are blocked by the shadow catcher. This is the expected behaviour.

This is because ideally you’ll want the shadow catcher object to block the rendering of objects behind it so it’s much easier to composite with. Because if the shadow catcher blocks the rendering of objects behind it, then it’s “masking out CG objects that shouldn’t be visible to the camera” which makes compositing easier.
Also, if the Shadow Catcher did render the objects behind it, then it’s going to be really hard to tell what is “shadow catcher information” and what are “CG objects you need to mask out”. And if you had a shadow catcher behind another shadow catcher and both were visible in the final render, that’s going to make it really hard to work with in compositing since you’ll be unable to easily seperate the two.

2 Likes

I was thinking this was probably be the case because why then not let the object just cast a shadow on the back object

So how would Blender handle an environment sphere?

Sorry for the late response.

Can you give an example of how this would work and why you think this would be beneficial? I’m not sure I full understand what you’re suggesting here.

Once again, which aspect are you asking about with regard to the environment sphere?
Are you asking for the option to render an environment sphere and place the shadows from a shadow catcher onto it?

Yes a sphere around the scene in which I want to cast shadows onto. A lot of our users implement their background environments like this vs a background image.

From my understanding, Cycles currently doesn’t support this option (Having a shadow catcher catch shadows, then place the shadows onto a CG background object).

However, if you use view layers and the compositor you can recreate an effect like this.

Here is a video demonstrating on how I would use view layers and the compositor to recreate the effect:

Notes:

  1. The scene I used wasn’t a good show case of this. And you might need to do some tweaking or modifications for your own scene.
  2. At a certain point in the video I go to the view layer properties and Override the sample count of the background render. This is just done to speed up the rendering of the background since it doesn’t have much complexity to it and doesn’t need many samples.

1 Like