That’s great, thanks. Will this function be added to the Blender Master builds soon?
1 Like
@pablodp606 I wanted to ask you something. What’s going to happen with the multires? For most sculptors it is a basic function for sculpt and is currently stuck in a version that fails and makes it impossible to work safely, or without touching the lower subdivisions, which is even worse. The same happens with dyntopo, but thanks to the voxel/quadriflow remesh it is something avoidable today. But in the case of multires it is something completely obligatory to use, although I think you don’t use it specially.
Is there any planning of this feature in a realistic timeframe?
1 Like
it was removed temporarily and might be added again when its ready.
1 Like
The Brush Hardness slider is a nice addition. It would be great if the slider would be easier accessible, e.g. in the RMB brush menu and in the top bar, next to Radius and Strength. Thanks.
1 Like
I’m wondering: when you reset a brush, is the reset temporary (only during that Blender session, or saved along with a particular scene), or will the reset be remembered from that moment on, even when installing a new daily build? Or is a Factory Settings operation necessary for that? (resetting every other setting as well)
A permanent Reset All Brushes option would be very welcome, so you can retain your other Blender preferences.
Hi @pablodp606 ,
I’ve been experimenting with Face Sets. I’m very happy with it. Here’s some feedback:
- It would be great if there would be a mode where you can see the rest of the mesh in a semi-transparent mode, while working on a fully opaque active Face Group.
- Is there a way to isolate multiple Face Sets and assign them to the same Face Set (sharing one color) ?
- I think it’s confusing that Viewport Overlays ➔ Face Sets visibility is set to 0 initially. It took me a while to find out why I didn’t see any Face Sets when using the Draw Face Sets tool.
- I think the Face Sets Auto-masking should be a scene-wide, general option in stead of brush-specific. Having to switch on the option for each different brush you use quickly becomes tedious.
Thanks!
1 Like
Your number 2 suggestion you can already do. I made my own keybinds that look like this:
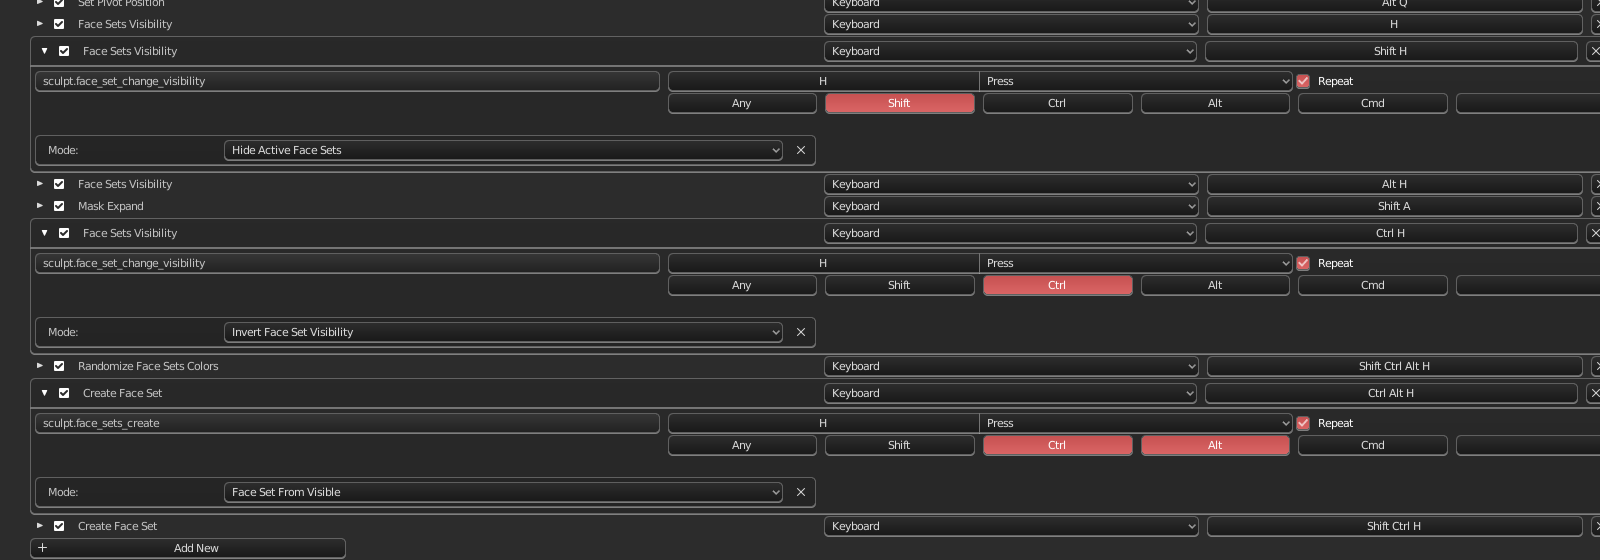
First you hide active face sets to hide the ones you want to share the same face set. After that you invert face set visibility to show the sets you want to group together. Finally you use face sets from visible to make them share the same face set.
Completely agree on number 4. Frankly, there are a lot of options for that could benefit from having global options on that same list. Would make it far more user friendly.
1 Like
It’d also be great to automatically create face sets based on UV islands like zbrush. Can give a really good starting point for many production models.
Faces for example, ears, inner mouth, eye sockets etc would be layed out seperately, it’d be a good way of getting face sets quickly. I imagine it’d also be helpful for anything hard surface.
3 Likes
Don’t forget the other way around (UV unwrap based on face sets)… ![]()
4 Likes
ye, that’d be neat  UVs could be a good topic for a GSOC project, hopefully someone will be interested in that area.
3 Likes
I’ve renamed this discussion to Sculpt Mode feedback. I think it’s good to collect Sculpt Mode feedback in one place on Devtalk.
If you’ve got good constructive feedback or an interesting suggestion regarding Blender Sculpt Mode, you can post it here.
Hopefully @pablodp606 will take a look here every once in a while.
Please don’t flood this thread with complaints and bug reports, so Pablo and fellow Blender developers will have a clear, useful collection of Sculpt Mode feedback.
 Bug reports can be submitted here.
Thanks.
4 Likes
I have a couple of suggestions.
-
A ‘lock normal’ option for the flatten brush. Currently when using the flatten tool, it seems to re-sample the face normals under the brush and slightly adjusts the angle at which it applies flatness. Could we have an option (perhaps holding a key down like ALT or CTRL) whereby the brush is locked to the face normal under the brush at the point you first hold the mouse button down - and holds that orientation until it’s released again. This change would allow you to easily create truly flat areas - whereas now, you can get some variation.
-
Some sort of force field tool that could be inserted or activated between parts of the mesh and would repel faces being sculpted and thus help avoid self intersection in parts of the model that are close proximity (like skin/skin contact areas on a human sculpt) . It’s a little hard to describe, but I have tried to illustrate it using objects with the cast modifier applied (see links below). As one object is brought closer to the other, the cast modifier causes the vertices to slow and deform, as if the objects are pushing up against each other.
2 Likes
Topology auto mask misses a lot, especially with large brush radiuses and, for example, a character with folded arms.
Worse, it doesn’t work at all with the mask brush.
I very often need to resort to switching to edit mode and making a selection (using grow, which I can count on always respects topology) and then hiding the rest, but that means I don’t see intersections in my sculpt until it’s too late, and I have to switch back and forth all the time.
Example:
The lower part is from the left arm, and the upper part that gets affected, despite topology mask being active, is the right arm, in a folded position. The vertices, if using control-select in edit mode, are a mile away from each other.
EDIT: Could it be that topology automask takes into account all of the vertices within the inner circle of the brush, when in fact, it should really only take into account the vertex closest to the dot in the center of it, because that is where you aim?
EDIT 2: I forgot, worse, even if if I start to sculpt away from the other arm, if I’m in mid stroke and get closer to that arm, it will still get affected. So that means that topology automask samples completely new vertices every frame, when it should remember it’s starting vertex until the stroke stops.
3 Likes
Hi, when blender is being used with screen tablet there is an issue when we want to make small brush from bigger(for righthanded people and left handed it will be a problem when going from small to big). The thing is that while doing this, we are covering the screen with our palm.
Can we add back 2.79/2.8 widget as option for people with screen tablets and people who prefer old design. Ive made a video for those of you who did not understand what im writing here.
regards.
5 Likes
I have two features I wish to leave feedback on which are relevant to the current development of 2.83.
First, let’s discuss MultiRes. Great work so far on addressing users’ concerns with this essential feature for workflow. While it is fantastic that the feature is getting a lot of long needed fixes to make it finally function as it should, I am concerned that we are still stuck with having to use Apply Base to deform the original model. As someone who started off with learning ZBrush, it just baffles me that MultiRes does not have an automatic Apply Base function when I began using Blender.
I hope the devs will consider implementing this essential feature in the future. I don’t want the new MultiRes to be a compromise between what sculptors want and what animators want. Create two separate modifiers if you can’t deliver on an automatic Apply Base function, since the current design just will not do.
Second, I want to talk about Face Sets. So far the development on it is going great. Keep at it! However, there are ideas I would like to see implemented that could expand its potential. Here’s a list:
-
Auto-generate face sets based on floating meshes. Meaning that if you have multiple meshes that aren’t connected to each other, it will simply generate face sets for everything at the press of a button. Very useful when discussing things like mechanical objects with possibly hundreds of little pieces. It would also be useful while isolating face sets where pieces of your mesh are floating and are not connected to each other.
-
Remeshers supporting face sets, i.e. Voxel Remesher and QuadriFlow. Voxel could benefit from this by allowing you the option to just remesh one set and keep the others intact. That way you could remesh an arm at a larger voxel size and then remesh the head or fingers at smaller voxel sizes just to save on performance a bit and also create some sort of Dyntopo-esque workflow where you can add details where absolutely needed. QuadriFlow would benefit from this the most however by creating much stronger guides for the remesher, possibly adding the ability to create mesh loops like in the face, fingers, toes, etc.
-
Add a menu option to cut your mesh up based on face sets, both as separate objects and as some sort of boolean operation. Right now I am able to do this by just going into Edit Mode, but it would be a nice quality of life feature nonetheless.
-
Add an option to mask the edges of your face set so they can’t be moved at all while sculpting. I can do this just using regular masking, but it could also be done with a check box or something.
-
Add full Face Sets support to the other painting modes, like Texture Paint Mode. Would be an excellent way for masking your model while texturing problem areas while also adding face sets support to other tools like the Fill tool.
-
Add face sets converters that can translate them over to Face Maps, Vertex Groups, and Materials. Right now face sets work in Edit Mode, which you can then all select and then assign as a Face Map/Vertex Group or add a Material slot to. Would be pretty convenient if you could somehow automate the process so you can mass create these based on the sets you’ve created.
-
Create UV islands based on face sets, with a little help from the new Sculpt Mode Vertex Paint system in the works, so the program knows where to cut in a set. Would be very handy when preparing your sculpt for texturing.
7 Likes
Thanks a lot @Frozen_Death_Knight! Great points.
1 Like
Quick question, I’m wondering how people are getting around this. I’m trying to transition some of my sculpting work from Zbrush to Blender, and despite using Blender for some time now I’m a bit cautious when changing key binds.
In Zbrush I don’t need to switch tools to mask or isolate parts. Any brush, pressing ctrl masks, shift+ctrl isolates, clicking on our outside of the selection exposes different options as well.
I’m curious how people are working around this, switching tools is a bit tedious. Maybe the defaults could be tweaked a bit.
Also, shift-w for growing a face set is great, but it’d also be handy to grow it based on topology and not have the cursor as a center point but as a starting point for the selection. Enables for more exact selections (like Zbrush tranform tool ctrl-drag). Could be handy for both face sets and masking.
1 Like
It is tedious yes. But about the mask, there’s a patch that would fix the mask switching madness https://developer.blender.org/D6515 and would allow us to use it in the same way like in zbrush, but unfortunately it seems like the devs are not understanding the feature and are rejecting it. I got no words man. ![]()
3 Likes
Nononono.  Mask and isolate is not a secondary brush, it’s tools used constantly independently of brushes all the time. Like smooth or pressing whatever to invert the function. Should have nothing to do with the asset manager, it should be defaults.
Well, I guess it comes down to consistency in the software, but working in high pressure production for 15 years now I really think there should be a vote on this . (also, let’s prettyplease propagate some of this to the weight paint tools)
4 Likes