When rendering with Cycles it is confusing to have two controls - film.exposure and cm.exposure - doing a similar (but not the same) thing. The difference is that film.exposure is before the compositor, and cm.exposure is after it:
Render → Film.exposure → Compositor → Color Management.
Film panel affects sampling during rendering, film.exposure has an effect on non-linear nodes in the compositor, and that’s the difference.
Why cm.exposure should be removed and not the film.exposure instead?
Exposure affects sampling. Human eyes are less sensitive to relative noise in darker regions of the image and this is taken into account in Cycles with adaptive sampling. At the same time Cycles shouldn’t account for the compositor and the following color management, because it is computationally way too expensive and breaks a common workflow (fix the render, then edit compositing).
Exposure modifies light threshold and might be used for other optimizations.
If you use compositor it’s doesn’t matter if you put exposure node right after the render result or right before the output. But it matters wrt previous points.
If you use Compositor it’s not hard to manually add an exposure node there, and if you don’t - you’d be better adjusting film.exposure.
On the other hand
Color management should have an exposure setting as well, especially given a gamma setting.
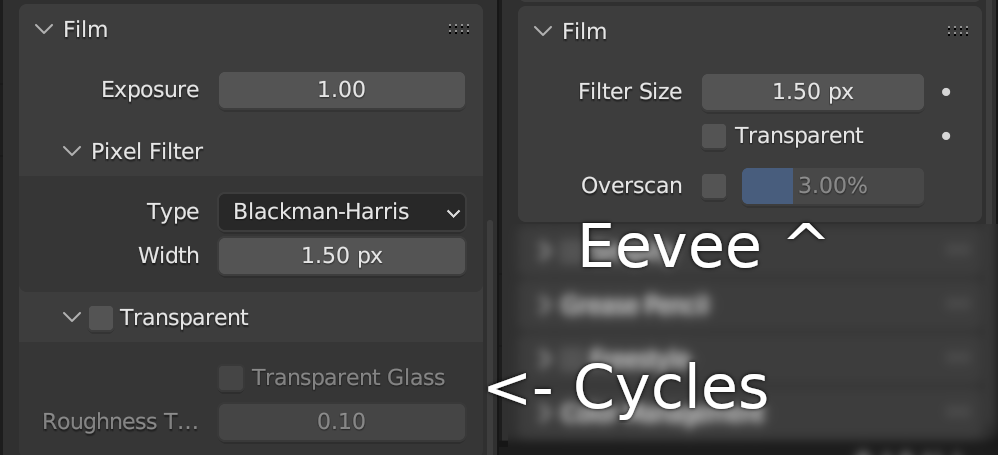
For Eevee there’s no exposure under the Film panel, though it should be for consistency. As Eevee will adopt RTX it might need similar to Cycles Film panel in the future anyway.
In general I think it would be great to bring the Film panel to a common denominator for Cycles and Eevee. Note the current difference:
The CM exposure is considered to be part of the image formation (the view transform)
A bit off topic but I actually think it makes more sense to rename that CM panel to be “Image Formation” since the name CM tends to mislead people to believe that Color Management is only about the View and Look combo and additional stuff like exposure and curve etc… But the fact is that every time you mark a texture as sRGB etc. you are doing color management by converting it to the working space. The stuff in CM panel are all for image formation (generate the image displayed on the monitor), it makes more sense this way.
“Taken into account” quite problematically since “what is noise” only makes sense after view transform (the image formation), you can never “see noise in the Cycles-outputed EXR”, you cannot look at an EXR, but only the end image generated by the image formation section. You have only seen noise after image formation, on your screen. Cycles can only “guess under some assuptions”.
You ignored the situation “only using image editor”. I personally love to import camera-encoding-converted EXR into Blender, use AgX for image formation, and adjust the exposure and look to get the desired Look. Or even just drag and drop an HDRI EXR into image editor and adjust the exposure to look at the dynamic range.
I would note that the so-called “Gamma” (off topic but the better name to call it is Power or Power Curve) is a kind of post-formation (after view transform) “Look” adjustment. Again it’s important to realize everything in the so-called CM panel is part of the image formation chain.
Also it is a common practice to adjust the contrast looks and exposure together since contrast looks adjustment can sometimes darken or brighten the result (depends on how close the intensity of the visually important area is to 0.18 middle grey) and people often like to adjust the exposure to compensate that.
I vote for keeping the exposure in the CM panel, and unrelated to this, rename the CM panel to Image Formation.
FWIW I don’t think that’s a good idea. Only color-nerds understand what the term image formation means. It would be better if everybody understood the exact intricacies of all this, but that’s not the real world.
@ktdfly, I agree there is an issue having both settings, in that often users will set the color management exposure when they should be setting the film exposure.
However simply removing it is not something we can easily do. There are some use cases for it like image editor inspection, and applying exposure to all render layers and passes in the compositor is not as convenient. Backwards compatibility (automatically creating compositor nodes?) is also tricky. Maybe there are alternative ways to solve those things,
A simple thing we could do is to put both exposures in the Color Management panel, and find some good name and UI organization to help make the difference more clear?
If we change the exposure in the film panel we affect the non-managed version of the frame, so when we save to EXR instead of having a neutral exposure that can be properly modified in compositing we have a baked exposure without color management, that’s an horror.
However the exposure in color management don’t affect the exposure of raw exr’s and we get the proper result in the exr, IMHO if there is some exposure that should fade away is the FILM one that breaks the resulting EXR, not the Color Management one
Regarding the relocation of the Film Exposure and renaming it, it can be called that way: “Film Exposure”, that makes a relation to the concept of it modifying the actual “film”, so it will be baked in the result affecting everything.
The big reason is because it’s just easier (especially when scripting) to use the same control for both Cycles and Eevee. An exposure adjusting add-on using Film for Cycles and CM for Eevee would be super confusing for users if they switched between render engines and it introduces way too much complexity. If Eevee had a comparable exposure setting, I would instantly switch!
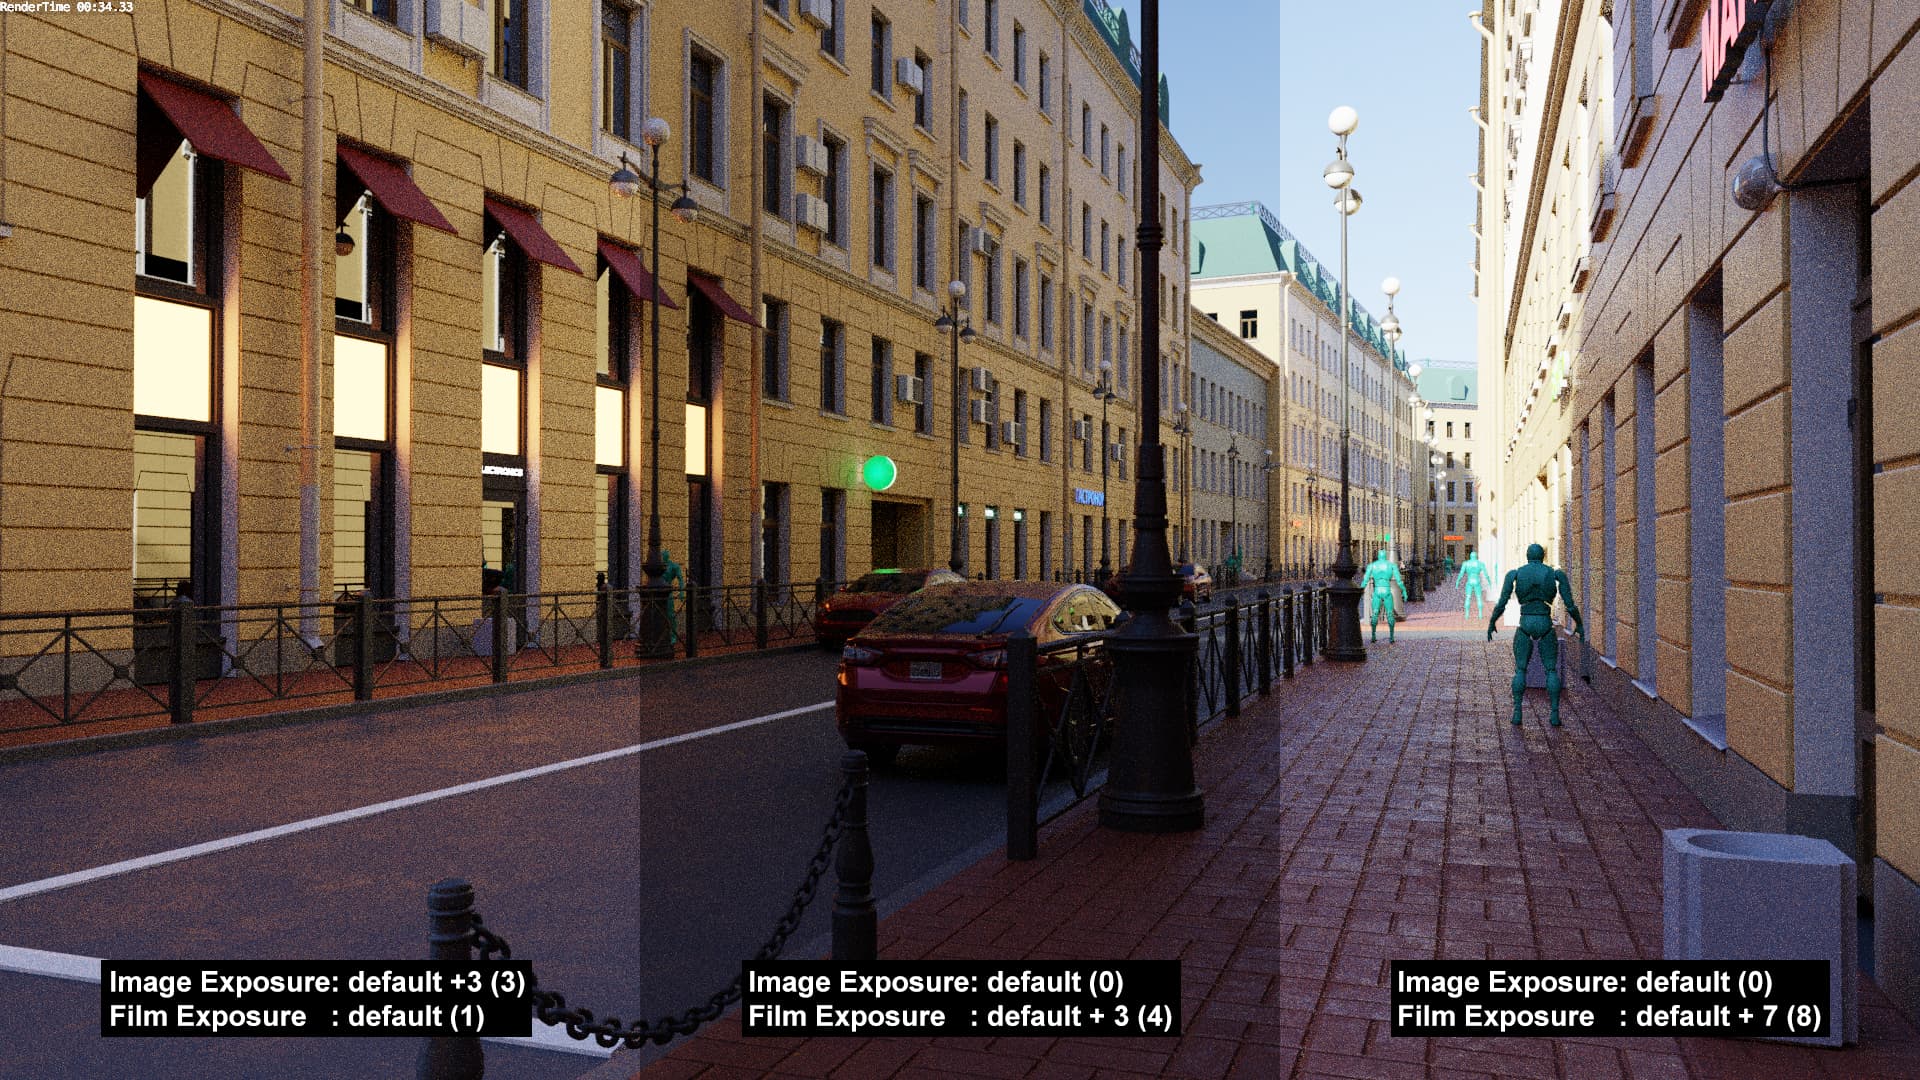
On top of that, image exposure can be adjusted in real-time while adjusting film exposure leads to invalidation and re-render which takes time. Besides that, users find film and image exposure confusing because to achieve the same result you have to use different values.
For example, to achieve similar results using only film exposure you have to crank it up to 8. Otherwise you’ll end up with a much darker picture which can confuse many: