Nodegroups to ship with Blender 2.8x

Although I can’t find the original posts anymore, I think it has been stated, that there are plans to ship some Nodegroup presets with Blender in the future (when the Asset Manager is done I guess), so why not start collecting content now? Nodegroups shipped with Blender by default could serve as a way of expanding Cycles / Eevees Material System, making common materials faster to setup and being a reference for beginners getting startet with Nodebased Materials.

Here are some guidelines that I thought could be reasonable to follow - let me know if you have anything to add / critique about this:
Nodegroups should:

  • Have a general usage (for example a procedural granite Texture with 20 parameters is nice, but not really of a general usage)
  • Not contain Image Textures (or should we exclude low res textures from that rule?)
  • Be setup nicely and understandable if possible
  • Be easy to use
  • Use the right input socket types - a value that must always be between 0 and 1, should use a slider. Also use the Min and Max parameters if necessary.
  • Generally, I think we should follow the Node Guidelines by the devs. Of course only if it makes sense in the context.

To put it with @smilebags words:

Posts here should contain:

  • Blendfile including the Nodetree / -Group
  • Compatibility info: Eevee, Cycles, (Compositor?)
  • Category (Shader, Texture, Color… could follow the existing Node Categories)
  • Type (Nodetree or Nodegroup)
  • Short description of what it does
  • Screenshot of the Nodegroup outside
  • Screenshot of the Nodegroup Inside
  • Example Render with material setup
12 Likes

I will start with an example:

Vector Distortion:

Compatibility: Cycles, Eevee
Category: Vector
Type: Nodegroup
Description: Distorts texture coordinates based on a custom texture

vector_distortion_group

Example:

.blend File

10 Likes

Random with Seed

Compatibility: Cycles, Eevee
Category: Input
Type: Nodegroup
Description: Returns a random value between 0.0 and 1.0 for each Object. Similar to the Object Info → Random Node, but with an additional Seed value.

random_with_seed_group

Example:

.blend File
Edit: notices some problems with the old setup and changed it

11 Likes

Remap Value:

Compatibility: Cycles, Eevee
Category: Converter
Type: Nodegroup
Description: Remaps the input map to a new range.

remap_value_group

Example:


.blend File

8 Likes

First, I applaud to you for starting this thread, such node groups are immensely useful and should be shipped with blender per default in the future to save everybody some time and make Blender more straight forward to use!

Second, well, I really don’t know if the following fits in here because the use case is quite specific. On the other hand, this isn’t possible with Blender out of the box so i hope this is useful for some. I made it for projecting a spherical panorama needed for VFX matte painting. The math was crudely hacked together, some logic was stolen from setups I’ve seen at blenderartists.org, so I’m pretty sure this can be further simplified by someone who is better at math than me. Nonetheless, it does a solid job imo.

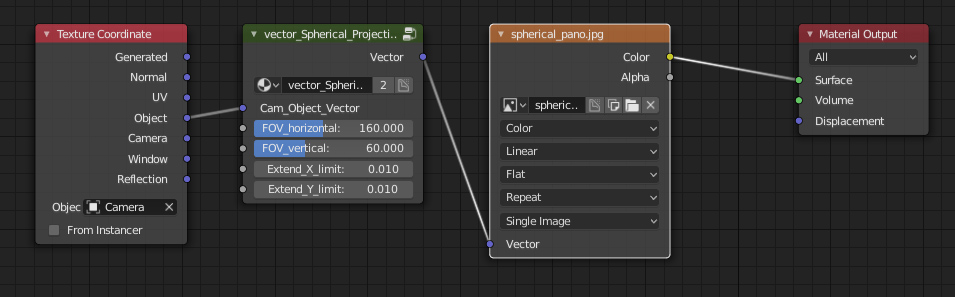
Spherical Projection:

Compatibility: Cycles
Category: Vector
Type: Nodegroup
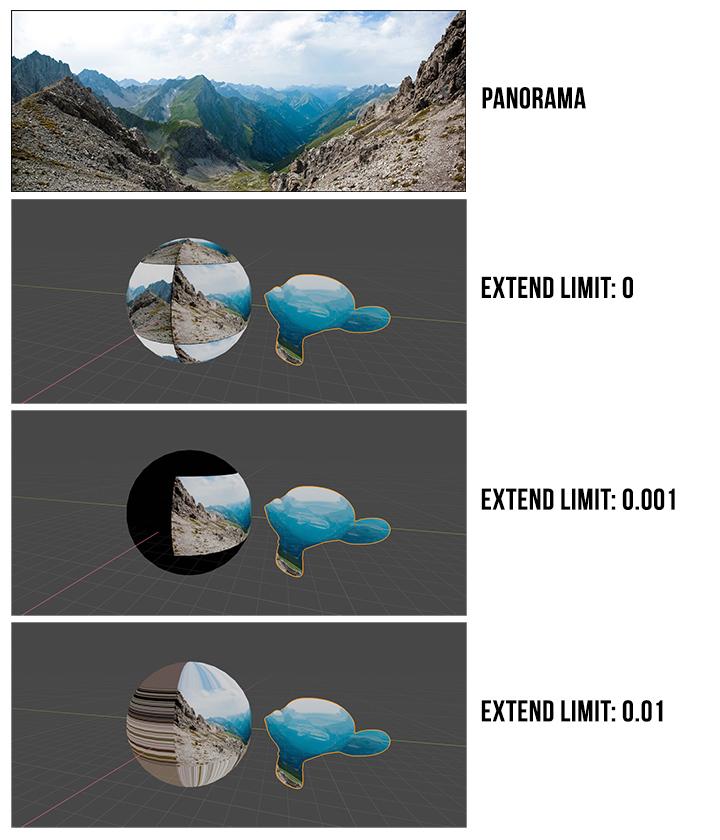
Description: Gives a vector for a spherical projection based on position and rotation of a camera. It has controls for specifying the horizontal and vertical FOV for the projection in degrees (as given by the stitching software). If the limit parameters are greater than zero the projection will “eat away” edge pixels to wrap around the sphere (useful when the projection is used for lighting of a shot or when the outer boundary of the projection would be visible in a reflection).

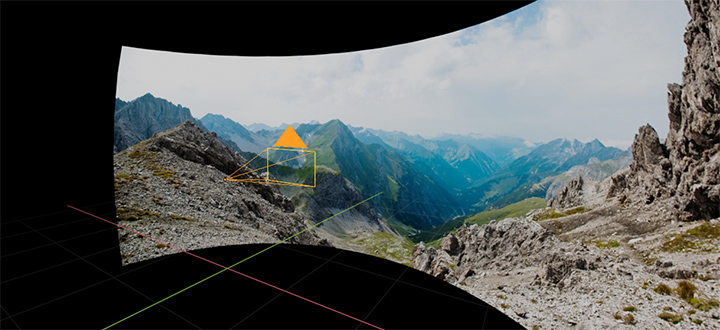
Example: (quite a bad example, sorry)

.blend File (2.80)

3 Likes

I have built an almost identical group I use in every scene with one extra input, a ‘bias’ which acts similar to a gamma curve and helps a lot when remapping textures to roughness maps etc. Whether this adds unneeded complexity or a convenient extra, I’m not sure, but I have found it very helpful.

1 Like

Funny - my setup also contained a value like this previously, but I removed it before posting it here. Since you also found it useful, I’ll just add it back in my original post. A simple power node Min:0.01 Max:10.0 should do.

I also initially went with a power-based approach but wasn’t happy with it for some reason. I can’t quite remember now why I didn’t like it, but I ended up going with an approach based on tan-1, which gives a slightly different behaviour I was more fond of.

That’s right, the behaviour I was expecting is that the value in the bias would be the ‘progress’ in the output range when the input was at 50%, and I wanted the range to go from 0 to 1 to be compatible with texturing this input too. I’ve found this a very pleasant falloff to work with for a variety of applications such as AO-based rust factors, cloud density factors and shader blending.

On another note, does anyone know of a way to create a checkbox input to a node-group? It would be great to be able to work with booleans in an easy way - I am aware you can work around this by having a 0-1 slider and using math nodes to make it exclusively 0 or 1, but having a checkbox in the UI would be nice (though this does mean you forfeit the ability to drive the input).

Sadly not possible currently. I would also like to like to have that feature. Enums would be great too, but I’m not sure in which way they should be exposed in the Group Input (inside the group).

I’ll look into your bias technique later. Having the range from 0 to 1 is a better idea.

1 Like

Glass Dispersion:

Compatibility: Cycles, Eevee
Category: Shader
Type: Nodegroup
Description: Simulates Dispersion in a glass shader.

glass_dispersion_group

Example:


.blend File

There are other, more advanced ways to fake dispersion in Cycles. I was not sure if that’d be overkill.
Fake caustics could also be integrated as a separate “Passthrough” node.

4 Likes

My “edgefinder” could be good to have as default. Works even on a simple cube.
image

6 Likes

image

2 Likes

it would be interesting if the guys of blender would create an archive folder in the datafile for this type of nodes, so that they appear automatically in the node menu …
@billrey

2 Likes

Good Idea, though in my opinion it could be simplyfied dramatically by not including the Musgrave texture. The same effect can be achieved by mixing it in before or after the Node. I cleaned it up a bit and instead added a Factor input that can be mapped and defaults to 0.5.
edge_detection_group

I think propper curvature is a planned feature for Cycles anyway - so it might get irrelevant in the future.
.blend File

4 Likes

The “Exposure” node group from this website could also pretty useful, there is no way to control exposure in the Blender compositor, I have to create this manually once and again.

Here is the picture:

And here is the blend file.

3 Likes

Great - no need to separate the channels though:


does the same thing

4 Likes

Great initiative. This will be useful when the Asset Manager ships. It makes obvious sense to include some useful node groups.

2 Likes

Terrain Mask

*UPDATE

Compability: Cycles, Eevee
Category: Shader
Type: Nodegroup
Description: Mixes Grass, Rock and Snow Shaders based on general terrain parameters like height and steepness.
terrain_mix_group


Example:

.blend File

Not sure if I’m breaking my own rule with this one. I think it’d be nice to have a standardized shader for mixing terrain shaders automatically. It’s still general in the way that the user needs to define his own Grass/Rock/Snow shaders and distortion maps.

1 Like

This could be verging on too specialised. That being said I have needed to create something similar before. What if I wanted to occlusion to play a part? Or wanted the south side to be more mossy, etc? I guess it could be used as a way to teach people how to work with normals.

1 Like