I wrote an add-on for hollowing out meshes. Its main use is for 3d printing. I would like to contribute it to Blender. The add-on is working, and I’m looking for feedback on its code and tips on how best to contribute it.
Context
Often in a 3d printing workflow, there is the need to hollow out a model before printing it, for instance, to save material or printing time. There is currently no tool in Blender able to reliably do such an operation, as far as I know. The closest alternative is the solidify modifier, but it generates inadequate geometry for any non trivial model.
Results
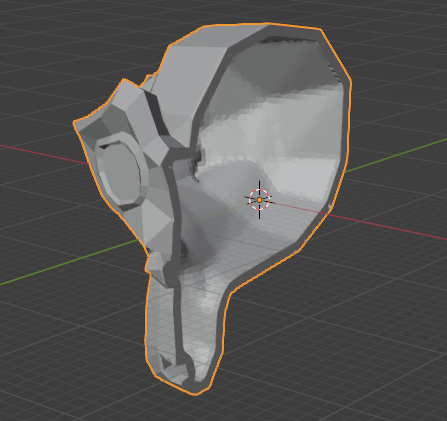
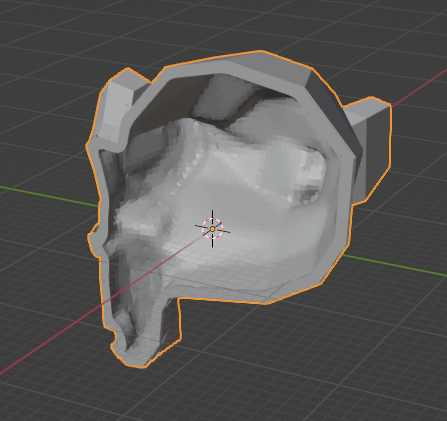
Here is an example with Suzanne. The result was cut to show the hollowed out inside of the model.
Implementation
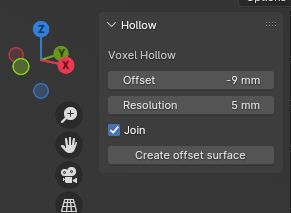
The add-on uses numpy and OpenVDB. The target mesh is read to numpy arrays and a level set is created in OpenVDB with a suitable halfWidth argument. An offset surface is than created. Optionally this surface is joined with the target to create the hollow object, after flipping normals if required.
As arguments, the add-on takes the desired offset, the resolution of the level set and a boolean to indicate if the created surface should be joined with the target.
The whole add-on fits in less than 200 lines of code. It is available here.
EDIT 2024-10-16:
For the ones landing here looking for this feature, the TL;DR is the hollow tool got integrated in the 3D Print Toolbox, which is now an extension. In Blender 4.2 and later versions, the extension can be installed directly from blender itself, in Edit->Preferences->Get Extensions (search for 3D print).
The add-on in Github linked above is only required if you want or need this feature in an older Blender version (3.6 to 4.1).
Hi, thanks! The addon works really well, but instead of including it as a standalone add-on, it would be better to add this functionality to existing 3D Print Toolbox add-on (which I am maintainer of).
There are still some minor issues that are needed to be handled (like add operator redo and account for object scale), you could prepare a patch for 3D Print add-on or I can incorporate your code myself along with tackling above mentioned issues.
Thanks! It would be awesome to have this included in the 3D Print add-on!
I would like to try and prepare the patch myself, as one of my motivations for publishing the code was to better learn how to program for Blender. Would you be available to offer some guidance? For instance, to account for object scale, I usually copy the matrix_world from the target to the new object, but I don’t know if this is the best way of doing it (I didn’t do that in this code). I’ll have lots of questions like that
Sure you can do it yourself if you want, fork blender-addons repo, then create pull request after you implement your changes into 3D Print add-on and assign me as a reviewer. I will give feedback on your code there.
Here is the getting started guide on how to contribute code, including using git, pull requests etc.
So it won’t be necessary to ship your addon with Blender, you can upload it on extensions and people will be able to find it from inside Blender and download.
It’s not sensible to add addon internally for one version, and its probably not getting accepted.
Since you are already liked by four BlenderArtists user now … you might even want to post this over there in the Coding -Released Script and Themes category ?? To get more attention… of users and coders…
( There where several questions about “what’s the best method to hollow out 3D objects for printing” … )
I understand. However, the way I see it, this feature (hollow out) makes much more sense as an operation in the 3D Print Toolbox than as an add-on by itself. The use cases I see are almost exclusive for 3d printing. The potential users of the feature will probably have the 3D print add-on already activated. If it were included there, it would save the users having to search for (or to know about) and install an extra add-on. Experienced 3d print users might just find an useful new operator in the add-on they’ve always had by the next time they upgrade Blender…
Moreover, the code is rather simple. The whole add-on, with class registration, UI and everything, is 165 lines, which is almost exactly one fifth of the lines in operators.py from 3D Print add-on, so it wouldn’t add so much to the maintenance burden there.
Anyway, if there still interest in integrating this feature in the 3D Print Toolbox I’ll be eager to help (and help maintain it). If there is not, I’ll just wait for the Extensions platform.
3D Print Toolbox will be extension also and not shipped with Blender. You can contact its creator and merge it there if you wish. But I’d leave it as separate addon if I were you.
Just an update. A much improved version of this code was merged to the 3D Print Toolbox, adding a Hollow operator there.
The much improved part is thanks to the excellent feedback and suggestions that @Mikhail_Rachinskiy provided.
I’ve updated the code in Github with the improvements from the pull request. For those who are using it, I strongly suggest to upgrade. It is much better to use, specially in dealing with scaling and modifiers on the target object.
Hi, I wanted to test this feature, so I downloaded 4.2 Alpha, but when I enable the 3D print toolbox addon nothing happens, it doesn’t appear in the N-panel, is this a bug?
My reason for having the normals as they are is that I wanted the offset surface to function as a normal solid in the case the tool generates only this surface. Think of this as a slightly reduced (or increased) copy of the target object.
Activating the Hollow Duplicate option, on the other hand, will generate normals consistent with a hollow body, i.e. the offset surface´s normals will point to the inside of the cavity for an inside offset.
But that is only my opinion on how the tool should work. If there is a compelling case for having inverted normals when generating just the offset surface, I´ll consider changing the behavior.
An additional cool feature would be to be able to apply it to open surfaces, and automatically make a bridge between the two boundary edges.
II think this is a more difficult problem than it looks, and definitely outside the scope of the hollow tool. You could use the Make Manifold from the same 3D Print Toolbox for that, but YMMV.
On the other hand, the hollow tool will reliably generate outside offset surfaces for open meshes. The result looks like the output of the Solidify modifier, and it may be a better alternative for that in some cases.
Hello, I was linked here from Suggestions on improving my (bad) workflow with (bad) mesh - Modeling - Blender Artists Community and I made an account just to post here. I think this is great tool. I like that it is in the 3D print toolbox, even though I might use it for other things. The first time I used it it worked flawlessly, but the second time I tried to use it, it didn’t work. I’m not sure what I’m doing wrong. I tried to upload my file, but zip files are not allowed on this forum, not sure how else to share it.
Hi!
I’m glad you find it useful. As for using it for other things, I have been using it myself mostly for offset surface generation, instead of making models hollow.
Regarding your difficulty with it, can you provide more details? Like:
Did you use the 3D Print Toolbox in Blender 4.2 or the standalone hollow add-on from github with another Blender version?
By “didn’t work” do you mean you got an error message like “Make sure target mesh has closed surface and…”, did not get any error message, or got a Python error with a traceback?
Another point is that while OpenVDB is very forgiving on the quality of the mesh it needs to work, a closed mesh is usually required for it to be able to find the inside of a model. And even if it can generate a hollow copy, the outside surface of it will be the one from the original model, with all the mesh quality problems it had before using the tool. Whether it will print or not will depend on how your slicer can deal with it.
Therefore, I think you should try to clean up the starting mesh as much as possible. Maybe it will help to use a remesh (voxel) modifier before hollowing out.
OMG!!! Thank you soooo much for this tool! I’ve been needing this for the last 4 years, and I’ve been stuck using the old and outdated MeshMixer to do it all this time. This tool is so much better. You’ve totally saved my arse.
This tool seems to work flawlessly except for one issue: the normals of the generated inner wall are wrong. Since this is the inside wall of the solid object the normals should be facing inwards, but they’re facing outwards, so when I join the original shell with the inner shell it creates invalid geometry. So, to fix it, I have to Invert Normals after doing the hollow.