Batch add custom properties

We are working with a large number of objects and planning on assigning custom properties to them. Is there any way we can automate this process? This is what we would like to achieve:

  1. First we would like to run a script that creates a custom property for all objects and adds the property name: ID, like this:
    bilde
  2. Then we would like to assign a base number as the property value: 1000 and a step: 1, the exact same way that 3ds Max does it: https://ibb.co/4VdDDQT

The result would be this: https://ibb.co/HVR65tC

So with 4 object in the scene, the script would add custom properties like this:

ID : 1000
ID : 1001
ID : 1002
ID : 1003
…etc

Any guidance would be highly appreciated.

Simply, you can create a script in the text editor with this in it:

import bpy

objs = [obj for obj in bpy.data.objects if obj.type in ["MESH", "CURVE"]]

numb = 1000

for obj in objs:
    obj["ID"] = str(numb)
    numb = numb + 1

If you want to work with only selected objects, let me know, that would require a slight change. This script only does mesh and curve objects, if you want that to change, let me know. You can also keep the ID as a number also, just take out the str() call.

Cheers, Clock.

2 Likes

Amazing @clockmender! :tada: This is just what we were looking for. Thank you so much for preparing the script. It would indeed be very handy to have a copy of a script that could perform the same operation to only selected objects. If you would be able to provide a snippet for that, I would highly appreciate it.

Again, thanks a bunch!

Try this:

import bpy

objs = bpy.context.view_layer.objects.selected

numb = 1000

for obj in objs:
    obj["ID"] = str(numb)
    numb = numb + 1

Cheers, Clock. :grin:

Thanks @clockmender you’re really good at this. Thanks for saving us for hours of work!

May I also check this with you: we happen to have an old script that we used for removing specific custom properties. It looks like this:

import bpy
for object in bpy.context.selected_objects:
    bpy.ops.wm.properties_remove(data_path = 'object', property = 'MaxHandle') 

Unfortunately it can only remove the properties of a single selected object. If we try to select the entire scene, it won’t work. Do you see how/if we could possibly make that script work to remove all selected objects with the property name MaxHandle?

Kind regards
Torbjørn

1 Like

The way you access the selected objects changed in 2.8, so the script would be:

import bpy
# delete Custom Property MaxHandle from all selected objects

for obj in bpy.context.view_layer.objects.selected:
    if "MaxHandle" in obj.keys():
        del obj["MaxHandle"]

Now we test for the custom property in the object’s keys, if it is there we can delete it. Note the display will not update until you float your cursor over the custom property…

Cheers, Clock.

1 Like

If you add these line to the bottom of your scripts, it forces an update of the UI panel:

# Force update of UI
for obj in bpy.context.view_layer.objects.selected:
    obj.select_set(state = True)

Just thought that might help you!

Cheers, Clock.

2 Likes

Thanks a lot @clockmender. This has all been really helpful. Thanks for resolving all of our scripting issues!

1 Like

hi again @clockmender, I hope you’re doing great!

We’re using your script pretty much every day!

We were wondering if you could help us make another version of the script.
Currently we have the snippet above which generates an increasing number to the Custom Properties.

What we would like to change in another version of this, is that we would like it to apply this increasing number to the object names. Meaning the selected objects would have their name changed into 1000, 1001, 1002…

The reason for this, is so that the same increasing number value will be able to generate both to the Custom Properties (current snippet above) but now also to the name (so that the generated numbers match). Maybe this could even be done in one script operation?

Would this be doable? :slight_smile:

Yes, give me a couple of days, I have a lot on at the moment, but it will not take long to change this…

Actually this is simple and I can tell you now:

import bpy

objs = bpy.context.view_layer.objects.selected

numb = 1000

for obj in objs:
    obj.name = str(numb)
    numb = numb + 1

Just tested it:

If you want it to have a pre-name, change the line to something like this:

    obj.name = f'part_{str(numb)}'

Then you get this:

Cheers, Clock. :grinning:

EDIT:

To do both the name and custom property just use this:

import bpy

objs = bpy.context.view_layer.objects.selected

numb = 1000

for obj in objs:
    obj.name = str(numb)
    obj["ID"] = str(numb)
    numb = numb + 1

:grinning:

Though your problem is a more specialized on (that needs scripting) - multi-property everything in a general sense as far as possible has been a design task for over one and a half years now. So I feel your pain as I would have needed it quite a few times as well, by now.

The only thing to do is wait, bug the developers that it’s important or finding someone willing and able to help with coding: https://developer.blender.org/T54862

Really useful, thank you!
I created a script to add a custom bool property called “ActiveGate” to the selected objects, at this point I would like to be able to assign to the object a material “ActiveMat” if the property is true and assign another material “DormentMat” if the property is false. I guess I should attach some sort of behaviour to the object that is triggered when the custom property is changed but I don’t really know how to do this, is there any sample script I can refer to?
Thanks!

Hi, yes this is all doable, give me a little time to look through my code samples to find you something that will work for you. You can start by searching for Handlers in the API, I am soooo busy today, but will get back to you soon… You can start by searching handlers in the API…

Welcome to DevTalk!

Cheers, Clock.

Great, take your time, I’ll go and investigate Handlers, thank you for the welcome :slight_smile:

Federaik

OK @Federaik some pointers to keep you going:

https://docs.blender.org/api/current/bpy.app.handlers.html?highlight=handlers#module-bpy.app.handlers

There are some basic examples there.

In my node system I also use handlers, some code snippets:

So, this one looks for an execute call in the node:

def start_exec(scene):
    """Run Execute Function in Nodes"""
    for nodetree in [
        n for n in bpy.data.node_groups if n.rna_type.name == "Clockworx Music Editor"
        ]:
        for n in nodetree.nodes:
            if (hasattr(n, "execute")):
                n.execute()

It’s just basically looking for the operation calls in the node, something like this node:

import bpy
from .._base.base_node import CM_ND_BaseNode
from ..cm_functions import connected_node_output


class CM_ND_AudioDebugNode(bpy.types.Node, CM_ND_BaseNode):
    bl_idname = "cm_audio.debug_node"
    bl_label = "Display Info"
    bl_icon = "SPEAKER"
    bl_width_default = 220

    num_entries : bpy.props.IntProperty(name="Entries #")
    output : bpy.props.StringProperty(name="Output", default="")
    text_input_1 : bpy.props.StringProperty(name="Out-1", default="")
    text_input_2 : bpy.props.StringProperty(name="Out-2", default="")
    text_input_3 : bpy.props.StringProperty(name="Out-3", default="")
    text_input_4 : bpy.props.StringProperty(name="Out-4", default="")
    text_input_5 : bpy.props.StringProperty(name="Out-5", default="")
    out_term : bpy.props.BoolProperty(name="View in Terminal", default=False)

    def init(self, context):
        self.inputs.new("cm_socket.generic", "Input")

    def draw_buttons(self, context, layout):
        layout.label(text=f"Number of entries: {self.num_entries}", icon = "INFO")
        layout.prop(self, "output")
        layout.prop(self, "text_input_1", text="")
        layout.prop(self, "text_input_2", text="")
        layout.prop(self, "text_input_3", text="")
        layout.prop(self, "text_input_4", text="")
        layout.prop(self, "text_input_5", text="")
        layout.context_pointer_set("audionode", self)
        layout.operator("cm_audio.display_audio")
        layout.prop(self, "out_term")

    def function(self):
        input = connected_node_output(self, 0)
        index = 0
        is_list = False
        self.text_input_1 = ""
        self.text_input_2 = ""
        self.text_input_3 = ""
        self.text_input_4 = ""
        self.text_input_5 = ""
        if isinstance(input, list):
            self.num_entries = len(input)
            if self.out_term:
                print("Viewer: '{}'".format(self.name))
                print("  ")
                ind = 0
                for v in input:
                    print(f"Item {ind}: {v}")
                    ind = ind + 1
            else:
                self.output = str(input)
            is_list = True
            if len(input) > 0:
                input = input[0]
        if isinstance(input, dict):
            self.num_entries = len(input.keys())
            if self.out_term:
                print("Viewer: '{}'".format(self.name))
                print("  ")
                for key,value in input.items():
                    if isinstance(value, list):
                        print(f"Key: {key}")
                        ind = 0
                        for v in value:
                            print(f"Item {ind}: {v}")
                            ind = ind + 1
                    else:
                        print("Key : {} , Value : {}".format(key,value))
            if "collections" in input.keys():
                collections = input["collections"]
                if not isinstance(collections, list):
                    collections = [collections]
            elif "objects" in input.keys():
                objects = input["objects"]
                if not isinstance(objects, list):
                    objects = [objects]
            if not is_list:
                self.output = str(input)
            for i in input.keys():
                if index == 0:
                    self.text_input_1 = f"{i}: {input[i]}"
                if index == 1:
                    self.text_input_2 = f"{i}: {input[i]}"
                if index == 2:
                    self.text_input_3 = f"{i}: {input[i]}"
                if index == 3:
                    self.text_input_4 = f"{i}: {input[i]}"
                if index == 4:
                    self.text_input_5 = f"{i}: {input[i]}"
                index = index + 1
        else:
            if self.out_term:
                print(input)
            self.output = str(input)

    def info(self, context):
        self.function()

    def execute(self):
        self.function()

This is the node:

Screenshot 2020-11-23 at 14.41.24

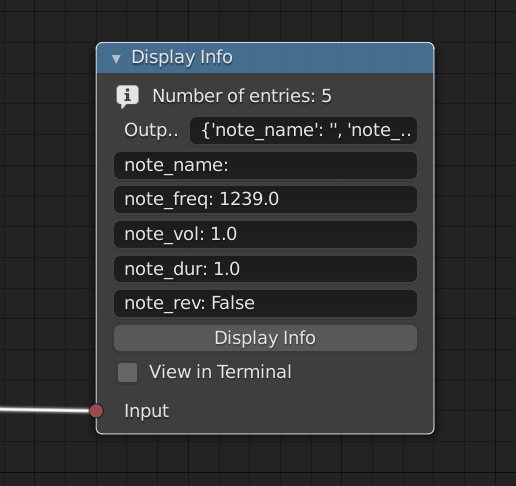
You can see at the bottom it has and execute function which calls previous code (function).

So if you add an operator to menu, for example, there are many ways to trigger handlers, it will look something like this:


You should see the Start Exec and Stop Exec buttons…

This is the code for the Start Exec button:

import bpy
from ..cm_functions import start_exec

class CM_OT_ExecuteStartOperator(bpy.types.Operator):
    bl_idname = "cm_audio.execute_start"
    bl_label = "CM Execute Start"

    @classmethod
    def poll(cls, context):
        return start_exec not in bpy.app.handlers.frame_change_post

    def execute(self, context):
        cm = context.scene.cm_pg
        if start_exec not in bpy.app.handlers.frame_change_post:
            bpy.app.handlers.frame_change_post.append(start_exec)
        return {"FINISHED"}

So when this is clicked it starts the handler running, by adding it to the frame_change_post handlers list. then at every frame change, in this case, every node that has an execute function will be activated, until you stop the handler with a function like this:

import bpy
from ..cm_functions import start_exec

class CM_OT_ExecuteStopOperator(bpy.types.Operator):
    bl_idname = "cm_audio.execute_stop"
    bl_label = "CM Execute Stop"

    @classmethod
    def poll(cls, context):
        return start_exec in bpy.app.handlers.frame_change_post

    def execute(self, context):
        cm = context.scene.cm_pg
        if start_exec in bpy.app.handlers.frame_change_post:
            bpy.app.handlers.frame_change_post.remove(start_exec)
        return {"FINISHED"}

Once you have removed the handler form frame_change_post it stops running. Now you can also combine/replace these with Timers:

https://docs.blender.org/api/current/bpy.app.timers.html?highlight=timers#module-bpy.app.timers

They let you run a function at time intervals, rather than on frame change. Beware here though not to run very complex functions at very short time intervals, or you will overload your CPU.

Let me know how you get on and I can help some more, if necessary I can put some test code together to check the Custom Property and change the material, but have a go yourself and see how you get on first. You will need to check that the object has a material and for starters, make sure it has only one material in material_slot[0]. Good luck!

Cheers, Clock.

Ok, thanks! Well although I’ve been programming a few years I don’t know python and not at all familiar with the Blender environment, so this would be my first attempt with a timer :

 import bpy

def every_1_second():
    for ob in bpy.context.scene.objects:
    
        if 'HDSactive' in ob :
            mat = bpy.data.materials.get("Inactive")
                
            if ob["HDSactive"] == 1 :
                mat = bpy.data.materials.get("Active.Red")
                print("Active Red!") 
                
            if ob["HDSactive"] == 2 :
                mat = bpy.data.materials.get("Active.Black")  
                print("Active Black!")
            
            # Assign it to object
            if ob.data.materials:
             # assign to 1st material slot
                ob.data.materials[0] = mat
            else:
            # no slots
                ob.data.materials.append(mat)
            print("Timer Parsed!")
            
    return 1.0

bpy.app.timers.register(every_1_second)

So to start I could create a custom panel with 3 buttons: to create the attribute for all the selected_objects, to register the timer, to unregister the timer; but I can’t seem to unregister the timer,
from a script or from the console “bpy.app.timers.unregister(every_1_second)” says that ‘every_1_second’ is not defined. Any idea?

Yes!, you have presumably defined every_1_socond in a script; let’s say you call this script something like “change_material.py” for example. You then have another script called “stop_matarial_change.py”, this script does not know anything about your function defined in the first script, so you must tell it where to look for it, so something like this:

import bpy
from .change_material import every_1_second

# Remove timer...

If you look at my example you can see this as the second lines, I keep all my functions in a separate “functions” script by the way so I can call them from anywhere else. the two dots in my line mean jump back one directory level by the way.

It’s a bit like the fact that you put import bpy at the start of every script so Python knows about Blender calls.

Cheers, Clock.

Could you please tell me how to remove properties from all seleted objects, not just the ones with specific name? Your advise will be really helpful. Thank you!