I have installed the very latest (11.3) CUDA Toolkit.
OK, got errors to:
Denoising ...
ERROR: exception caught 'OPTIX_ERROR_UNSUPPORTED_ABI_VERSION: Optix call 'optixInit()' failed: /home/user/Downloads/SDK/optixDenoiser/OptiXDenoiser.h:173)
Will leave it for now.
Cheers and good night, mib
1 Like
I get the same error even when trying with a single image. With OptiX 7.2 this works fine with single image.
Linux, CUDA Toolkit 11.3, nvidia 460.73, GTX 960
The issue is most likely your driver. You’ll probably need to update to 465.24 in the “new feature” branch or wait for something newer to arrive. At least I believe that’s the cause for this issue as when searching up the error I saw, the most common cause was an out-dated GPU driver.
Also, the page for OptiX 7.3 does say
Requires NVIDIA R465.84 driver or newer. You may need a Beta Driver for certain operating systems.
Edit: It may also be related to the C++ compiler we’re using.
1 Like
Ok, apparently in Ubuntu PPA they will not provide “Latest New Feature Branch Version” for now:
https://www.nvidia.com/en-us/drivers/unix/
I had a lot of bad experiences installing the driver from .run file, so expecting something new soon in that PPA.
EDIT:
I have found this other “untrusted” PPA, I am going to test in a few minutes:
EDIT 2:
It works with a single image now (465.24.02 driver). With sequence I get an error similar to what @SteffenD gets. But I’m not sure about how exactly it should be used and what are the necessary outputs from Blender.
I would like Patrick Mours to be a member of the forum to try to enlighten us and give us some clues about how temporal denoising with Blender outputs…
Hi, as it is not working for me with 460.79, can you may test the tiled denoising?
It would be interessting how much VRam it can save if you denoise a 4K image, for example.
Cheers, mib
EDIT: You can check with:
watch -n 2 "nvidia-settings -q GPUUtilization -q UsedDedicatedGPUMemory"
Do you know if the unit is in pixels?
./optixDenoiser -o /tmp/denoised/4k_d.exr 4k.exr
Works.
But:
./optixDenoiser -t 32 32 -o /tmp/denoised/4k_d.exr 4k.exr
It doesn’t work and I get the following message:
Loading inputs …
Loaded color image 4k.exr (3840x2160)
Load inputs from disk : 1058.07 ms
Denoising …
API Initialization : 152.45 ms
[ 2][ ERROR]: not enough scratch memory, need at least 33179143 bytes
ERROR: exception caught 'OPTIX_ERROR_INVALID_VALUE: Optix call 'optixDenoiserComputeIntensity
I cant find any information about the format but I guess int int meant tiles not pixel.
6 6 were 36 tiles.
Cheers, mib
I get the same error message.
I am going back to 460 driver right now, I was having problems with 465 driver when resuming from Sleep to RAM the system.
I hope someone can make it work 
1 Like
@YAFU and @mib2berlin
I just thought I’d let you know I got OptiX temporal denoising with the standalone app built from the SDK folder on Windows to work. I run the test on the included test files, and they seem to work, so I’ll be expanding my test to stuff from Blender. Will report back with results in a while.
Note: If you do decide to use the included test files as a test, keep in mind that it’ll probably just look white. This is because the default exposure of the scene is extremely bright. You need to bring it down a few stops to get it to look right.
2 Likes
I hadn’t even paid attention that there were sample images and “README.txt” documentation in optixDenoiser folder.
I have copied “optixDenoiser” binary to “SDK/optixDenoiser/motiondata” folder, opened terminal there and running:
./optixDenoiser -F 1-20 -a soane-BSDF-+++.exr -n soane-Normal-+++.exr -f soane-Flow-+++.exr -o result-+++.exr soane-Beauty-+++.exr
and it worked.
But I still have no idea how to do it with Blender layers/AOVs. Especially how to get that “Flow” output.
1 Like
Hmm… just tried the same and it worked. Drivers version 465.19
+-----------------------------------------------------------------------------+
| NVIDIA-SMI 465.19.01    Driver Version: 465.19.01    CUDA Version: 11.3     |
|-------------------------------+----------------------+----------------------+
| GPU  Name        Persistence-M| Bus-Id        Disp.A | Volatile Uncorr. ECC |
| Fan  Temp  Perf  Pwr:Usage/Cap|         Memory-Usage | GPU-Util  Compute M. |
|                               |                      |               MIG M. |
|===============================+======================+======================|
|   0  NVIDIA GeForce ...  On   | 00000000:42:00.0  On |                  N/A |
| 28%   52C    P0    72W / 250W |    945MiB / 11162MiB |      5%      Default |
|                               |                      |                  N/A |
+-------------------------------+----------------------+----------------------+

+-----------------------------------------------------------------------------+
| Processes:                                                                  |
|  GPU   GI   CI        PID   Type   Process name                  GPU Memory |
|        ID   ID                                                   Usage      |
|=============================================================================|
|    0   N/A  N/A      1278      G   /usr/lib/xorg/Xorg                540MiB |
|    0   N/A  N/A      2271      G   cinnamon                          213MiB |
|    0   N/A  N/A      2617      G   ...AAAAAAAAA= --shared-files      122MiB |
+-----------------------------------------------------------------------------+
1 Like
To export the Blender layers for use with the OptiX denoiser I personally went down this route in the compositor (yes, it can be made more compact, but this layout makes it clear what’s going on):
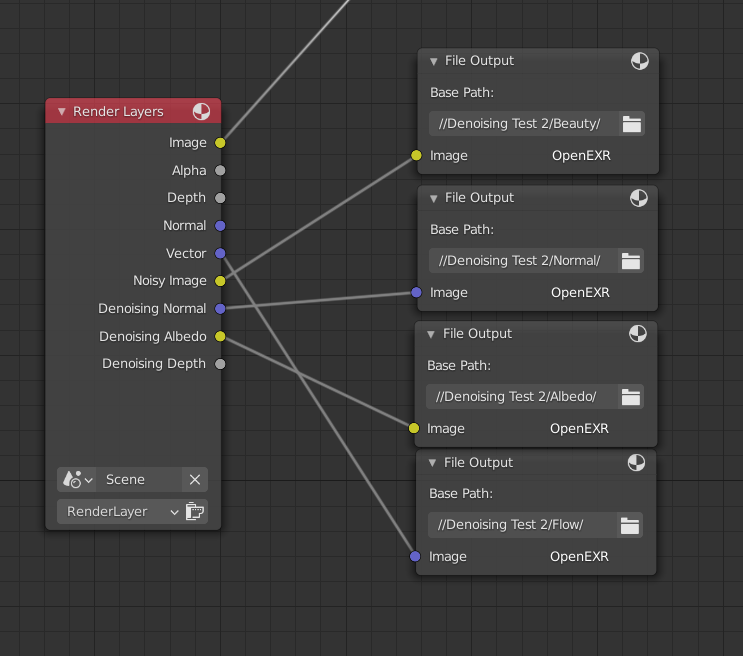
As for the “Flow” output, I just interpreted that as motion vectors, however I have a feeling the motion vectors may be in the wrong format for OptiX. But this doesn’t really make much sense. Suring OptiX uses an industry standard for motion vectors and so does Cycles? Or maybe it specifically calls it “Flow” because some other renderer uses a different format of motion vector and call it flow? (By format, I mean the colours and intensity of the motion pass may mean different things to Cycles and OptiX. E.G. Red might mean an object is moving left to Cycles, but it may mean moving right in OptiX)
Note: The flow pass is a motion vector mass
It requires the denoised beauty image from the previous frame as input as well as
flow (motion) vectors.
Source (OptiX 7.3 release notes, page 2): https://developer.download.nvidia.com/designworks/optix/secure/7.3.0/OptiX_Release_Notes_7.3.pdf?CD-llS8l6kuyp07gSjTNq7TjGKhVQ9WwFmdhF5vR2NWjozP0YqJI55F41FBAN_DEiLo7_flN67xYpb0R1kvXDkQALF28xjhOhALP7YXVNH_rRzDFewRsensOJgFtnNO-fcMEAvrj7VImr4b3j9x37ycl65N3v8zt_Q
2 Likes
Thank you. I’ll try it tomorrow.
Do you have any ideas on how to use tiles for denoising (t parameter)? Does it work on Windows?
Haven’t tested it yet. Will look into on Windows when I reboot back into it to test the temporal denoising.
(My Windows installation has basically nothing on it as I use Linux for almost everything, including rendering the test frames right now for temporal denoising as I don’t even have Blender on my Windows install)
1 Like
I gave tiled denoising a test on Windows and it worked (at least I think). Sadly I don’t have monitoring tools setup so I can’t tell you if it really helped with VRAM, and I can’t confirm for sure that the image was denoised by OptiX with tiles, but the image was denoised with no errors.
To use it, I used a command like this
/path/to/OptixDenoiser -t 100 100 -a “/albedo” -n “/normal” -o “/output” “/beauty”
Note:
-t 100 100 tells OptiX to use tiled denoising with tiles of 100x100 pixels in size.
-a "/albedo" tells OptiX where the albedo pass is located (Optional)
-n "/normal" tells OptiX where the normal pass is located (Optional)
-o "/output" "/beauty" tells OptiX where to output the result and where the un-denoised (beauty) render is.
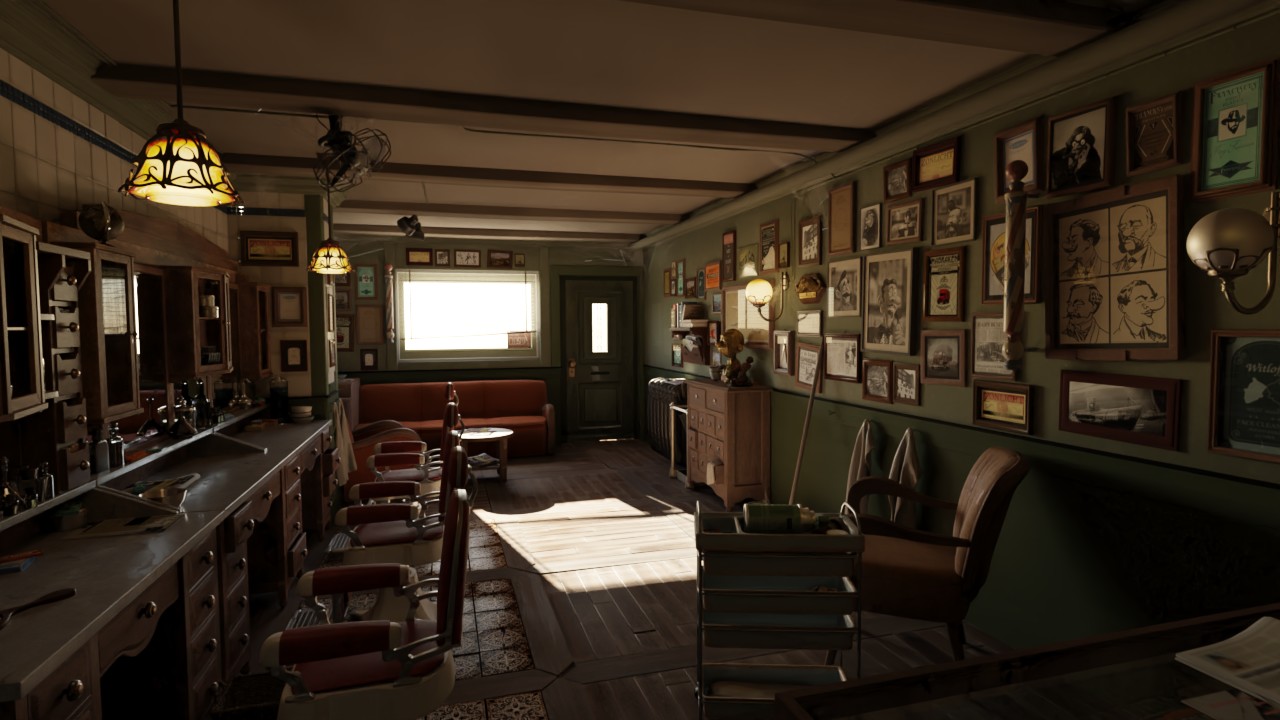
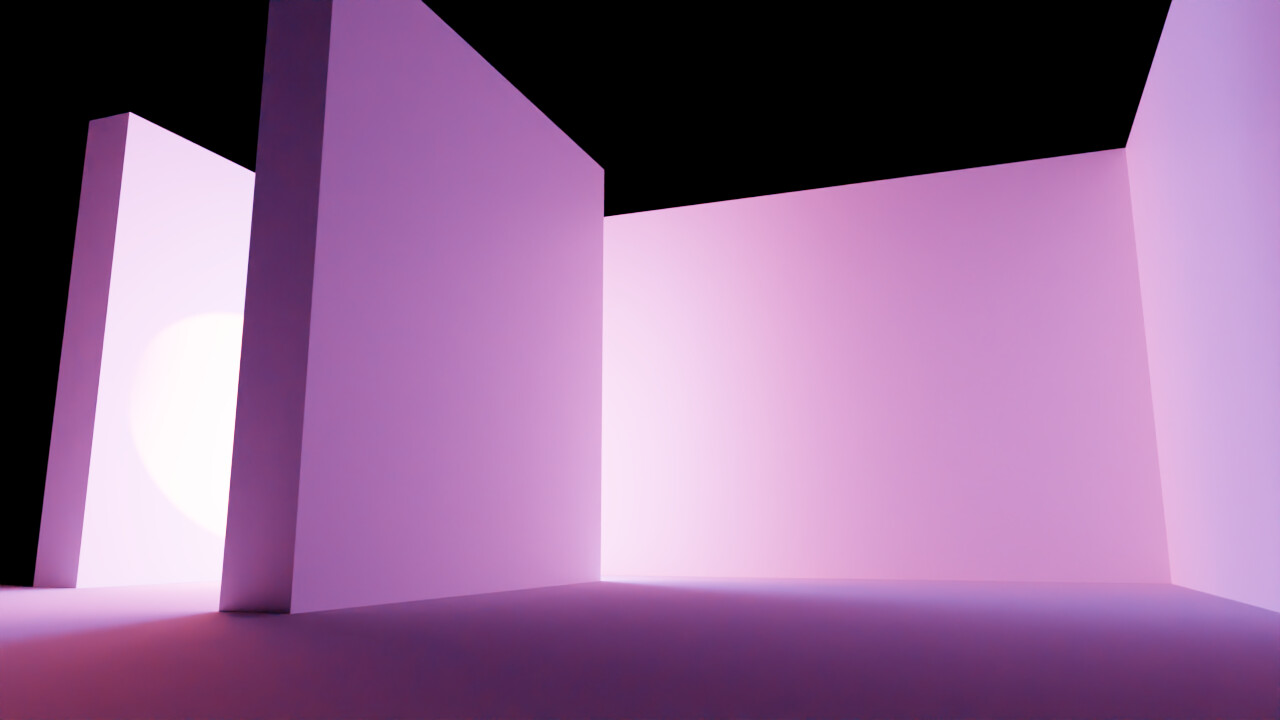
I gave temporal denoising a try using these scenes.
- Agent 327 Barbershop re-worked a little bit. (available for download here: https://www.blender.org/download/demo-files/)
- A very simple scene consisting of a few white walls with two lights. The main focus of the scene is lit entirely by in-direct light and thus is noisy.
- A little scene I had for some other project.
Here’s images of all of them (all rendered at a high sample count and denoised with OIDN so you can see the scene for what it is… although, they’re rendered at a resolution of 1280x720… so…)
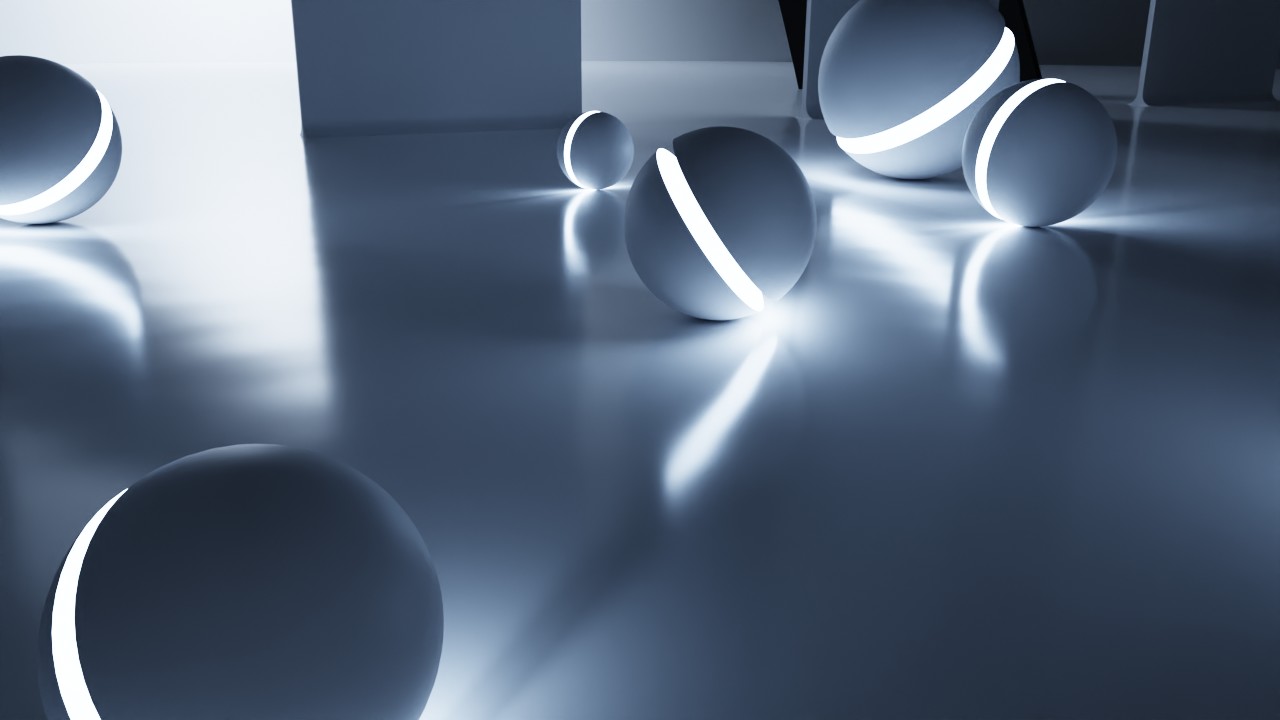
In each case, I animated the camera moving (both moving forward and slowly rotating). Due to long render times (and multiple stuff ups on my end), I only rendered out about a second from each project. In the third project, I also had the balls rolling around slowly. I also had the “Animated Seed” option turned on as the example scene provided with OptiX looks like it had this kind of option enabled, and so I thought I would match it.
DISCLAIMER: MOST OF WHAT I TALK ABOUT IN THIS POST IS SPECULATION AND PERSONAL OPINION. KEEP THAT IN MIND. I MAY BE (and probably am) WRONG ON CERTAIN POINTS.
Here’s what I discovered from testing in these specific scenes. Things may be different with different scenes, sample counts, settings, etc.
-
As mentioned in previous comments, I believe the motion vector format generated by Cycles are not in the form OptiX wants. Quickly running tests, I could not get the OptiX denoiser to run temporal denoising without the motion vectors. So, my results may be a little skewed? But once again, this assumption may be wrong.
-
OptiX temporal denoising does not appear to use temporal re-projection (using motion data to project data from future or previous frames onto the current one to reduce noise before denoising). I was kind of hoping for this, but this does not seem to be the case. And temporal re-projection isn’t mentioned in the documentation of denoiser, so it makes sense that it may not be here.
-
As a result of a (presumed) lack of temporal re-projection, you will still need to render your animation at a high sample count. Why? Because from my understanding what the temporal denoiser is actually doing is trying to keep the denoiser temporally stable. And as a result, if your input image is noisy enough to cause a loss of detail with OptiX denoising, or the standard “blotchy” effect we see with AI denoisers, then what the temporal denoiser will try to do is keep the blotches/loss of detail stable. This is fine… stable blotches are better than blotches in random places per frame, but this still means you need a high sample count if you want a temporally stable animation AND high detail. Another thing to note, the temporal denoiser didn’t seem to be that temporally stable in some areas of the image. It may be related to the motion vector thing talked above or it may be that the scene was too noisy to properly keep stable.
OPTIX TEMPORAL DENOISING WILL NOT INCREASE THE DETAIL OF A ANIMATION WHEN COMPARED TO STANDARD OPTIX DENOISING. IT WILL JUST MAKE THE LOSS OF DETAIL (OR BLOTCHES) MORE TEMPORALLY STABLE. (BASED ON MY OBSERVATIONS)
- One extra thing I did notice was that the animation denoised with temporal denoising seemed to be softer overall, and lacking specific sharp edges in some cases, when compared to the non-temporal version. This could be related to the issue described in point 3. It could be a result of the motion vectors messing stuff up. It could be that my scene was just too noisy and a part of the temporal denoising algorithm decided that a stable loss of detail was better than random patches of detail and non-detail (probably tying back into point 3 again).
I don’t really know how to describe it. And trying to show you probably isn’t going to be great due to compression on video platforms and the fact my animations are rather short (I do not believe the shortness of the animation had a negative impact as the OptiX documentation only talks about the denoiser using the current frame and the previous frame, nothing else.) Also, my results may be rubbish because of how I ran my tests. So I suggest each of you try it out for yourself when/if you can.
DISCLAIMER: MOST OF WHAT I TALK ABOUT IN THIS POST IS SPECULATION AND PERSONAL OPINION. KEEP THAT IN MIND. I MAY BE (and probably am) WRONG ON CERTAIN POINTS.
1 Like
Its quite easy to create a rudimentary temporal denoiser in the compositor.
Just project the previous and next frames into the current frame using motion vectors and the 2d displace node and average/median them together.
Much cleaner renders and temporal stability is increased. (can also this be a feature request for a timeoffset node in the compositor ? )
Caveats are
- Fails at fast moving objects
- Fails at areas that dont/cant have motion vectors (reflections / refractions)
- First and last frames of a sequence don’t have extra frames to sample from so they will always be a bit noisier.
1 Like
Thanks for all your research on this.
I think I’m getting a pretty good result with Classroom scene, only 50 samples. NLM denoiser also requires high render samples with almost no noise in images, only containing some residual noise. So I think even OptiX denoiser might require even less render samples than NLM denoiser. That said, 50 samples is an extremely low value, but it is good for a first tetsing.
I am using “Image” output instead of “Noisy” image output (Noisy image is modified with fireflies removal for better NLM denoiser result)
Then later I will share Classroom scene comparison.