I believe it is white when it is not finding a snap point and turns orange when a snap point is found.
In general it indicates what is currently the active snap point. In case of a base point it is under the mouse curser and in case of having base point turned off it depends on the snap and pivot settings.
For example, if you set “snap with” to “center” the white target will be in the center of the object you are trying to snap to something. set “snap with” to “closest” it depends on where you want to snap it and the white target will ajust its position accordingly.
I would prefer that nothing in blender required the use of the cursor. The software should be able to interpret multiple clicks without making one use the cursor to indicate where a basic action should happen.
The “white target” is the Snap Base itself.
It can be calculated automatically with the “Snap With” options, or set by the user with the B key.
Note that if the Snap Base and Snap Target (orange) are in the same position, overlapping each other, only the Snap Target will be drawn. This is for the drawing to be cleaner.
I’ve had a chance to test out 4.0 alpha build from today, and while on paper I wasn’t convinced of the utility of moving the view while transforming, in practice it’s amazing. It’s one of those things I didn’t know I needed. Mad props for making this work. I’m sold.
Then, basepoint transform. Let’s not mince words, it’s amazing. So straightforward. It feels… well, simply natural : grab Suzanne by the ear, move it over there. The legacy options (closest, median, etc.) already look antiquated in comparison.
Now I suppose it could be made even more straightforward by not requiring the hotkey (B). Perhaps it could go something like G → click on basepoint → click on target and voilà.
In any case that is such a QOL it needs to be said out loud. Thanks !
Maybe it would make sense to introduce a new active tool (maybe as a sub-tool of the “Translate” tool) that worked like this. That would work nicely with keymap option that enables the corresponding active tool instead of immediately starting the operator.
For tools, it was discussed a while ago on changing the behavior of Move tools if snap toggle is enabled.
But it conflicted with the current click-drag behavior of doing the Select-Box instead of activating the operator of the tool.
Creating another Tool can be a solution. But note that there are many other transform tools besides Move. It is appropriate to think of a solution that can benefit all Tools.
Why make this an all in or nothing thing? Use of the cursor is absolutely fine wherever it makes sense but it should never be forced, either. It’s there to be used when it’s the logical thing to use.
The benefit of B hotkey solution is the support of a heavy alternation which is typical for mesh modeling - when basepoint transforms are interleaved with non-basepoint transforms like freehand/axis-restricted (by closest) and also numeric value-driven transforms.
Autobasepoint transform is typical for pure CAD solutions, such kind of a solution is known to be weak with heavy alternation, and, therefore, is less versatile. I can agree with mano-wii that it may require a separate tool or a separate “autosnapping” mode.
Hello,
I did few test with the build today, I have to say that it is great to be able to move and snap to reference points. Athough, it is intuitive for moving, is not so much for scaling and rotating (not sure if the design for those is finalized or not).
For me the main caveat is that I have to rely on the 3d cursor to scale by base and the same to rotate.
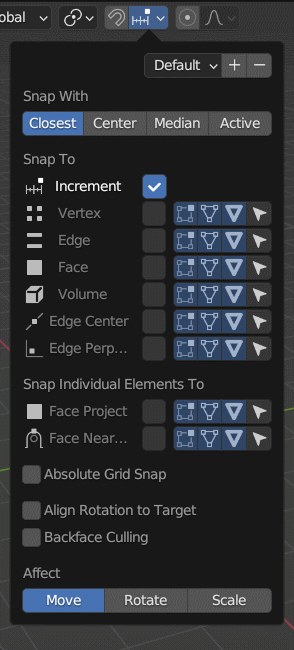
It might be a controversial topic, but I came up with an idea that maybe can “overcomplicate” the Snapping panel in order to solve some old retopology issues (like snapping only to vertices and edges in edit mode and not to unedited objects):
The idea is to add Presets and Filters.
Does it seem reasonable?
I think I would be down for presets. Of course as every time presets are involved there should be a set of good defaults. But I think it’s worth the complexity : often when doing retopology I have to switch between vertex and face snapping, because while I want the retopo mesh to snap to the sculpt object’s faces (obviously), I also want it to snap to its own vertices for merging purposes. If that kind of discrimination becomes possible it would streamline things quite a bit. Sure, collapsing or merging vertices/edges can be done with the dedicated commands, but the workflow of just bringing a vertex over to another to merge them is very natural, especially within the “kinetic” workflow of sculpting & retopologizing, and I use it often. Maybe that’s just me?
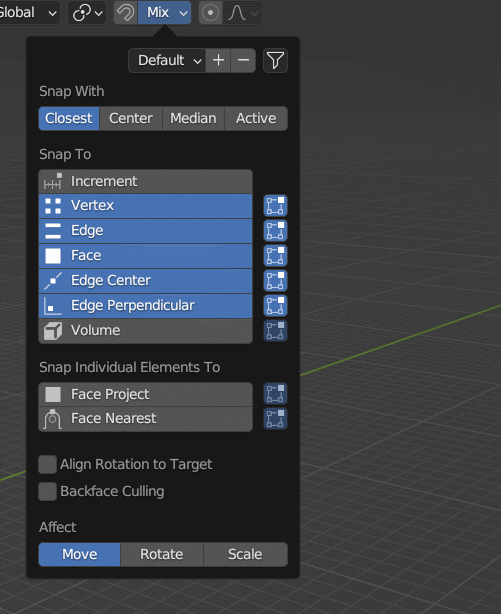
Edge center and edge perpendicular I use for more mechanical models, I’d say if it overlaps with other snap targets those would be vertex and edge. Volume I personally only use in armature edit mode for placing bones within geometry, but then again I might be underutilizing the feature.
I’m not entirely sure what all the filters do in your mockup, but I’d say “edited object” is the most important. If you’re editing several objects at the same time, you probably want them to behave as one, in the sense that you don’t want to discriminate between “self” and “other edited objects”. I think also having an explicit snap target object/collection would go a long way in simplifying many of these combinations.
Thanks for the proposal ! I love seeing movement on that front
From looking at it I don’t think it is something I would personally use. It does seem overcomplicated.
But also I have met many blender character artists who don’t know what face nearest is or how it is really good for retopology. So maybe a preset for that will help them discover it organically.
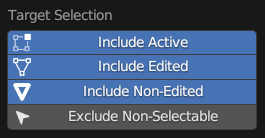
Could you explain exactly what those four buttons toggle? It’s not clear to me. It seems like toggle for edit mode and object mode? But what is selection button for? I’m very confused. I haven’t read start of the topic is “Non-Edited vs Edited” explained somewhere?
Is there really a usecase to flag these per snap mode?
The options are useful for various things but I can’t think of a need to be this specific, as those feel more like ‘global’ snapping behaviour toggles.
Can’t it be a modal option in the existing tools as well? The idea is that you can toggle the Base point snap on/ off.When it’s off, it behaves like it always did, when it is on, you first set the basepoint and then transform.
You could add the option to preserve the basepoint for subsequent transforms (e.g. move first and then rotate using the same basepoint) or to pick the basepoint for each individual transform operation.
I am really exited to see this new snapping functionality.
Looks like RTOs filter from Collection Manager.
Not sure what kind of a practical workflow may require such kind of a flexibility in snapping though.
I would prefer to be careful with implementing something like that - it is not that hard to flood the software with unnecessary functionality making it overcomplicated, so it is always reasonable to detect and cover critical demands first, especially at the core level.
Thank you for the clarification, I understand now, but I have to say naming of those four options are very bad. Looking at the names before reading your comment I assumed actual opposite of that, no kidding. I can’t see any beginner understanding what those are without reading tooltips or documentation. I would also suggest rethinking icons, because those icons are associated with some things in Blender and might confuse users. I’m not say change it they might be correct, but we need to think.
Also what I would suggest:
Make all four of those disabled by default, so that new users, or those who don’t have use for it don’t have to take it into account. We already see people in this thread who don’t have a use for it, but I have, so just hide it for them and few people who use it will turn on by themselves.
Make presets enum (or whatever that is) fit entire width of the panel, it’s ugly and text would be impossible to read with long names.