I know there are some complex cases but why not just show 2 arrows in cases where it’s 2 to 1 area merge? Having to manually do split is very finicky when you just want to collapse something like outliner.
1 Like
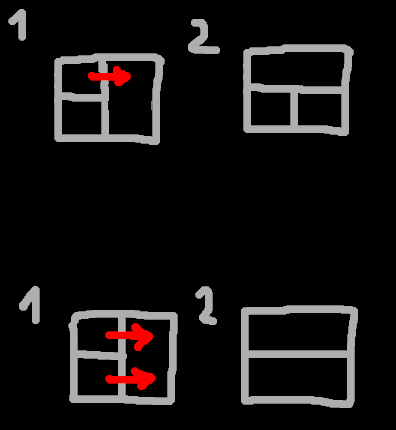
Probably because I can’t see in your example how you would differentiate between the following two processes. The first looks more likely to be the intended outcome than your second.
2 Likes
Being able to undo split/join would be super useful, since what you want to do, rarely works in the first attempt, and you end up with more regions than you need.
2 Likes
@TheRedWaxPolice is correct, I wanted to get rid of the rightmost column, regardless of how whatever is in the column to the left of it is split, but the right-click menu didn’t contain any option for it.
And as mentioned, I’ve seen several people really curse Blender out on Twitter because of this over the years too…
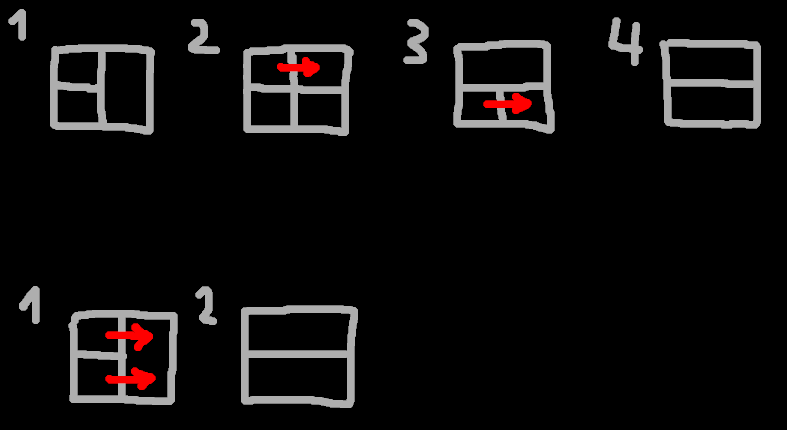
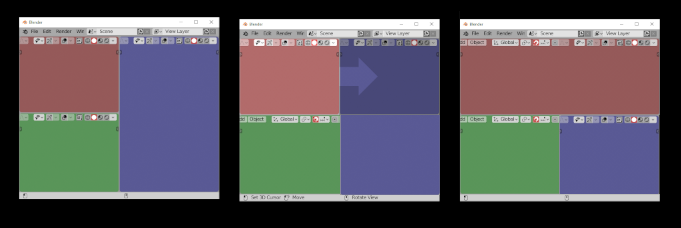
Sorry, first proposal was not very clear.
Top row - current process:
1 pick corner or use right click / join area operator and try merge small area into big one. Discover what it’s not possible and cursor turns into  symbol
2 manually add new area split and position it
3 merge first part
4 merge another part
5 done
Bottom row - suggestion:
1 start join area operator
2 when moving cursor from small area into big one left to right merge arrows appear in both top and bottom small areas. What stuff gets merged into what is based on mouse movement (same as when trying to merge 4 areas - order is determined by which area border mouse cursor crosses)
3 done
1 Like
I don’t know if you guys checked this one but its all what we need.
2 Likes
when creating a collection, the collection name isn’t automatically highlighted ready for editing.
1 Like
Clicking on a collection in the outliner deselects any selected objects
1 Like
That is that part I asking for clarification on. Faced with the arrangement shown on the left here, you seem to be making the assumption that the only good rightward merge is the one you show, which simply deletes everything to the right and replaces it with an extension of what is on the left.
That might be what you want to do (as shown in the 2nd image). But “Bob” might want the third result, to extend the top area to the right, as shown in the third image. And Alice might want the fourth image, to extend the green area rightward. So your solution reduces what you want to a single step but keeps Bob and Alice from getting what they want at all.
So I would argue that we just need one new variation (currently called a SplitJoin in my head LOL).
So allow a join into a larger area by splitting that area, if that target area is large enough. This way you would get exactly what you want in only two steps but allowing Bob and Alice to get what they want in a single step. But for all three of you it is much better than the complicated process you have now.
5 Likes
not sure if this belongs here but i noticed that its not possible any more in 2.8+ if in weight paint mode to select an other object without leaving weight paint mode. this makes working with multiple objects and weight paint super tedious and it would be great to get that functionality back to how it was in 2.79 where one could directly switch to an other object with RMB.
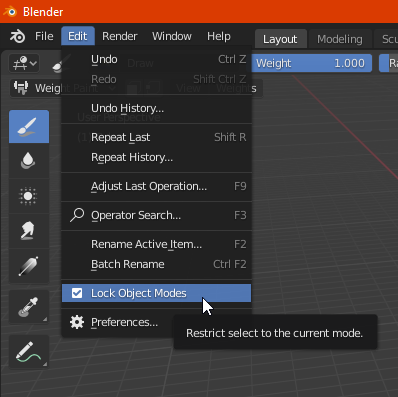
it’s there
btw 2.8x series is being worked on for more then 2 years. If any feature is missing then either everyone is aware of it or there is a new workflow for it
Oh wow i always wondered what that option is doing, i guess now i know. Thanks a lot for pointing this out. Kinda strange that this option is not in the preferences, seems odd to have it in the edit menu.
How about user-named render slots? So if I want to test a few variations of a render, instead of Slot 1, Slot 2, etc. and having to make notes on paper as to which of them holds which test, I can name the slots (for instance) sun test, spot test, ambient sun test, ambient spot test.
2 Likes
Like this?

2 Likes
Small paper cut for adding new collection keystrokes:
In an empty scene, the key combo to add objects to a new collection is always M > N. However, once new collections are added, it’s possible for the letter N to be hijacked by existing collection names using the letter N, either as a first letter or, in large scenes, if used at all. At that point, the second keystroke in M > N would no longer be N and instead would become arbitrary, or even non-existent if all letters in “New Collection” are used.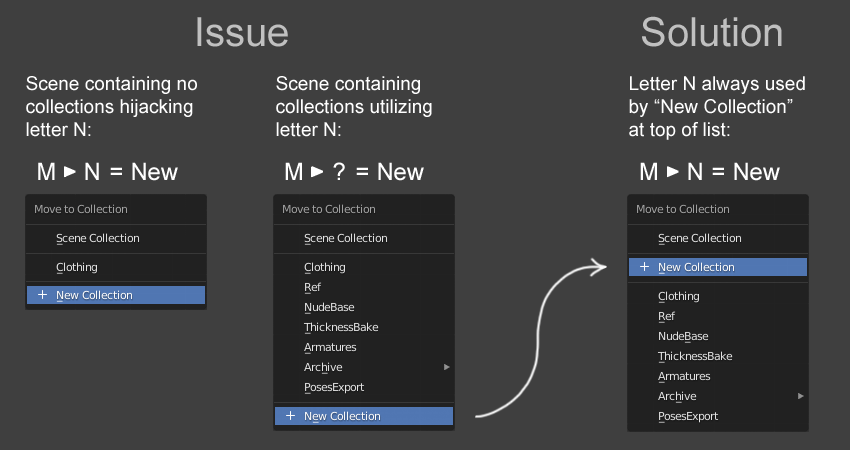
The solution is as simple as moving the menu option above the collection list, where the “Scene Collection” option is. This ensures that the keystrokes will stay consistent, as menu options at the top of the list are unaffected by options below.
14 Likes
Agreed. That and away with the 8 max render slots, too !
Blender never had max 8 render slots…
To rename the slot just double click on it.
To add a new slot just press that + button.

I don’t understand how everyone misses those features and claims they are not there.
You don’t even need any addons for that
1 Like
Oh wow ! Just checked and infinite render slots are there since Blender 2.80 ! I had completely missed this improvement. (see commit : https://developer.blender.org/D3474, thanks Lukas) @rontarrant it’s found in the image editor sidebar.
1 Like
I would like to point out some inconsistencies with hotkeys across editors, which makes using VSE more difficult.
I’m not sure if hotkeys are related to UI or they are not. This topic feels like a good place to post it
3D Viewport:
H - hides only selected objects
alt+H - unhides all objects
pressing ‘H’ twice does nothing since hidden objects can’t be even more hidden which is understandable
Node Editors:
H - collapses selected nodes (it doesn’t hide them, even though the name of this operation says otherwise)
pressing ‘H’ again expands them
alt+H does nothing
M - disables/mutes the node
pressing M on muted nodes unmutes them
alt+M does nothing
VSE:
H - disables only selected strips (it doesn’t hide them)(in the menu this operation is called “mute”)
alt+H - enables only selected strips
One could argue that H does hides strips in the VSE since they are no longer visible in the preview, but why then operation that collapses nodes is called “hide” and disableing them from any influence is called “mute”.
As you can see those hotkeys are inconsistent and using VSE can be really confusing. User not only has to learn that M doesn’t disable strips like it does for nodes, H does that instead, but also pressing H again won’t enable them back. This time it’s alt+H which is completly different from the viewport alt+H since this one makes all objects in the viewport visible while in VSE it’s for selected strips only.
My simple solution would be to either use M for enabling/disabling both nodes and strips or to use H for that and look for a new hotkey for collapsing nodes.
2 Likes
Maybe you came on board with 2.80?
The feature are there but only since 2.80. Before, no renaming and only 8 slots