F2 Add-on as default?
3 Likes
On the most recent build, depending on the theme, when adding a material to an object, they become transparent (Changing the viewport display option corrects it)
2 Likes
Empty space in this menu (Graph/driver editor):

2 Likes
Scrubbing animation with alt+scroll doesn’t work.
It is the most convenient way of time navigation for many tasks.
3 Likes
I get the logic in placing shading selection as it is, but the most widely used pairing is:
shaded vs rendered (or shaded vs wireframe).
It would be a bit of optimization to alter those with Z key, as well as placing them for Z+horizontal swipe, and moving Look/Wireframe shading to Z+vertical swipe.
Because it is a bit more straining on motoric attention to alter vertical/horizontal motion on every shading switch.
Weighted Normals - Face Strength
I am not sure if this is small enough to be a UI paper cut, but I think this definitely requires some attention.
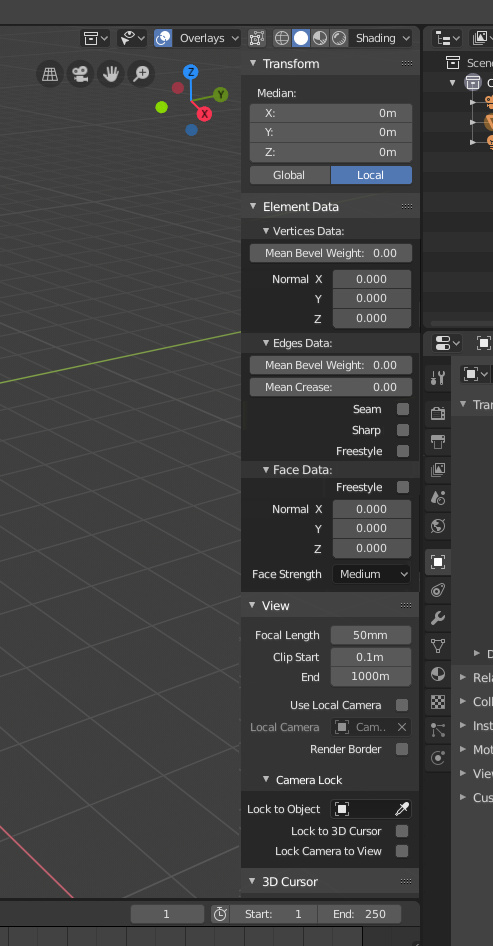
Mesh -> Normals -> Set Strength/Face Select does not work at all. Unless Weighted Normal modifier is added and Face Influence is enabled. This is very confusing. Average Normals has Face Area option that should be able to use Face Strengths as well and it does not. Face Strength should be considered to be Face Data and controlled from the n panel same way as edge and vertex data is:
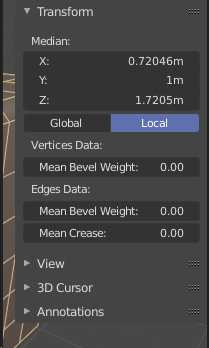
This image also raises a question - why is vertex data and edge data under Transform category?
At the moment Face Strength is in Properties Editor’s Active Tool and Workspace tab and at the top bar in the top right corner. There is no logic for these settings to be there, they have nothing to do with the Active Tool or Workspace.
I have seen only people who either don’t understand how this works or just think that it just doesn’t work at all because it’s in development. I thought that too at first glance.
5 Likes
Yes, I agree the ‘Dyntopo’ is needlessly abbreviated. We have generally been removing abbreviations over time in Blender, in favour of plain, clear language. It’s hard enough to learn to use a complex piece of software like Blender - if we don’t user normal words, we just make things needlessly difficult.
Users of 2.49 and earlier will especially remember some really obscure abbreviations used.
Agreed also on the warning. There’s a hidden way to dismiss, by pressing Esc, but that’s too hidden.
5 Likes
I remember those days, abbreviation everywhere but It was also kinda needed with the horizontal layout back then. I think concatenations in code are semi OK but funny thing is that it’s not always concatenated in the python UI code.
dynamic_topology_toggle, there are some places that uses dyntopo in the code.
What I meant with a OK, don’t show me anymore option is that once pressed it will not show up until you do a factory reset. I would like to see such a option. Because it’s kinda destructive in workflow to have to click OK all the times you enable dynamic topology.
2 Likes
This isn’t a UI paper-cut but a feature request. An interesting feature request to be sure, but posted in the wrong place non-the-less.
1 Like
Fair enough! – but as an Animator, I see all the nice tools blender has for changing the bones and controls, yet everytime I do, it always stings because I have always wanted to just click on my mesh in Blender and make it move by dragging it around. D:
This is being worked on via the new Face Maps feature. It was originally a 2.80 target, but may not happen until 2.81.
Face Maps were originally designed to be a very complicated feature, whose purpose was very fuzzy and was partly a way to replace bones and rigs, and also allow manipulating rigs in Object Mode in new and complex ways:
https://developer.blender.org/T51675
But for now the idea is to make it much simpler, to solve the simple problem of selecting and displaying bones as though you are manipulating the mesh:
https://developer.blender.org/T54989
Just doing the simple version solves the main problem (bones are hard to select and get in the way) without having to introduce a new type of rig system.
4 Likes
This is awesome.
Seems like Face Maps could just be an additional feature of Vertex Groups (which are automatically populated when loading a rigged character most of the time).
This could eliminate some of the tedium of manually creating these since most rigged characters have verts already assigned to bones, right?
Yes, that’s a possibility too, or at least it could take those vertex groups as a starting point. It won’t always work that way though, because in some rigs the deform bones are not the same as the control bones, so there needs to be a mechanism to manually define it.
1 Like
Animation Papercut – Onion Skinning Control instead of Mesh…! D:
It is painful to not be able to see the Character’s Mesh as a “ghost” while you’re animating using a control-rig or IK solver…
There are only two options to animate with “ghost” option and control rigs: – all meshes, displays, and controls showing (with controls, appendages, etc cluttering the viewport) or nothing helpful (the currently manipulated control you’ve selected, rather than the mesh it deforms.) I need to be able to see the important character bits (not the extras) while animating it.
A solution:
-
We need to be able to select an entire list of meshes we want to be included in the Onion Skin / “ghost” for the currently-selected collection or armature, then let this main “ghost” mesh selection set (for the currently-selected collection/armature) be activated globally from the “Overlay” menu with a single click/toggle while in Pose Mode (for armatures) or Object Mode (for collections).
-
This “ghost” option in the “Overlays” menu needs a slider to slide between a manageable min/max number of frames we want to see before/after the current frame.
-
The “ghost” options could even disappear from “Overlays” menu if we’re not in pose or object mode…
1 Like
When using GPU preview rendering, my interface slows to a crawl. Editing nodes and render settings becomes a hassle. I’ll generally use CPU for preview and then switch over to GPU for the final thing, but I’m not sure why this should be necessary in the first place.
I don’t think it’s really a bug per se, but definitely a long standing annoyance that could be solved either by allocating more GPU memory for the UI or allowing preview and final renders to use different devices.
4 Likes
It’s not necessarily the GPU memory that’s the issue there, more than likely the rasterizer and shader units that are pegged. For best results use one dedicated GPU just for interface and GL viewport, and another dedicated card or more for compute. Assuming you are dealing with professional work and can afford a proper decked out workstation, of course.
3 Likes
In edit mode toolbar, knife and vertex slide have almost identical icons. I find myself selecting the wrong tool frequently. Maybe just show a knife icon?
thanks
When you are selecting, the tool tips at the bottom of the Blender interface doesn’t tell me which modifier key adds to the selection and which modifier key subtracts from the selection.
Regardless whether if I hold down shift, control or alt, it just says “Select”.