Node Tools Workshop
15 to 17 May 2023, Amsterdam.
Participants:
- Andy Goralczyk
- Dalai Felinto
- Jacques Lucke
- Lukas Tönne
- Simon Thommes

Introduction
3-day workshop at Blender HQ about adding high-level interface for assets and simulations. For example to have tools to add mushrooms, scale them and scatter them randomly.
Goal
“Create purely artistic driven tools”.
- Tools empowering artists, not constraining.
- Add-ons already address a lot of the use-cases, however it is too much overhead on creating them.
Tools
Design for scattering tools
- Ship asset with the interface to use it.
- Use-case: mushrooms, scattering
Design for realtime interaction
These cases involve a realtime capture of the user interaction (e.g., painting) which is enhanced by a geometry-nodes setup.
- Auto-keying + puppetry
- Auto-keying + VJing
- e.g., sculpting + time + bake
- e.g., paint + time + bake
The realtime use case was postponed. The initial focus is on the scattering use-case. But essentially the realtime is the simple use-case with time + bake.
Also instead of the scattering use-case, we focused on the fracture use case.
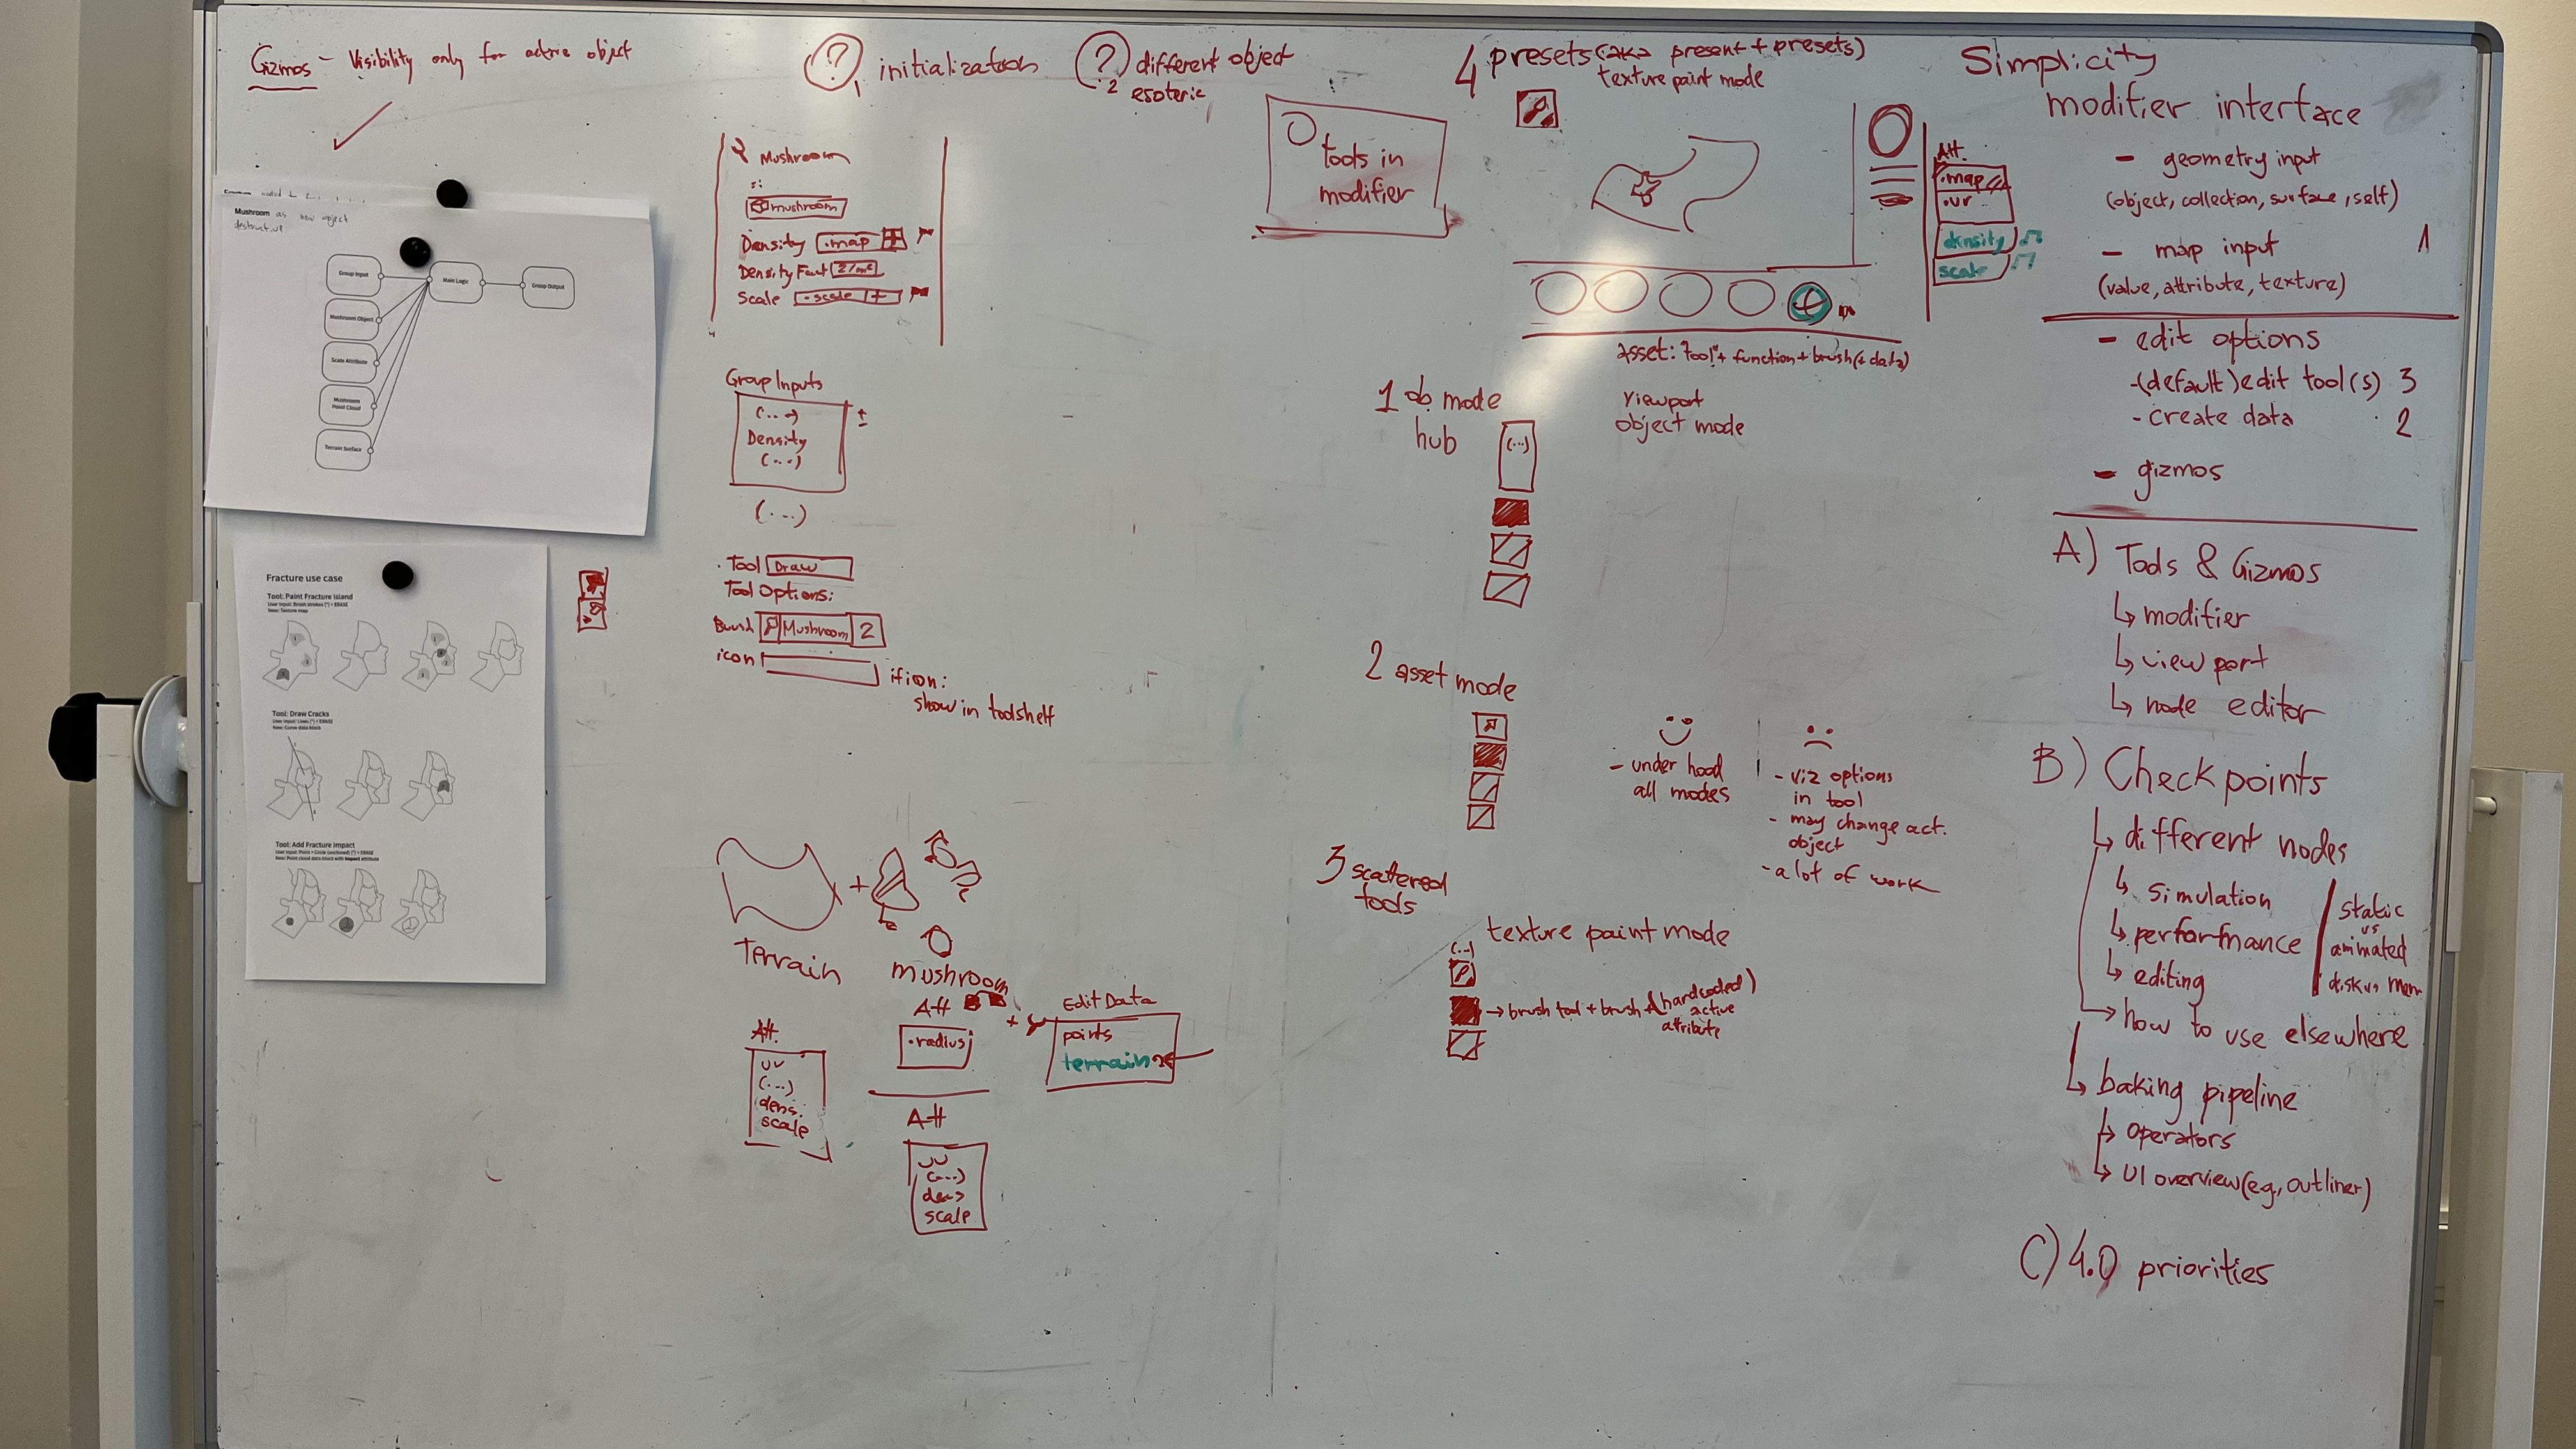
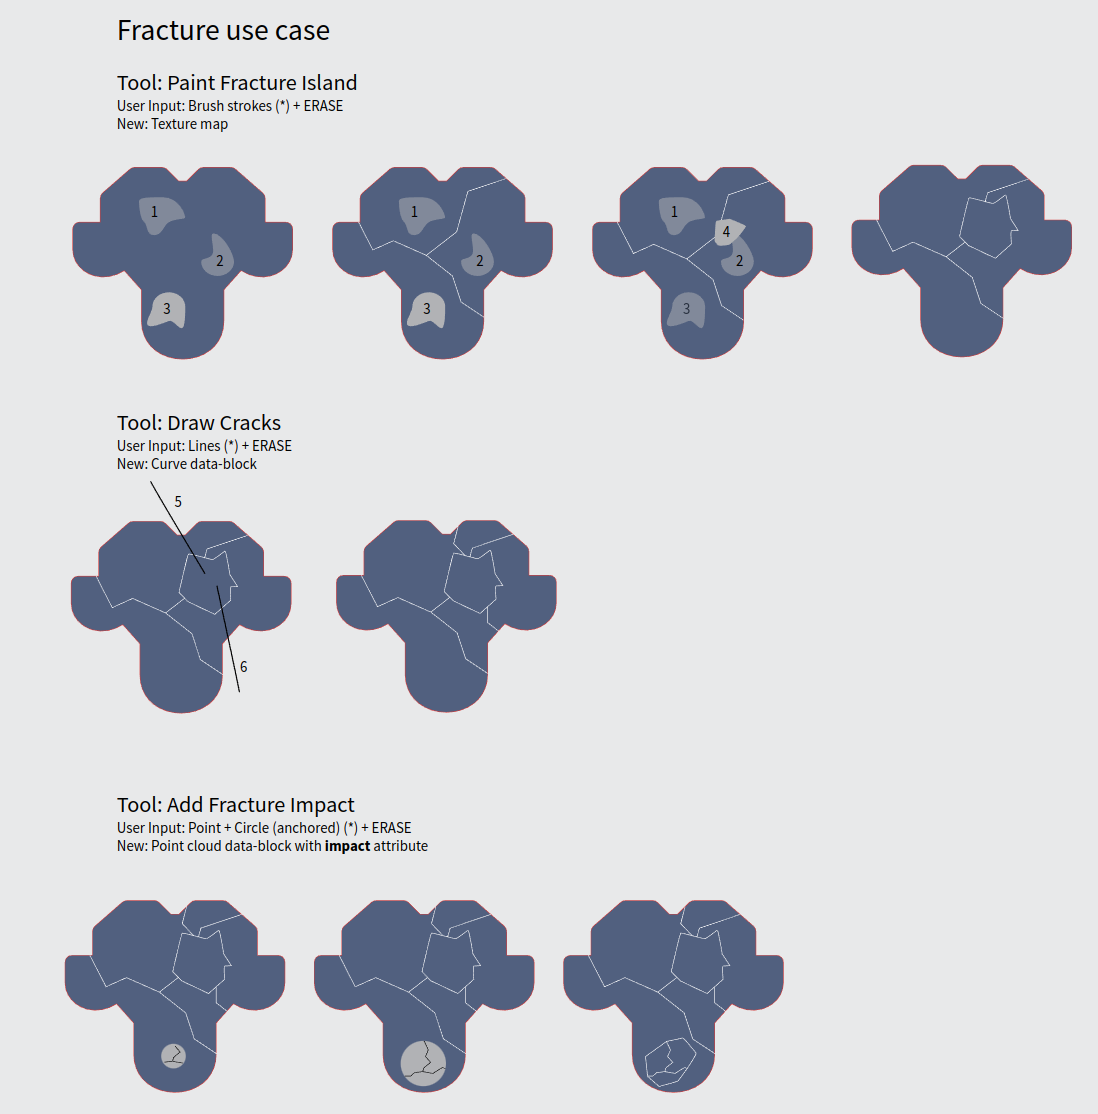
Fracture use-case
Asset that has a node-tree with a few inputs that can be edited by different tools. Those tools are to be exposed together with the node-tree.
For example, the user drags the Fracture node-tree from the Asset Browser into an object. By doing so:
- The object gets a modifier with the fracture Geometry Nodes node-tree.
- Three new tools are visible when this object is active.
Realtime Interaction
Layout (or animation) tools to perform interactively on top of simulation or animation playback.
- Record keyframes or geometry (grease pencil or curves) over time.
- Auto-Keying is a good start point (nice to have: playback speed control).
- Needs support for arbitrary UI inputs (e.g., any property in the UI which may be animated).
- If other inputs are supported in Blender (3d navigator, VR controllers, midi-controllers), they could be mapped to a shortcut and used as well.
Note: Grease Pencil already supports this, although it is not hooked with auto-keying or the scene playback.
Checkpoints
We talked about the latest proposals for checkpoints.
There are multiple use-cases for baking:
- Simulation
- Editing part of the node-tree
- Performance
- Re-timing (added later, not part of the following example)
It would be good to have those use-cases using the same solution under the hood and using the same concept (checkpoint). Effectively a single node-tree may have all three use-cases combined:
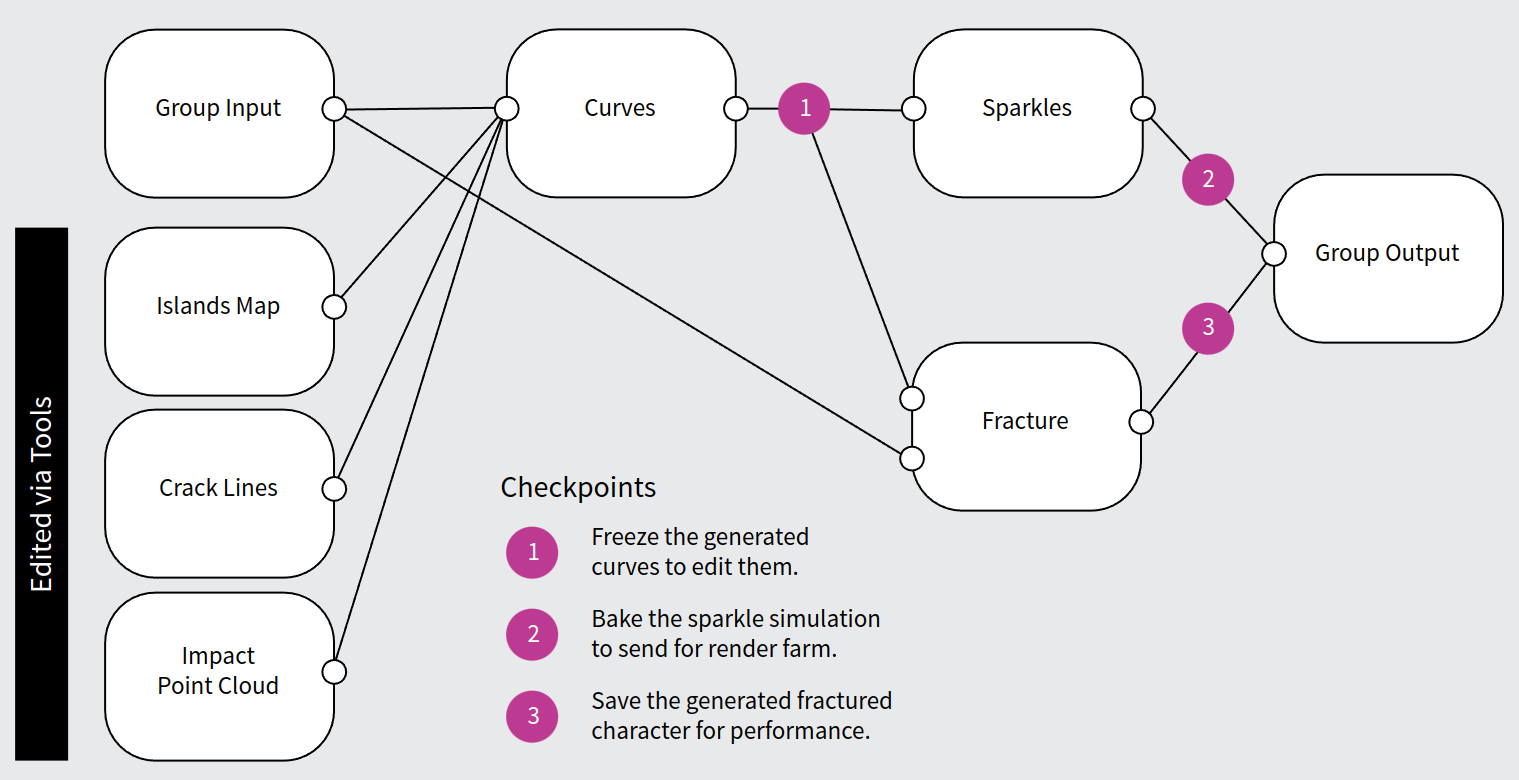
In this example (of the fracture use-case) the tools inputs are generating curves internally. Those curves are then used for a “Sparkle” simulation (to generate particles) and to fracture the original mesh.
After using the fracture tools to create the initial fracture system artists can:
- Have a checkpoint after the curves to tweak them. That means the tools will no longer create new fracture islands/cracks/impacts.
- Have a checkpoint to bake the sparkle simulation (so this can be sent for a renderfarm).
- Have a checkpoint to bake the final fractured geometry (for performance reasons).
In some cases the different steps of a simulation may be used by different objects. For example, one object can be used to generate ocean waves from curves, while another one generates foam and water spray. In this case checkpoints could be used to output different stages of an object geometry to another node-tree.
We still need to have mockups on how the different use-cases would be exposed to users, and the user interface for the overall view of the checkpoints in a scene/object.
Checkpoints In-depth Discussion
General principles:
- Store animated data (almost) always outside .blend.
- Only baked data can be accessed at arbitrary frames (independent of the current frame).
Use Stories:
- Edit static (i.e., non-animated) “procedural hair” destructively.
- Edit simulated hair for the entire range (e.g., delete or offset).
- Edit specific (sub-)frame baked geometry.
- Bake simulation to send to render-farm.
- Bake heavy “animation” (e.g., waves) for animators.
- Re-time baked cache (e.g., bake in ones, render in twos; bullet time; re-time).
Concepts
To understand a checkpoint we first need to understand the concepts of Input node and Passthrough nodes.
Input Node
A node that brings in new data into the node-tree. E.g., an Importer node, an Editable Mesh node. or an Object Info node.
Passthrough Node
A node where the data just bypasses the node. E.g., Gizmo nodes (see below), any muted node, and technically also the Reroute element.
A checkpoint is a combination of both. It can work either as an input or passthrough depending on whether or not the node it is baked. In a way it works like a “quantum” node.
Nodes Overview
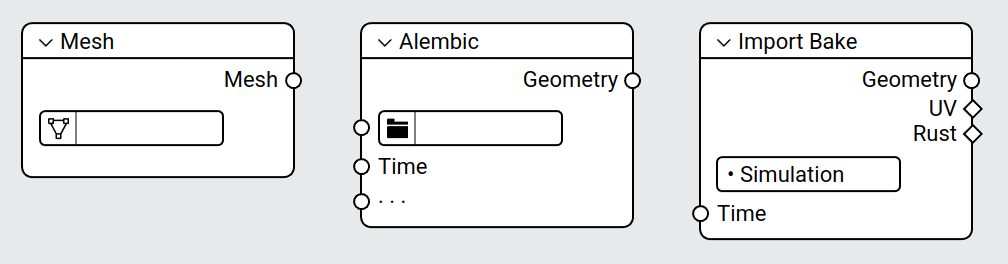
Input Nodes
- Editable Geometry input
- I/O Nodes (e.g., Alembic importer)
- Import Bake
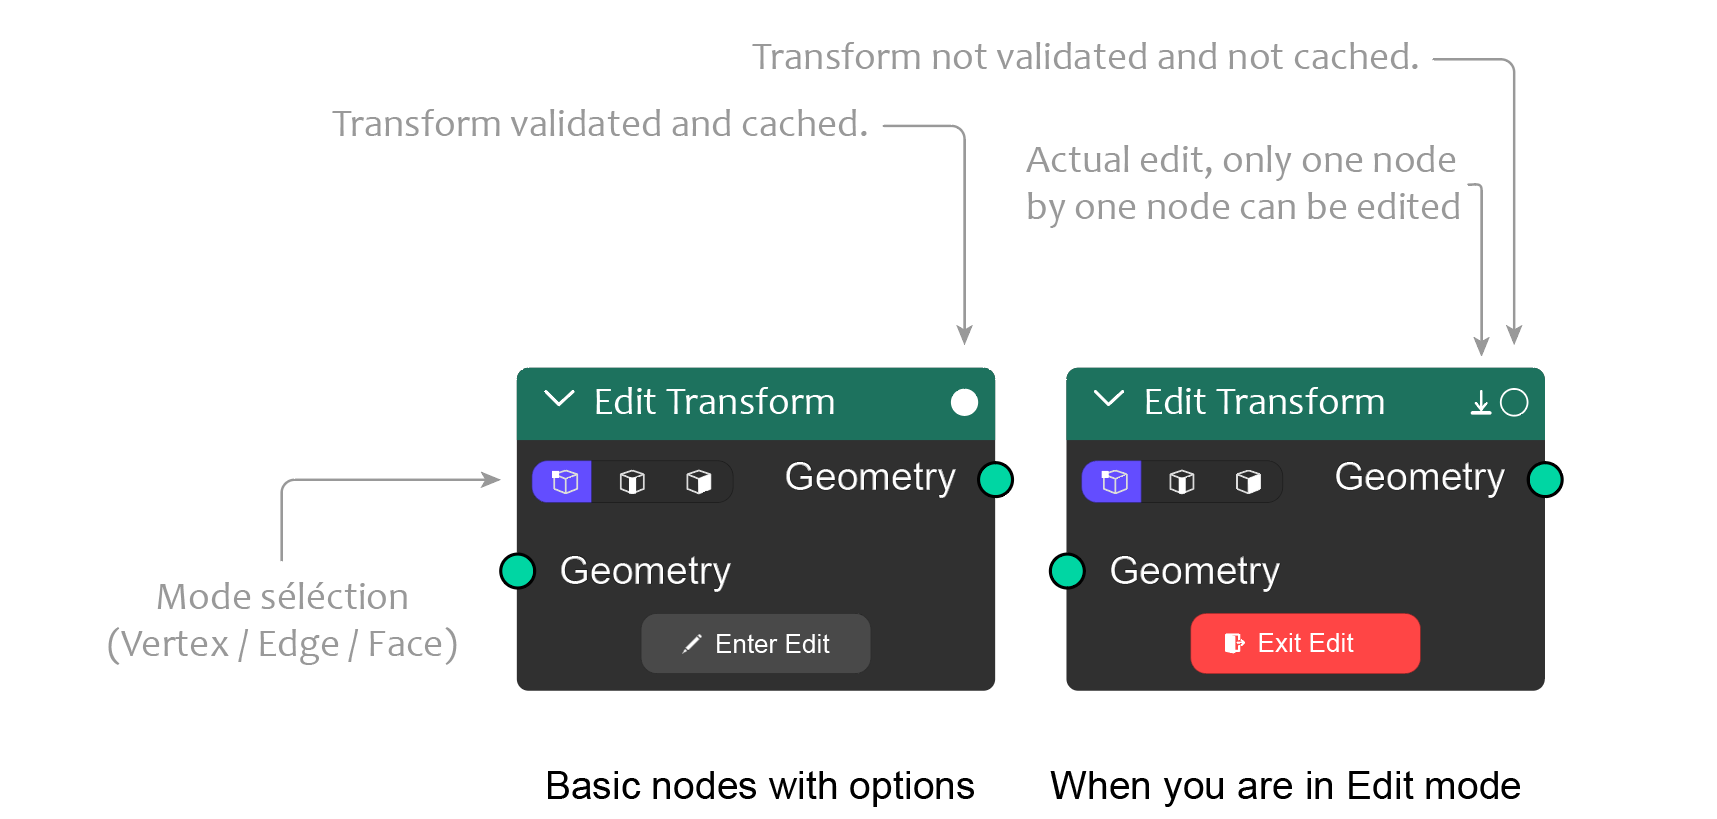
Checkpoints
- Simulation Zones
- Freeze
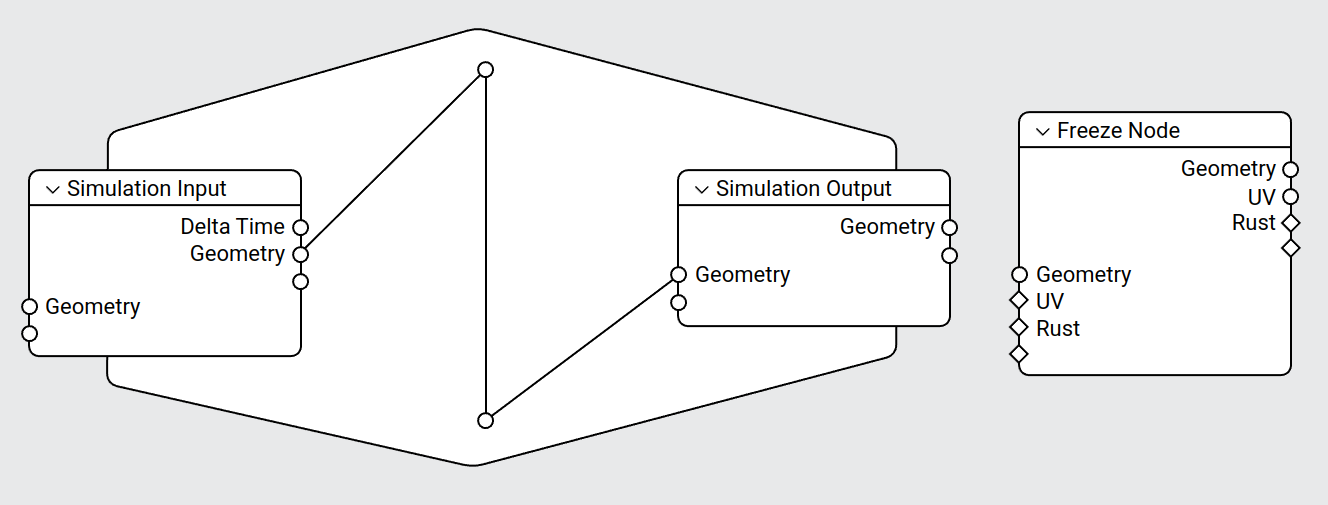
It is still not clear whether editing the freeze node is an option on top of the Freeze Node, or if it is a separate node.
The baking options and controllers for both the simulation zone and the freeze node should be accessed in a similar way. With operators inside the node editor to define whether to bake selected “checkpoints”, operators on the scene level to bake selected objects and so on.
The baked data is stored in the modifier level.
Tools and Group Inputs
Tools are to be implemented as part of the modifier inputs. Similarly to how an input can have a subtype and a range, the input could also have a default tool to be used to edit it.
Only tools supported by Blender are accessible for the Group Inputs. So if an input type requires a Flow Map editor, we first need a tool in Blender that can do that. That also means that clicking on an modifier property tool will:
- Change the mode to the expected mode (e.g., edit mode).
- Set the active attribute or texture to the one used by this property.
- Switch the active tool to use the tool defined for this input.
The mapping between modifier input and tools can be done automatically in some cases (i.e., different data types can have a default tool).
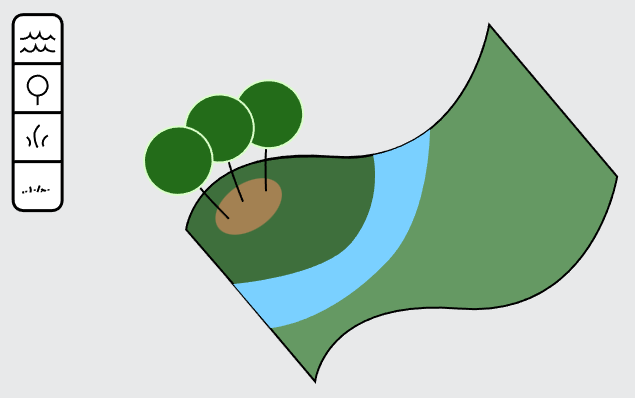
Example: Landscape Asset
A lanscape asset that adds either water, tree, grass or flower.
The modifier itself would have those properties:
- Tree-type
- Water turbulance
- Wind strength
- Wind direction (gizmo)
Besides that, a single texture map (or ID attribute) would be controlling which asset type to instance. This map wouldn’t be exposed as a modifier property, but instead as four separate tools:
- Tool: Attribute Paint
- Name: Paint Tree / Water / Grass / Flower
- ID: 1 / 2 / 3 / 4
Besides that we could support high-level modifier input types such as:
- Geometry Input (object, collection, surface, self).
- Map Input (value, attribute, texture).
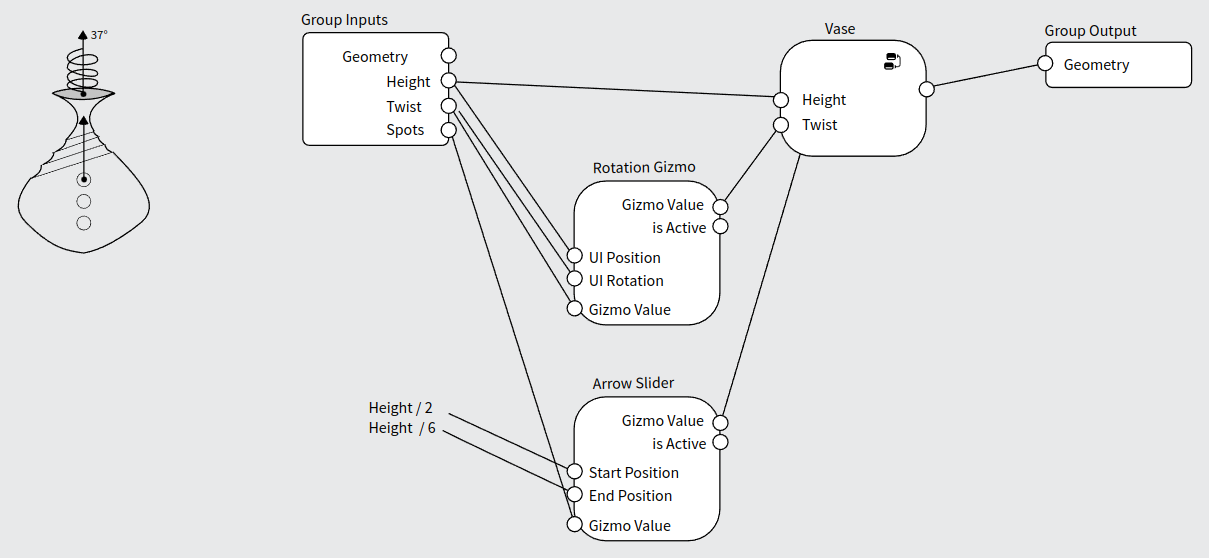
Gizmos
Gizmos work also as an interface to a node-tree asset. As such we explored a few design options until we landed on Gizmo nodes which allowed for the most flexibility.
In essence, a Gizmo node is a node that brings a potential new data-entry in the node-tree, but effectivelly also works as a pass-through. The gizmo node necessarily has a Value input and output besides gizmo specific options.
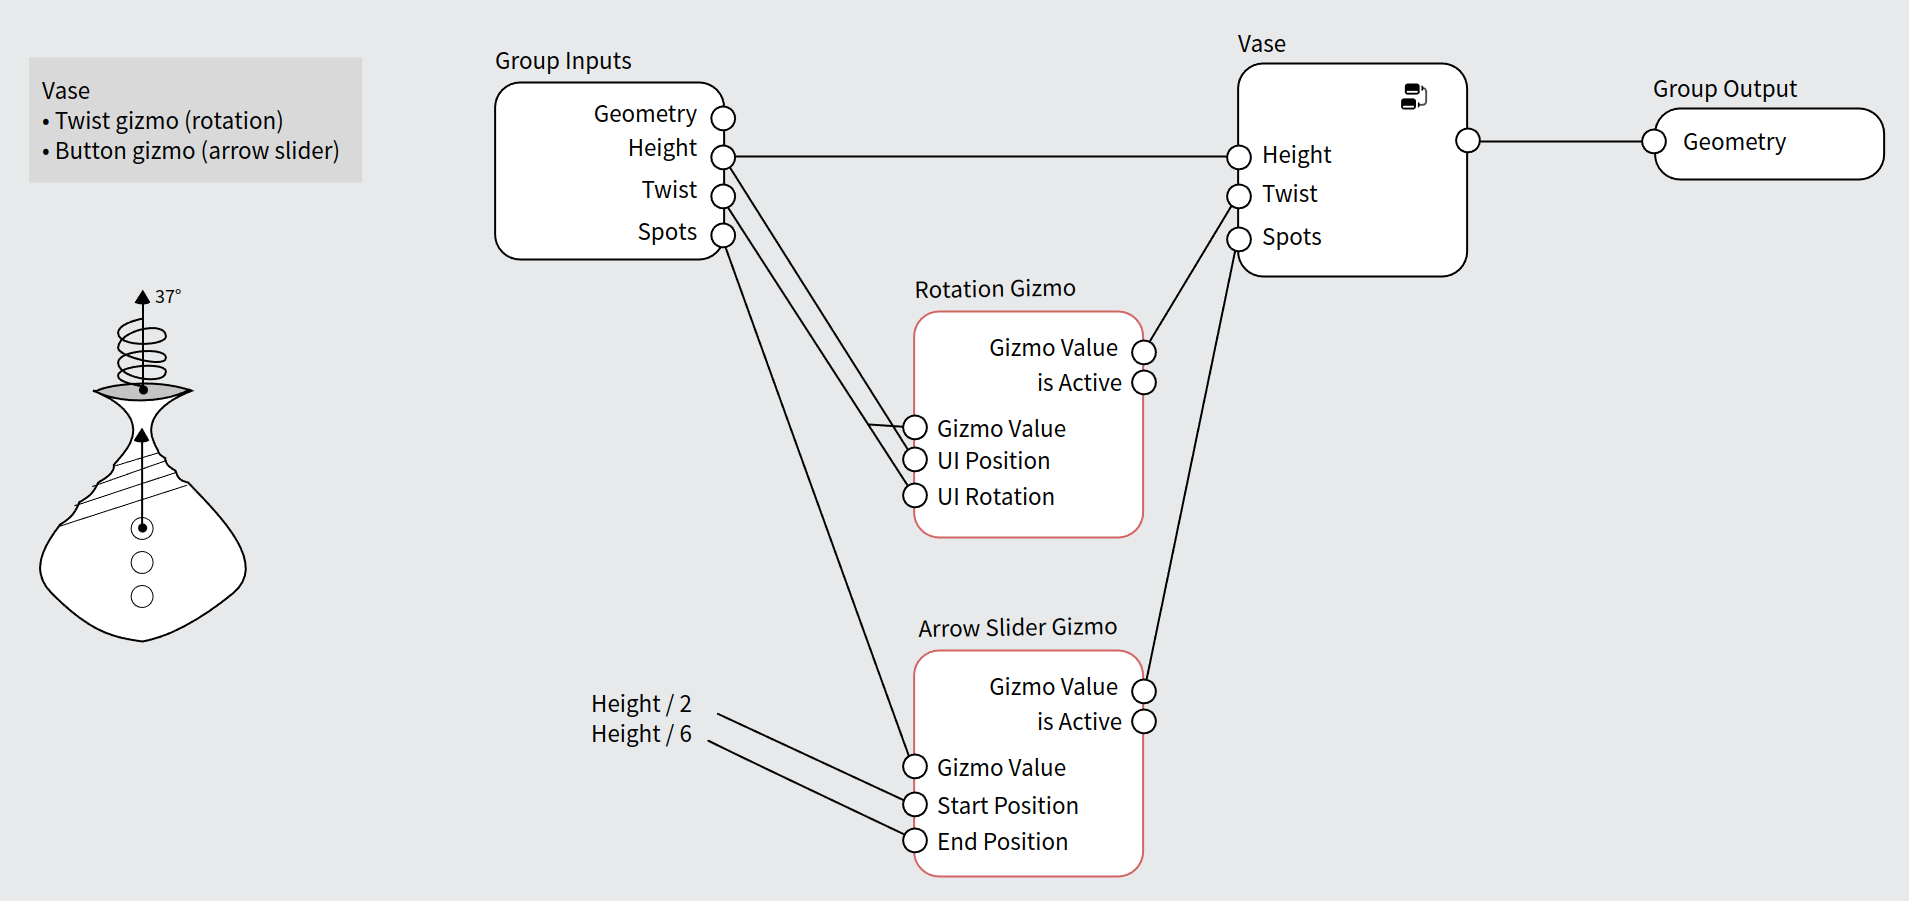
In this Vase Asset example you can see that both the rotation and the button gizmo are dependent on the Height input.
The gizmos should work similarly to the camera and lamps gizmos. They are always available when the object is active, but their visibility can be controlled in the Viewport Gizmos menu.
Tools
The Group Input items get a new option to define a tool to be used to edit it.
This is exposed as an edit button by the modifier properties which sets:
- Active tool (+ brush).
- Active object (in the cases the attribute to be edited is in a different object).
- Active mode.
- Active attribute.
The idea is to focus on having built-in tools in Blender that support editing attributes (e.g., flow map) and then allowing those tools to be hooked up with different attributes.
This gets us 80% there, and help technical artists who are comfortable with the existing tools in Blender. It also bring the artist in the right context in case they need to access another tool for the same attribute.
More asset specific tools would be supported the moment Blender has support for node-based tools.
In some cases we still want to provide an easy to discover “tool” that is available when the asset is active. For that we can have an icon option which when available makes the tool show in the toolshelf. This would effectively be a light layer on top of the actual tool being used.
To get this working as elegant as possible we would need to have multi-data objects implemented, so there would be no need to change the active object.